Showing posts with label igniters. Show all posts

Monday, August 22, 2016

The Current State of Quest Q2G2 Igniters


Yesterday on The Rocketry Forum, on the subject of the Quest Q2G2 model rocket igniter, someone asked "Why is it so hard to get these things now... is this an Aerotech thing or what ??"

The Q2G2, seen above in its current form (they used to be blue), are a popular igniter for model rocketry, and have some high power uses as well. They are particularly useful to rocketeers who like to launch clusters - rockets with two or more motors firing in parallel.

[Edit: according to one of the commenters, Q2G2 always came in blue and red. I have seen pictures of blue ones, but only ever had red ones. Quest in recent years changed how they are made, to conform to new AFTE regulations. While still great, they are slightly slower to fire than they used to be. I had assumed there was a change in color to signify the different formula. Apparently, I was mistaken about this.]

Preparing a 3-motor cluster with Quest Q2G2 igniters

Because they are low-current igniters, and because they have a pyrogen tip, they are very reliable for igniting multiple motors quickly and simultaneously - very important in clusters. You need all motors to ignite at the same time or the rocket may leave the launch pad with unfired motors, which will result in an underpowered flight, or a flight which may veer off in one direction. The Q2G2 is a much better igniter for clusters than the Estes igniter, especially now that the Estes igniters no longer have a black pyrogen tip.

High power rocketeers sometimes like to use the Q2G2 to ignite electronically-controlled ejection charges, in a process known as dual deployment. Rather than using a motor with an ejection charge, which is the standard for model rocketry, in dual deployment, the motor has no ejection charge. Instead, the charges are installed in the rocket by the flyer, and are controlled by an altimeter on board. At apogee, the altimeter sends an electric current to fire an igniter or e-match, which sets off the first charge. This usually deploys a small drogue parachute. It stabilizes the rocket's descent, but doesn't slow it down too much.

Then, at a lower altitude, the altimeter causes a second charge to fire, deploying a larger, main parachute. The purpose of this is to keep the rocket from drifting too far to recover it, especially if it's going to fly to a very high altitude. The Q2G2 makes an excellent and reliable substitute for an e-match, which is why it's popular for dual deployment.

The Q2G2 comes bundled with Quest motors, or can be purchased alone.


But for the last couple of years, Quest igniters and Quest motors have been hard to come by. For a while, rumors circulated that perhaps they were going away.

One advantage of being on The Rocketry Show podcast is that I've made contacts with some interesting people who can answer questions. A while back, we interviewed Charles Savoie of AeroTech, manufacturer of mid power kits and mid and high power composite rocket motors. AeroTech now owns Quest Aerospace. He assured us that, no, the Q2G2 and Quest motors would not disappear. In fact, to make things easier and more readily available, manufacture would be relocated to the United States from China.

But since the question popped up on TRF, and since I've been looking for both Quest motors and igniters for myself for a while, I sent him an email to ask if he could shed some light on the situation.

He replied, "The Q2G2's are still being resolved as we deal with some supply chain issues with China. They had a huge explosion last year that has seemed to have an affect on hazardous materials and how they ship and store them. We are working on a solution now but nothing for sure."

"Are you still planning on moving manufacture of the Quest stuff to the US?" I asked.

"Yes," he replied, "we currently have the new Quest motors in the certification process. Once we get the design settled we will begin production."

This is good news. Although the Q2G2 igniters seem to be in limbo at the moment, with new motors will come new igniters. This kind of transition takes a lot of logistics and planning, so the issue may not be resolved right away. But our patience may be rewarded with wider motor selection for low power rockets, and more readily available igniters for those cluster rockets some of us love.

Part 1 of the Charles Savoie interview on The Rocketry Show can be heard here.

Part 2 is here

Like my Facebook page for blog updates and extra stuff.

Follow me on Twitter.

Wednesday, December 17, 2014

Launching Your First Rocket (For N00bs) - Part 2

[Click here for Part 1]

It's time to launch some rockets!


(Quick safety note: I took the following pictures on my back patio, with lots of trees, buildings and dead leaves around. BUT, I was using a used motor, so there was no chance of an accidental ignition! These pictures are merely for illustration. In case it needs to be said, do not do the following steps until you are out in the flying field, away from trees, houses, etc., and that the ground is clear of fire hazards like dry grass and dead leaves. The NAR website has the appropriate site dimensions on its safety code page for flying rockets of various-sized motors.)

The rocket is prepped, but before we place it on the pad, it's a good idea to make one slight adjustment.

If you slide the rocket onto the launch rod now, you'll see that it goes all the way down and rests right on the blast deflector. This might be fine with some rockets, but generally, it's not a great idea.

An Estes Hi-Flier rests directly on the blast deflector.

When you press the launch button, a surge of electric current will run from the batteries in the launch controller, through one of the wires leading out to the pad, through the igniter, and back to the launch controller, completing a circuit. The igniter is a high-resistance metal, and that resistance is what causes it to heat up - just like the wires in a toaster.

But, electrons are lazy; they always take the path of least resistance. If the clips on the launch controller wires touch the blast deflector (or each other), suddenly there's a path around that resistor, and current won't flow through the igniter.

The launch controller microclips are touching the metal blast deflector. The electrical current will go
through the deflector, and not the igniter at all. Your rocket won't budge an inch if this happens.

So we need to raise the rocket off the pad just a little bit.

The common way to do this is with a little masking tape. Just take a long strip of tape and wrap it several times around the launch rod until it's thick enough that it holds the rocket up by the launch lug. This is what Estes recommends, and it works fine, mostly.


However, if you don't get the tape on straight, or if you've already launched several times, you might expose some of the sticky side of the tape, and it will stick to the rocket. This could cause the rocket to have trouble lifting off, or worse!

Chad once launched his Crossfire ISX, and it had the weirdest, unstable flight. It didn't fly very high, and it arched over and flew in a weird twisty spiral until it crash landed a few hundred feet away. What we didn't notice until we ran to recover the rocket is that it had taken the launch rod with it!!

Model rocketry has an extraordinary safety record, but this could have been really dangerous! If that metal rod had landed on someone (or someone's car), there would have been some real damage done! (It also goes to show how powerful these little motors can be!)

We think the culprit was the engine hook. It's on the same side as the launch lug. The Crossfire is a pretty narrow rocket, and I said I thought the hook might have grabbed the seam on the launch rod (this is why, when I built my Crossfire, I put the lug on a different side from the hook, just in case). Another possibility was a crooked lug. Make sure your launch lugs are straight when you build your rockets! If they're not properly aligned with the rocket body, the lug can bind the rod at launch.

But I worry that if your rocket gets stuck to the tape, this could perhaps happen. This was a freak accident, but happening once was more than enough.

I add an alligator clip to my tape, and use that as a little ledge to hold the rocket up by the body tube or maybe a fin.

I clamp an alligator clip to the launch rod, just above the tape.

Now the rocket has plenty of support while sitting on the pad. Make sure
you keep the clip well away from the igniter leads, so you don't get a short.

Slide the rocket down to the tape (or alligator clip). Make sure it slides freely along the rod, and can come right back off again without getting stuck. Then, carefully hook up the clips from the launch controller to each of the leads of the igniter.

 
I say "carefully," because you don't want to pull the igniter out! If it happens to fall out, remove the clips, reinstall the igniter, and make sure the plug goes in firmly. If it's too loose, you can put a small piece of masking tape over it to hold it. The tape will come off with the force of the blast from the rocket motor.

Step back. The NAR model rocket safety code says you should stand at least 15 feet from the launch pad when launching a rocket with anything up to a D motor, and 30 feet away when launching something larger. If you're using the Estes launch kit and your standard motors, 15 feet is enough (that's as far as you can go with an Estes launch controller anyway).

Insert the safety key, and press it down. The continuity light on the launch controller should come on. If it doesn't, check your connection - are the clips in place? Do you have a new igniter, or did you accidentally install a used one? Once you get the continuity light, you're good to go.

Insert the safety key into the launch controller. On an Estes controller, this is spring-loaded, so you'll
have to press it down with your thumb. Wait until you're ready to launch before you do this.

If all the connections are good, the continuity light will turn on. Then it's go time!

Make sure everyone is at least 15 feet away from the launch pad, and knows you're about to launch. Then, do a countdown. The NAR safety code says that you should count down from at least 5. This is for a couple of reasons. First, you want any spectators to know what's about to happen, and be aware should anything go wrong. Also, imagine you have a little kid watching (or a not-so-bright adult), and suddenly they walk up to the launch pad! If you're counting down, you can hold while you get that person out of harm's way.

Once you reach zero, press the button and hold it down. If everything is correctly installed, the rocket will take off at incredible speed! The first time you launch a rocket, you'll be surprised how fast and high it can go!

Note: If nothing happens after you've held the launch button down for a few seconds, release the button and remove the safety key. You must wait 60 seconds before approaching the pad, to prevent being right on top of the rocket if it suddenly ignites!

This is particularly true of composite motors, which we're not discussing here, but it's also true of black powder motors. Now, black powder doesn't really smoulder. It's lit, or it's not. But one reason for a misfire is that the igniter might not be touching the propellant. I believe the reason for waiting 60 seconds is that the igniter wire may still be hot, and if it suddenly comes in contact with the propellant, you could have an unexpected ignition, so you want to let that wire cool down.

Approach the rocket and inspect it. Are the clips still in place? Did the igniter fall out? If those aren't the problems, remove the clips and take the rocket off the pad, and flip it over. The igniter wires should not be touching each other. They're not insulated on Estes igniters, so if they're touching, you have a short circuit. You can simply spread the wires apart slightly, or use a new igniter.

Here, the igniter wires are touching each other. That's a short circuit - the current won't go all the way to the tip of the
igniter, where it's in contact with the propellant. Try spreading these apart and re-installing the igniter.

If that's not the problem, your igniter probably isn't touching the propellant. Pull it out of the nozzle and look at it. If the igniter is still intact, re-insert it into the nozzle, making sure it touches the propellant, then reinstall the plug, hook everything back up, and do your countdown again. It will probably work. If not, then just install a new igniter.


Once the rocket has left the pad, while you've got your eye on it, remove the safety key by feel. This isn't hard. The Estes controllers now have a spring-loaded key which pretty much pops out on its own when you're not pressing it down.

Watch the rocket ascend into the sky. Once the burn, or powered flight, is over, it will keep going up. It goes further just by coasting than it does during the burn time! The delay charge will leave a trail of white smoke which will help you keep your eye on the rocket. Smaller rockets are really easy to lose sight of!

When the rocket is at or near apogee, assuming you've installed the correct motor, the ejection charge should go off, and the nose cone and parachute will pop out. If you used a ton of baby powder, there may even be a puff of white "smoke."

The parachute should open and the rocket will slowly descend to the ground. Keep your eyes on it. Don't trip while you follow it! Let it come down to the ground. Don't try to catch it. You want to examine how it performed once it hit the ground, and besides, you can accidentally damage a rocket by catching it, if you trip, or grip it too hard.

Chad loves to catch rockets. He's like a golden retriever. It's fun to watch. But not best practices, according to most rocketeers.

Now, if the rocket gets hung up on a power line, forget it. It's gone. Don't try to get it back. But hopefully the majority of your rockets will not land in trees, power lines, roofs, etc. The goal is to get them back safely.

Most of your flights will go just great. Sometimes a parachute won't deploy, or the rocket will behave oddly, or it won't lift off at all. Figuring out what the problem is and correcting it is part of the fun, actually. Analyzing a crash is kind of fun. Of course, that sometimes means you need to repair (or completely trash) a rocket, but even when things go wrong, rocketry is awesome. After your first launch, you'll want to do a lot more.

Here's a successful launch of my Estes Cosmic Explorer, from liftoff to touchdown, plus a slo-mo replay of the liftoff:


Saturday, December 13, 2014

Launching Your First Rocket (For N00bs)

Let's assume you've got a rocket. Maybe you built your first Skill Level 1 rocket, like the Big Bertha, or maybe you have a Ready-To-Fly or E2X (Estes' term for "easy to assemble") rocket. In any case, it's time to launch this sucker.

This post will be long, so I'm breaking it into two parts. I don't want you to think it's really complicated, or that launching a rocket takes a long time - it doesn't. But there are some details you need to get right to have a successful, safe, awesome rocket launch, and I don't want to leave anything out.

Rocket Flight

Here's basically what'll happen. You'll load up the rocket, put it on the launch pad, hook up the launch controller, press the launch button, and it should take off into the sky. The motor (or engine) will burn for a second or two (this phase is known as powered flight), and when it stops burning, the rocket will continue to coast upward. You'll see white smoke coming from the back of the rocket for several seconds as it does; this is the delay charge burning. The delay produces no thrust, but it allows the rocket to coast up to its apogee - the uppermost part of its flight. Then, the motor will fire the ejection charge - a tiny explosion that will push the nose cone off and eject the parachute. The parachute should open, and the rocket will drift back to earth.


What are you going to need?

Here are the basics:
  • A rocket
  • A launch pad - with a launch rod
  • A launch controller
  • Some rocket motors - or, as Estes and many people call them, engines
  • Some igniters - these usually come with motors or engines, so you shouldn't need to buy any
  • Some recovery wadding
  • Something to carry all this stuff
What is this stuff?

Well, as I've recommended in the previous post, you might want to get launch kit. You can get a basic Estes kit - or Quest - which will have the launch pad and rod, the launch controller, and a rocket for less than you'd pay for the pad and controller plus no rocket at all, if you'd bought them separately.

An Estes launch pad - with a round metal
blast deflector and a 33-inch launch rod. The
cap at the top of the rod comes off - it's to prevent you
gouging your eyes out when prepping the rocket!


A launch pad comes with a metal disk called a "blast deflector," and it's not optional! This will deflect the hot gasses and burning propellant away from the ground, and protect the plastic from melting.

The launch rod is usually about 3 feet long. The purpose of the rod has to do with rocket stability. The only thing keeping the rocket going upward instead of straight at the crowd is the fins. And for the fins to work, the rocket has to be moving upward, so there's wind moving past them. The launch rod keeps the rocket moving straight up until it is going fast enough - at least 30 miles per hour - for the fins to do their job. With model rockets, it takes only a fraction of a second to reach that velocity or much higher, so a 3-foot rod is usually plenty.

The Estes rods are 33 inches - close enough - and come in two parts which you have to push together. There's a narrow, curved bit of metal shoulder material in one half of the rod which you push into a hollow onto the other half. I found I had to crimp mine with pliers to get the halves together.

Tap one end of the rod on a concrete surface to get the pieces completely together - but don't try to hammer them. The rod will bend, and if that happens, you need a new rod!

Estes recommends using sand paper to smooth out the joint between the rods. Don't do this. What happened when I did this was that I scuffed the chrome coating off the rod, making it rougher! You could try some steel wool, but honestly, unless the joint is way off, you'll be fine.

The rod gets inserted into a little hole in the top of the launch pad. There's a little safety cap included which you place on top of the rod when you're not actually launching a rocket - this is to prevent you bending over the rod and gouging your eyes out. I've mentioned that rocketry has a great safety record - I read once that the most dangerous thing about launching rockets is that rod!

Arr! Don't be the guy who loses an eye launching rockets!

The launch controller is a plastic box with a button, a light, and a removable "key" - usually a bit of wire or metal with a plastic button on top of it - and a couple of wires coming out one end with little clips on the ends of them. The controller takes batteries, and it ignites the motors electrically. The key is a safety feature. Once you hook the rocket up, you cannot launch it accidentally by hitting the launch button with your thumb, because you have to put the key in the launch controller and press it down before it will work.

The light is known as a continuity light, and when you hook up the rocket igniters to the launch controller, and put in the key, this will light up. It tells you that electricity is flowing through the system, the batteries are good, and the igniters are not broken.

Typical Estes launch controller, from Chris Michielssen's
modelrocketbuilding.blogspot.com. If you haven't seen his
blog, you need to check it out!


The launch button... uh, launches the rocket.

***I do have to say something important here, in case you are not going strictly the Estes route for your first rocket launch. Currently, Quest motors and igniters are out of stock, but once Quest motors are back out again, this is very important: You cannot use an Estes launch controller with Quest igniters. Quest makes a very sensitive igniter. They require very little current to flow through them to actually cause them to fire - which is a good thing, for certain applications. But an Estes launch controller doesn't have enough resistance in it, and as soon as you put the safety key into the Estes launch controller, instead of just the continuity light coming on, a Quest igniter will get enough juice to fire prematurely. If there's someone at the launch pad making an adjustment, that can be dangerous!***

A rocket motor is a heavy paper cylinder  which encases a solid propellant - in this case, black powder. One end has a little hole in it - the nozzle - and the other end has a clay cap in it.

A typical 3-pack of black powder motors - in this case,
Estes B6-4. That's an average thrust of 6 Newtons
and a delay of 4 seconds.

The nozzle end - this sticks out the back of the rocket.

The clay cap end - goes into the rocket pointed toward the nose cone.
In A and B motors, this is further recessed into the motor, because
there's less propellant inside.
(If you don't see a clay cap, and instead see the dark black powder in the non-nozzle end, look at the side of the motor. Is the last number a 0? Then you have a special motor used only for the first stage of multistage rockets. Put that away for now - we'll get to those later. For now, it's definitely not what you need!)

The motor on the left has no clay cap - you can see the black powder propellant. This is
only for multistage rockets. Put that one away for now. We'll do staging later!
Rockets for beginners come in three basic classes - A, B, and C. The basic explanation of this is that each letter class is roughly twice as powerful as the previous one. C is twice as powerful as B, and four times as powerful as A. They are described by a letter and two numbers. The first is average thrust, and the second, after the dash, is the delay time, which is the time between when the motor stops burning propellant and the ejection charge going off. So, a C6-5 motor has an average thrust of 6 Newtons, and a delay time of 5 seconds. A Newton is about 0.225 pounds.

Your first rocket will come with a list of recommended motors to use. Read these. First time I launched the Big Bertha, it was kind of windy, and I didn't want to lose my beautiful new rocket. So, I put an A motor in it.

Problem is, the Bertha is kind of heavy. An A8-3 motor doesn't have enough power to properly lift it. It flew about 30-50 feet into the air, took a nose dive, and straight down for 3 seconds (that was the delay time!). The nose cone ejected about 5 feet from the ground, and the rocket drove itself into the damp earth.

The fancy, homemade launch controller makes me look like an "expert,"
but the crash landing goes to show that I'm still kind of a n00b.

I thought I knew what I was doing, but hadn't realized that the A8-3 is not on the list of recommended motors for this rocket! The weakest motor for the Bertha is a B-something. Oops!

There will be a list of appropriate motors with your rocket. There's usually one with an asterisk (often the least powerful one) that says "first flight." This is so that, if, say, it's windy, you're less likely to lose the rocket when the parachute drifts too far, or if you made some kind of catastrophic error in the construction of your rocket, the damage will be minimal.


The igniter is a little wire thing that comes with the motors. It's usually made of high-resistance nichrome wire. The resistance is important, because when electricity flows through a high-resistance wire, the wire heats up. This happens in an incandescent light bulb, and in the wires of a toaster - which are also made of nichrome. Most Estes igniters are also tipped with a combustible material called pyrogen.

To igniters - you snip these apart before using them.
Motor packs include tiny plastic plugs for
securing igniters into the nozzle of the motor.

You insert the motor into the back of the rocket with the nozzle end - the little hole - pointing out the back of the rocket. Secure the motor with the motor hook (or sometimes you tape it in, if the kit instructions tell you to do that). The motor hook should lock into place once the motor is all the way in. Tug on the motor gently to make sure that when it moves backward, the hook holds it in firmly by the edge.

Now, pull out the nose cone, parachute and shock cord. You need to protect the parachute from the burning particles of the ejection charge, or it will melt together and won't open. Into the rocket body, you put recovery wadding. Tear off individual sheets, and roll them loosely into little wadded balls of paper - not too tight! The instructions on your kit will tell you how many pieces you'll need for your particular rocket. Put them one by one into the body of the rocket, and if you need to, push them down very gently with a dowel rod.

Picture from stormthecastle.com

Next, you need to fold the parachute and insert it and the shock cord into the rocket. There are lots of ways to fold parachutes, but some ways are better than others. Doing it by the instructions in the Estes kits is terrible - mine do not deploy at least 50% of the time when I do it this way. We're going to do it another way.

The Estes "fold over and roll both ends to the center"
technique - terrible. The shroud lines get tangled, and
the chutes often fail to deploy.

Plastic parachutes sometimes have problems deploying. This can be due to static electricity, or cold, or bad folding. In any case, you'll help the parachute properly deploy if you give it a few dashes of talcum powder or baby powder.

I prep my rockets before going to the flying field by laying the parachute open on a table. 
The Big Bertha 18-inch parachute ready for prep
I sprinkle a bit of baby powder on the underside of the parachute and lightly spread it around so it coats the whole chute. 
Sprinkle a little baby powder or talcum on the chute to aid deployment

Next, fold the chute in half, with two of the corners being at the top of the fold. Now you'll have half a hexagon, with four corners showing - two at the top and two at the bottom.


Take one of the top corners and fold it down to the bottom corner on the opposite side. Then do the same for the other top corner. You now have a triangle, with all the shroud lines - the strings on the parachute - coming off the two corners at the bottom.

Fold one of the top corners down to the opposite bottom corner - in this case, top right to bottom left.

Then do the same for the opposite top corner - here, top left to bottom right. You now
have a triangle with shroud lines coming from the bottom two corners.
Fold the parachute in half so that all the shroud lines are together. Now, you'll have a scalene triangle, with all the shroud lines coming out the bottom.


Take most of the extra slack that leads from the parachute to the nose cone and gently lay it on top of the parachute.


Gently lay the slack from the shroud lines on top of the folded parachute.


Fold that outside corner over the shroud lines, then fold the top corner down about a third of the way, then fold what you have down again.

Fold that outside corner over the shroud lines

Fold the top third of the parachute down.

Fold that down over the bottom third.

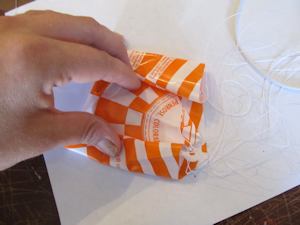
Next, roll the whole thing up into a little packet and gently wrap whatever is left of the shroud lines around the parachute into a helical shape, making sure you don't cross over what you've already rolled.

Roll the folded chute down into a sausage shape

Wrap the shroud lines in one bundle around the chute, moving from one end to another, in a helix.
Don't cross lines back over what you've already rolled!
Once this is done, you stuff the parachute and shock cord into the rocket. Some say you should put the shock cord in first - which is probably better. Some say the shock cord goes on top. It probably doesn't matter a ton, and in some small-diameter rockets, it's hard to get that shock cord in there - it's just rubbery enough that it doesn't want to go in on its own unless you're pushing it, and that's hard to do when you've got your rocket in one hand and a perfectly-rolled parachute in another. If I can't get the cord in first, I stuff in the chute, then pack the cord on top. I've rarely had a deployment problem with this.

The shock cord in a larger rocket like the Big Bertha goes in quite easily - put that in first.


Put the nose cone on top, and make sure it's snug, but not tight. You should be able to easily pull it out with your hand, but it shouldn't be so loose it falls out if you turn the rocket over and give a little shake. If it's too loose, add a little strip of masking tape to the shoulder. If it's too tight, sand the shoulder down a little bit.

The nose cone of my Cosmic Explorer is just a little too loose. A few
bits of masking tape makes it snug enough to fly.

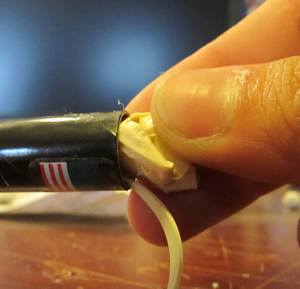
You then insert the igniter into the nozzle of the motor, making sure it touches the propellant inside. It doesn't have to go very far, and you don't need to force it. Just set the tip of the igniter gently into the nozzle until it stops.

Don't insert the igniter until it's in the rocket and at the launch pad!I'm just doing it on the table here for the purpose of taking pictures.

Next, you'll secure the igniter into the nozzle with either a little plastic plug that comes with the motor (in the case of Estes motors), or with a piece of masking tape. Either way, this will bend the igniter's leads into a 90 degree angle. Make sure the two wires leading into the nozzle don't touch each other - this creates a short circuit, which means that when you press the launch button, nothing will happen.


Now, you'll bend the ends of the igniter wires away from each other. You can bend them into little rabbit-ear loops, or simply bend them away from each other at a wide angle. The rabbit ears are easier to connect to the clips, but as long as the two wire leads aren't near each other, you'll be fine.


The rocket is now prepped for flight.

In Part 2, we'll launch the sucker!

[Click here for Part 2]

Tuesday, November 25, 2014

Bill Stine Himself on Quest Igniters

I think something incredible just happened.

If you're new to rockets, this might not mean anything to you, but stick with me. I'll explain.

So, Estes is not the only rocket company in the rocket biz. There are lots. One of them, Quest Aerospace (perhaps Estes' biggest rival in the low power rocket arena) is another. I have a few of their rockets, including the Magnum Sport Loader, a two-motor cluster rocket. Here's the video:


Quest has a line of motors and igniters. The igniters are called Q2G2, and they're sought after because they're very reliable - especially if you do cluster launches of low power, black powder motors (that's all I'm up to at this point). They require very low amperage to get them to fire, which means it takes less juice to get them to work quickly and properly - very important, since you want all your motors to ignite at the same time in a cluster rocket.

Problem is, Quest motors and starters have been out of stock for months - since long before I got involved in clusters. I kept hearing they'd be back in stock "in November," but, they're just not. Apogee Components has lately been saying "July 15."

I posted a thread on The Rocketry Forum to ask what the deal was. Were they ever coming back? Some insisted that, no, they are gone for good. Something to do with a recent merger between Quest and AeroTech (a company that specializes more in mid and high power rockets and motors). This Quest Q2G2 issue has been a hot topic in rocketry circles lately, and the thread has generated a lot of replies.

OK, that's Part One.

There's a guy named Bill Stine. He's basically been around hobby rocketry since the beginning, and he's the author - along with his father, the late G. Harry Stine (one of the founding members of model rocketry) - of The Handbook of Model Rocketry. If you're serious about pursuing rocketry as a hobby, and want to understand more about it, this book is required reading. I bought a copy for my Kindle and devoured it a few months back, and I turn back to it frequently. Seriously, get this book - it has a lot of information important to understanding rocketry basics. Point is, Bill Stine is one of the biggest names in hobby rocketry. He's like the Richard Leakey of model rockets.


Well, it appears as though Bill Stine himself responded to my thread.

Here's what he had to say:


Originally Posted by OldRocketeer"II"

OK, here's an official response from Quest:

First, NO, Q2G2 igniters are NOT gone forever and you will be able to purchase them again soon (both shorts and longs). The version that comes packed with the motors will not have any difference at all from the "originals" you guys love! But due to new pending BATF regulations, the ones sold as accessories are going to have a slightly different pyrogen on them - but you likely won't notice any difference.

And yes, we have been out of stock on A's, and then B's and then C6-5's. New production was completed in September and was expected to arrive via ocean freight then. Some regulations on shipping HazMat materials have recently changed in China - and we had to test new shipping cartons. Unexpected after unexpected delays just keep happening, and therefore I won't announce a "solid" arrival date now. but it will be soon...

We appreciate your patience and loyalty.

As to quality, the Quest China motors are very bit as reliable and safe as Estes BP motors (NAR MESS reports certainly support this). They are not made in a fireworks factory and the AQL process and testing is every bit as tough as it was in our own US factory years ago. In fact they are made from military grade BP - it just has a slightly slower burn rate than the US BP does. Most folks love our slightly slower burns, especially the C's. Teachers especially like the slower burn times because the kids get a bigger thrill out of slower boost that they can see...

The merger with AeroTech has been great, but of course there have been some "bumps". Running out of motors certainly was the biggest one...

We hope to have some new product announcements soon that I think the rocketry community will get a big buzz out of.

Bill Stine
Wow, I thought, Bill Stine saw my TRF thread? He REPLIED to my thread? THE Bill Stine?? For real?? Am I reading this right???

I went to his profile page. Looks like he's been on TRF for almost six years, and though I may simply not be understanding what I'm seeing on the website... it looks like my post on TRF is the only one he's ever responded to.

And if that's actually true... it kind of blows my mind.

Anyway, whether or not Bill Stine wrote this post himself, or it's someone quoting Bill, it's good to know Quest will eventually put out new starters, because I want to build bigger clusters, and I want them to launch correctly.

And I choose to believe Bill Stine thought my post worthy of comment. Because... wow...