Showing posts with label tube spirals. Show all posts

Tuesday, January 4, 2022

Estes V2 - Body Tube


Busy week this week, but here's a brief update on the Estes V2 build.

I decided to use the body tube that came with the Estes V2 after all. The minor stretching of one end won't be noticeable, and I'll use that end for the aft end of the airframe, where the tail cone gets glued in. The snugger end of the body tube will have the nose cone.

As I usually do, I filled the tube spiral with Elmer's Carpenters Wood Filler. This wide groove filled quite easily, and the tube is so short, it took no time.

Some people feel you're wasting your time if you fill in tube spirals. Not me - I enjoy the process and the results, and with a scale project like this one, I think there's a stronger argument in favor of doing it.

But it's a cosmetic thing - if you don't like it, you certainly don't have to bother. Rocketry has a lot of different things to offer as a hobby. You should do the things you like doing, and don't let others' opinions make you feel bad. I've seen plenty of the "that's not how I do it" types of comments in various forums, that I feel the need to make these points whenever I bring up tube spirals.

I would never call someone out for not filling spirals on their rockets (I've seen someone do that on a forum before). I'd also never tell someone they're wasting their time pursuing some part of the craft I'm not into (which I've also seen). It's your rocket - do as you please.

My method for filling spirals is HERE.

I post a lot of things on Instagram these days. Follow me here.


Like my Facebook page for blog updates and extra stuff.

Have a question you'd like to see addressed on this blog? Email me at iamtherocketn00b@gmail.com.

Sunday, November 17, 2019

The Semroc Bandit - Part 2


The ducted ejection motor mount system for the Semroc Bandit can be seen above. This is apparently a re-creation of the original Estes baffle system in the 1971 Bandit. The parts fit together well, and it's pretty neat - although it does add significant weight. If you went with a simple motor mount and just used recovery wadding as per usual, you'd probably get the Bandit to fly a lot higher.

But part of the pleasure of flying the Bandit is watching the whole flight. It's a pretty bird.

The end of the motor tube is plugged with a balsa bulkhead or nose block. Into that bulkhead, you attach one of the supplied screw eyes to anchor the shock cord.


The shock cord which comes with the kit is a thin piece of sewing elastic. I decided against using it here for a couple reasons.

First, it's a little short for my taste. While I do use sewing elastic in my low power model rockets - a lot - I like to make my shock cords very long (more on this in a future post).

Second, despite the ejection baffle, I worry that the elastic will wear out over time after repeated ejections. Not from the heat, but from the chemistry. The caustic vapors from black powder charges have a negative effect on the latex in the elastic, making it brittle and prone to snapping. If I mounted an elastic shock cord that far down into the rocket, when it broke, I wouldn't be able to replace it.

I prefer to attach my elastic cords to something less prone to wearing out - Kevlar kite string.

While Kevlar will burn through after so many charges if it's right by the ejection site, with the baffle system, it will probably be just fine here.

I replaced the elastic cord with a Kevlar string, which I attached to the bulkhead on one end. On the other, I tied a loop. The Kevlar cord is just long enough that you can see it at the end of the body tube.


This will allow me to attach an elastic cord, which I can cut off and replace when it becomes brittle.


With the elastic attaching to the Kevlar inside the body tube, the shock cord is less likely to damage the tube should the parachute come out while the rocket is moving at high velocity. If the Kevlar extended beyond the end of the tube, there's a chance that the cord could cut into the end of the tube, possibly causing a jagged tear down the side of the rocket, known as a zipper.

I sanded the fins into airfoil shapes, which I often do. I like the finished look it gives to a model rocket.


While these aren't perfect, they turned out better than this picture implies. Sometimes a closeup can distort things in a photo. They look pretty even in real life, and once on the rocket, you won't be able to see the imperfections without close examination. I could have taken a second crack at them and probably gotten better airfoils, since I have a spare set of fins (see Part 1), but I decided I was happy enough with these.

I sealed the balsa nose cone and even the fins with thin CA - cyanoacrylate or Super Glue - and sanded them smooth. On the fins, I left the bottom 1/4 inch unsealed. If you get CA on the root edge, wood glue won't bond to it as well, and a fin could easily pop off.

I used the Guillotine Fin Jig to glue the fins on. I made a couple layers of glue fin fillets and then treated the root edges of the fins with CA, then sanded again.


The whole kit looks pretty nice.


You'll notice that I did not fill in the spiral grooves on the main body tube, but I did on the white upper payload tube. That's because the lower tube didn't really have grooves as such. The spirals were more of a tight overlap, so there was nothing to fill in. My hope here is that a good few coats of filler primer will hide those overlaps.

You can fill in spiral grooves with heavy coats of filler primer, too, but I prefer carpenter's wood filler. Filling grooves in with primer alone takes a lot more primer, which is more expensive than wood filler. I like hiding the grooves, and I like getting more than one rocket out of a can of primer, so I usually use the wood filler method. You don't have to fill spirals if you don't want to, but I like doing it, and I have a pretty hassle-free (i.e. not much sanding involved) method.

Follow me on Twitter.

Like my Facebook page for blog updates and extra stuff.

Have a question you'd like to see addressed on this blog? Email me at iamtherocketn00b@gmail.com. 

Monday, March 16, 2015

Mid Power - Building the Quest Big Dog (Part 2)

Click here for Part 1

Back to building the Big Dog, from Quest Aerospace...

After assembling the motor mount, I next decided to mark fin lines and a launch lug line - though I'll be using mini or micro rail buttons for this rocket.

If you're new to rockets, here's what I mean. Launch lugs were the standard for all hobby rockets until not too long ago. But in the last - I don't know for sure - decade or so, a lot of rocketeers have switched over to rail buttons. Instead of a thin, wobbly launch rod, which can suffer from wire whip if it gets too long for its diameter, mid and high power rocketeers often use something called t-slot rail to keep a rocket upright on the launch pad.

One of the most common rails used is a square aluminum extrusion, used to build all kinds of modular industrial things, with a cross-section that looks like this:

Instead of launch lugs, two (or sometimes more for really big rockets) small buttons are attached to the rocket, and they slide down into the slots in the rail. The result is a really sturdy launch platform.

Launch button (bottom) fitting into a rail slot.
Image from CoastRocketry.com
Sorry to digress. Back to the subject at hand.

I cut out the paper fin guide from the instructions, I carefully lined it up around the tube and taped it in place. There was a slight gap between the fourth fin line and the edge of the paper guide, which I figured was intentional. I marked each fin line with a little pencil dot.

As always, I decided which end I wanted to be the forward and which end the aft, and marked them so as not to
forget. I don't remember how I chose on this rocket, but it may have had to do with how the centering rings fit.

Estes fin guides have an additional line, the launch lug line, exactly between two of the fin lines. The Quest guide didn't have that. In order to get the launch lug line exactly spaced between two fins, I folded the guide over and matched up to of the fin lines, then put a pencil mark on the fold.


Then I attempted to match up the fin lines with the little pencil dots on the airframe, and that's when I noticed a flaw in the kit - the dots didn't line up with the lines. I can only have noticed this because I must have laid the guide down between the first and fourth fins. I double-checked the lines with the other dot, and they all matched up. Something was off here!

A few months ago, I bought a digital caliper, because it was inexpensive, and because I figured I'd use it for... well, something. In any case, I like having precise measuring tools.

I got out the caliper and measured the diameter of the body tube. The box claimed the airframe was 1.92 inches. The caliper told a different story - 1.97 inches!


I knew this thing would come in handy!

I opened the free RockSim file for the Big Dog, available from Apogee Components. I don't have RockSim, but OpenRocket will open those files. I saw that, according the the sim file, the rocket should have an outer diameter of 1.97 inches. That's not much of a difference, but if the paper fin guide was made with a smaller diameter in mind, you'd get fins that are ever so slightly unevenly placed - all too close together, except for the first and fourth fin, which would be slightly too far apart. You might not even notice the difference unless you looked closely, but I look closely. It would have bothered me.

So, I used OpenRocket to print off a new fin guide - with an additional advantage that this one would already have a launch lug line marked.


I taped this guide to the rocket, and everything matched up correctly, so I marked all the lines.


Finally, I grabbed a length of aluminum angle and extended all the lines.

Normally, I extend the launch lug line all the way down the body tube, so I can sight along it and verify that I have the lug on straight. I keep the fin lines rather short. But, due to probably a little sloppiness on my part, I've gotten a few fins on not quite perfectly straight when using the Guillotine fin jig lately. The Guillotine is a great tool, but like all tools, you must use it with care.

Just to be sure I'm getting the fins on true, I extended the fin lines most of the way down the body tube. That way, I can check the fins are on the same vertical line on both ends of the fin jig before gluing them down.


You can see that before I did all this, I marked the tube spirals with a pencil so I could see the lines clearly when I filled them in.

The spiral groove on this rocket is really tight, and I had trouble in spots keeping the pencil tip in them. In spots, I couldn't even feel the groove with my fingernail. It's possible I could get away with just priming the rocket with a good coat of filler primer, but I don't want to get to the end of the build and see grooves. So I filled them in.

I didn't take any pictures of this process, but I just blogged about how I do it.

I filled the grooves, let them dry, then lightly sanded.

Next, I installed the motor mount and began airfoiling the fins. I'll talk about that in the next build post on this rocket.

Click here for Part 3.

Like my Facebook page for blog updates.

Saturday, March 14, 2015

Filling Tube Spirals - Revisited

Back in Part 4 of my Skill Level 1 series, Building the Big Bertha, I talked about filling in those spiral grooves you find on your rocket body tubes.

My first build - Der Red Max. I hadn't yet learned that you can fill in those spiral grooves.

This makes the rocket look better (it doesn't look like you made it from a roll of toilet paper), and might even make it fly better.

In any case, I like my rockets to look nice close up, because they spend a lot more time on the ground than in the air, and I like to show off my work to people who come to visit.

Some people don't bother to fill in the spiral grooves, because you don't see them while the rocket is flying. But if you're fussy about rockets like me, you try your best (I usually make a few mistakes) to get all the details.

Since building the Bertha, I've refined my technique, and I want to share it here. I've now gotten it to where I can fill in those spirals quite effectively - and this technique requires almost no sanding. That's particularly important for me, because I've never managed to sand wood filler off a body tube without going through the smooth surface and raising a few paper fibers - which show up in the final paint job.


Here's how I now fill tube spirals, and I hope you find it helpful.

First, you need your old friend, Elmer's Carpenter's Wood Filler - the kind with the orange lid, which looks like this:


Get only this stuff for rocketry purposes. Don't get the other stuff - it's grainy and weird, and doesn't sand well.

As is often the case, I pick up a lot of my building tips from Chris Michielssen's blog, and that's where I got the razor blade idea, which I still use, but with a twist - plastic razor blades.


I didn't even know they made these until I saw them at a hardware store. I grabbed some, and thought I'd try them, and if they worked, I'd report here that now even kids can safely fill tube spirals using the razor blade technique. It turns out, these are even more effective for me than metal blades.

Chris uses a dull hobby knife blade to lay some CWF into the spiral groove (see here) with beautiful results. I haven't quite got the hang of that technique. Back when I was building the Bertha, I used a small paint brush to fill in the spiral with thinned CWF.

This technique was OK, but I had to overthin the filler a bit, and it wouldn't go evenly into the groove. There would be a lot of low spots, and I'd have to re-fill the grooves after priming and sanding the rocket, and it didn't always turn out great.

Now I use a medicine dosage syringe.


Pharmacies sell these mostly for measuring out cough syrups and other liquid medicines for children. They work great for getting wood filler into the grooves.

A good first step (again, a Chris Michielssen tip) is to use a sharp pencil to trace along the spiral groove.

Though not strictly necessary, it will help you see the groove clearly as you apply filler. Some grooves are deep and obvious; others are thin and very light. I pencil in all my grooves, just to be sure to have a guide line.

Next, you'll thin - slightly - some CWF. This shouldn't be as thin as you'll need it to paint onto the fins for filling. It just needs to be thin enough that you can draw it up into the syringe. I spoon some out into a small bowl, then add water bit by bit with an eye dropper. I stir until it's nice and smooth, no lumps. Continue adding small amounts of water and stirring until it's about the consistency of cake batter - or perhaps a little thicker, say, between cake batter and peanut butter.

Stick in the tip of your syringe and draw an inch or so of CWF into the syringe. Wipe off the tip of the syringe.

Use the syringe to dispense a line of CWF right into the spiral groove, about an inch or two at a time.

I should have worked in the other direction, so you could see the filler going into the groove. But it doesn't matter.
Next, you'll pick up one of your plastic razor blades.

A regular razor blade will work for this - essentially, you're using it as a little putty knife. But the plastic blade has a couple advantages, I find. First, there's no risk of cutting yourself - or the rocket. With a metal razor, I sometimes cut or scrape into the body tube a little with a corner, raising paper fibers - that won't happen with a plastic blade. Second, because the blade is plastic, you can apply downward pressure. So instead of just scraping off the excess filler, you can actually push the filler into the groove as you go.

The blade has a beveled face and a straight face. Leading with the beveled face, you apply pressure, and the edge of the blade flexes, flattening the filler and completely filling the groove.

Both edges of the blade have a flat face and a beveled face.
So with the blade, follow the groove and remove the excess filler.


See the edge of the filler? That will have to be sanded off later - unless you do this next trick.
What you're trying to do is two things: completely fill the spiral groove and minimize the sanding you'll have to do once the filler is try. This part is especially true for me, because I've never been able to sand filler off a body tube with ordinary sand paper and not mess up the surface. Apparently I'm alone in this, because I've never heard of anyone else having this problem. But in any case, sanding is a pain.

So I came up with this last little trick - the part of the process that makes it all even more effective, almost eliminating the need to sand when you're done. Using the pad of your finger, buff the filler you've just applied. This will take off any excess and smooth out the edges of filler left by the razor blade. Just buff lightly - across the groove, not with it.


You'll know you're removing excess filler because after a few times, a small amount of it will cake on your fingertip. You'll need to wipe or wash that off occasionally.

Let the filler dry completely, then check it to see if you can feel any bits of the groove that were not filled in, or any raised ridges you didn't buff off with your finger. You may find that you don't need to sand at all!

I always do sand, just for good measure, but now I only have to make a cursory pass over the groove, and sometimes I find a glob I accidentally got somewhere in the middle I have to sand off. Because regular sandpaper messes up my body tubes 100% of the time, I now use a sanding sponge - the finest grit I can find, which is 320.


The sanding sponge is soft and flexible, and conforms to the body tube, and it won't cut into the smooth surface.

That's it. You'll want to wipe off any dust before you prime and paint, but everything should be filled in perfectly, and the surface will be smooth and groove-free. If you notice any low spots you missed in the groove after you put on primer and sand it down, you can use a bit more CWF to fill those in - but I find with this technique I almost never have to do that.

I hope somebody tries this technique and likes it. I used to get so frustrated filling tube spirals, because I could never quite get them filled, and because when I sanded them down, I'd have scratches and bumps that looked terrible once the rocket was painted. Now this is a part of rocket building I enjoy.

Now if only I could find a way of filling wood grain on fins I looked forward to!

Like my Facebook page for blog updates.

Tuesday, October 7, 2014

Building the Big Bertha - Part 4 (For N00bs)

[Click here for Part 1]

Once you're happy with the smooth texture of your fins, it's time to set them aside for now, and focus on the body tube, with a couple of Rocket Pro Tips.

I got some of these tips from various places online, including Chris Michielssen's Model Rocket Building blog.

First thing I always do, even though it is not written in the instructions, is to reinforce the ends of the body tube. To do this, I use cyanoacrylate - commonly called CA. This is the same stuff as Super Glue, but you can find specially made bottles at hobby shops which come in different viscosities.  This stuff is useful for a lot of rocketry applications (though not generally recommended for gluing on fins or motor mounts).

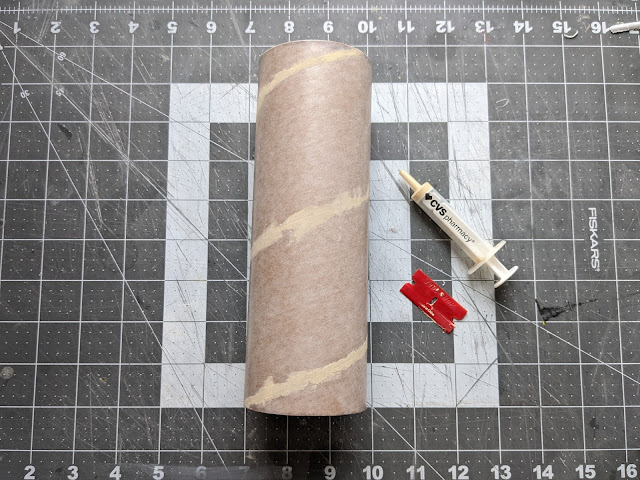
For this, you want thin CA, which is pretty watery. This stuff bonds instantly to skin, as I learned when I glued a bit of paper towel to my finger, so you'll need to be careful. With thin CA, you should also wear eye protection.

Protective eye gear, thin CA (pink bottle) and CA un-bonder,
in case you glue your fingers together

Open the bottle of CA and run a very thin bead of the glue around the inside of very ends of the tube. Using a bit of paper towel, wipe off any excess - though don't use your fingers. Roll up a bit of it into a kind of wand or baton, hold it from one end, and run the other end lightly around the inside of the tube. Throw the paper towel away immediately, so you don't accidentally grab it by the wet part later and end up with stuck fingers.

Thin CA will wick into the paper fibers, and when it dries, the ends of the tube will be stronger and harder - good if your rocket has a hard landing.


It also makes it less likely the end of the tube will wear out from having the nose cone inserted and removed launch after launch.

Now, these low power rockets are all made with tubes of rolled paper - cardboard, essentially, a little like what you find at the center of a roll of paper towels or toilet paper, but better constructed, a bit thicker, and usually with some kind of waxy, smooth coating on them.

But they do all have that spiral groove winding their way from one end to another. That groove will show up through the paint job, so when people look closely at your rocket, they can tell. "Oh, yeah, looks like a paper towel tube." But you can fix that, and hide that groove, so that people may not be able to tell what it's made of.

Before I go any further, let me say that you can totally skip this next step if you're not into it. A lot of people build tons of rockets and don't bother. I didn't even know it was an option when I built my first rocket, Der Red Max, and I was really happy with the way that turned out - though now I can see the spiral.

A visible tube spiral on Der Red Max. Spirals are sometimes hard to see on a bare
body tube, but they're really visible once you prime and paint the rocket.

 But a lot of people prefer it, and I try to do it with every rocket I make.

There are a few options for filling a tube spiral (technically, it's a helix), but by far the most common solution is to use more of the carpenter's wood filler - CWF - we used to fill the wood grain in the fins. This doesn't take nearly as much time as the fins did, and if you get it right, the results are rewarding.

I admit, I've had trouble getting this right, and it's only with this latest build, the Big Bertha, that I finally did it to my satisfaction. More about that in a minute. The other option, which I've read about but not tried yet, is to skip the filling, and when you go to prime the rocket for painting, use automotive filler primer instead of mere sandable primer. Filler primer is used to fill in deep scratches in car paint jobs, so it actually has some structure, and you can sand it smooth, filling in the seam as you go through the priming process.


When I heard about this, it sounded much easier, but I'm stubborn, and wanted to learn the CWF technique, so I kept at it.

You'll need some CWF - thinned, but perhaps not as much as you used to paint onto the fins - and a razor blade. You'll also need something to apply the CWF to the spiral seams. Chris Michielssen of the Model Rocket Building blog uses the tip of a used (dulled) hobby knife to apply CWF right to the seams, and he's a real pro at getting rockets to look great. But I've tried this, and I personally don't have a lot of success with it. So I use a fine tipped artist's paintbrush. You'll want a fresh razor blade. You might also want a freshly-sharpened pencil.

There are actually two seams. One of them is easier to see than the other, especially on white tubes (they're usually white or brown, and they're a little different, but I don't know enough to tell you what the technical difference is). Often, that one is actually filled in - the seam is on the inside, and you're seeing the filled outside of it, so it looks darker. Run your thumbnail around the tube until you feel the other seam - it may be invisible. That's the one you're going to fill, because that is the one you'll see when you paint the rocket.

Run the tip of the pencil down the whole length of the seam, from the top of the tube to the bottom. Now you can clearly see the seam, and you'll be able to get CWF exactly where you need it.

Next, apply the CWF to the seam, going about an inch or so at a time at most. Use Chris Michielssen's knife blade technique if that works for you, or paint it on. I try to tap it into the seam with the tip of the paint brush, then brush over that, so I get CWF all the way into the seam.


Next, grab your razor blade, and scrape off all the excess. You're going to hold the razor so it is lined up with the body tube, perfectly straight, and so the blade is perpendicular to the surface of the tube. Be careful not to cut into the tube - you're just using this blade as a super fine putty knife to push the putty into the seam, and scrape off all the excess, so you'll have less sanding to do later.

Don't hold it at an angle like this - this was just me trying to use one
hand to hold the blade, and the other to take a picture.

 Wipe the edge of the blade off often, on the edge of the container of CWF. Go inch by inch, all the length of the tube. When you're done, you should have a fully-filled spiral, with not much excess to sand off.


Once the CWF on the tube is dry, you're going to sand it off. Now, this is supposed to be really easy, but I admit for the first few rockets I built, every time I tried sanding the CWF down to the surface, I ended up scuffing the waxy coating on the tube and ended up raising all of these hairy paper fibers from the tube. I could not for the life of me stop doing this, and it ended up making my rockets have some weird fuzzies on them.

Paper fuzzy bits poking through the finish of my Crossfire ISX. This
was driving me absolutely crazy for my first few builds!
When I asked about this on The Rocketry Forum, I got a lot of responses, ranging from "You need to sand in little circles" (I did) to "Did you use a sanding block?" (sometimes yes, sometimes no, always with the same result) to "I don't bother to do that on tiny paper rockets" or even "Why bother? Nobody's going to notice when it's rotting in a tree!"

What nobody ever said was "Yeah, I used to have that same problem myself. Here's how I solved it..."

I tried fine grit sanding paper, rougher grit sanding paper, wet sanding (bad idea with no paint on it), dry sanding, etc. So, I was beginning to think that this whole CWF spiral filling thing was either beyond me, or that maybe it was some kind of rocket urban legend, and that the secret was something the real craftsmen weren't sharing with the rest of us. It was really frustrating me, and I felt like it was holding me back, because regardless of the size of the rocket or the fact that it might end up in a tree or a pond, I wanted to craft a nice rocket. So I kept experimenting.

Then I cracked it.

I now use a sanding sponge. It's like sandpaper, but in sponge form, and it comes in various grits. The finest I could find was 320. This is why it is important - for me - to use the razor blade method and get as much of the excess CWF off the rocket body before I sand, because I want to sand as little as possible. Something about the sponge being softer and conforming to the body of the rocket makes it less likely that I raise those nasty paper fibers, and I end up with an acceptable surface for painting later.

My sanding sponge, just before sanding off the CWF. You can rinse these
out, and they last a lot longer than a piece of sandpaper.


Chris Michielssen - whom I've mentioned on this blog numerous times, and I recommend you check his blog out if you want to see some expert builds - sands CWF off seams by going parallel to the body tube, thereby going across the CWF. I have to be really careful, so I lightly sand with a corner of the sponge in tiny circles, trying to touch only the CWF. I go slowly, and stop if it looks like I'm going too far.

You might just try using sandpaper - I've seen some people using grit as coarse as 150 or even 100. Maybe it's just me.

Anyway, when you're done, there should be no raised bits of CWF, and when you prime your rocket, those spiral seams will be invisible.

Now, I had said in Part 3 that we'd put the fins on in this post, but this body tube prep post has gotten longer than I'd anticipated, so I'll save that for Part 5. We'll figure out where the fins go, attach them to the rocket, and I'll show you a cool, very useful tool that you can make yourself for less than two bucks.

Click here for Part 5