
In Part 4, the first thing we did was to reinforce the ends of the body tube with a bit of thin CA - cyanoacrylate, or super glue. Turns out, this is a really good idea.
A couple days ago, I took a few rockets out to try out my new homemade launch controller.

I took my newly-completed Big Bertha with me. Since it was a little windy, and I didn't want to lose my beautiful, new rocket to a big gust of wind, I put in the weakest motor I had - an A8-3 (We'll talk about motors later, but I'll just say, the A is the least powerful of the standard sized motors). This was a mistake, because it turns out this motor is far too weak for a rocket this heavy (always read the instructions!).
The controller works great. But the rocket lifted off the launch rod, went about 50 feet maximum into the air, then the motor ceased its burn and the rocket took a nose dive straight at the Earth. The ejection charge blew the nose cone off about 6 feet from the ground. The parachute didn't even open, and the rocket body embedded itself into the ground.
 |
| The parachute is still folded... |
This could have been the end of the Big Bertha. But I pulled it out of the ground. Smoke still oozed out of the top of the tube. Apart from a bit of mud, grass and clover leaves, there was no damage!


So that Rocket Pro Tip was well worth it!
OK, back to our build. Now it's time to add the fins to the rocket body.
The first thing we need to do is determine where the fins will go, and mark the tube, so that we get them on straight. Kits come with a fin marking guide for this purpose.

You'll cut this out and wrap it around the body tube, somewhere near the base. Make sure the lines on the ends line up perfectly - that's how you know you have the fin marking guide on straight.
 |
| You can see here that my fin marking guide has a bit of a gap in it. Some Estes kits are a bit sloppy on a few details. But the fin lines did line up perfectly. |
Next, what you'll need to do is draw a perfectly straight line up the body tube to show exactly where to place the fins. Well, how do you do that?
The traditional way is to place the body tube in a door jamb and use that as a straight rule to mark a line up the tube. People have been doing that since the birth of model rocketry in the 1960's, and it works. Many kits will explicitly include that in the instructions. If that's all you've got, it's fine. But it has drawbacks.
Some door jambs are not as straight as they should be - especially in an older house that has settled, or been repainted many times. And they may have chips in them. And you'll get pencil lines on your door jambs.
 |
| Using a door jamb to mark a fin line - notice the nick in the jamb? |
You can make yourself a really cool, cheap tool, with aluminum angle. This is a piece of aluminum, sold at hardware stores, and it's used for... I dunno. Construction or something. Doors or windows. I have no idea. I only know it's used for rockets.
It comes in 3-foot lengths, and it costs less than two bucks. Get yourself a piece of 1/2 inch aluminum angle, the kind with equal-length sides, and cut off an 8- to 12-inch piece with a hack saw. Here's mine:


See how the angle sits exactly along the tube?
Line the angle (or the door jamb, or the Estes Tube Marking Guide) up with the fin marks you made, and draw a line up the body tube, for several inches. Then do the launch lug line. I like to mark the launch lug line with an LL so I don't accidentally glue a fin to the wrong place.
 |
| The yellow thing is an Estes Tube Marking Guide part. |
 |
| See? Perfect lines! |
Now it's time to glue on the fins. This gave me a real panic the first time I did it. I knew I would have to do this freehand, and I was pretty sure I would screw it up.
There are options for assuring that you get perfectly straight fins. But if this is your first rocket, try it freehand. It's not as hard as you think - you'll just have to hold the fins in place until the glue sets.
For low power rockets, most people use either wood glue - sometimes called "yellow glue," because it's yellowish - or "white glue" like Elmer's Glue All, so called because it's white. Some people use epoxy, but that's more for higher powered rockets, so for your first Skill Level 1 kit, just get some yellow or white glue. Do not use "school glue" or anything washable - it just won't hold as well.
 |
| Wood glue, white glue. I started with the Elmer's wood glue, but I've really taken a liking to this Titebond stuff. |
You can make the glue set better and in less time by creating a double glue joint. This works really well with wood glue, which is about all I use, because it creates a stronger bond - stronger than the material it's gluing, so the rocket itself will break before the glue does.
First thing to do is to put a small bit of glue on the root edge of the fin. Just dab a bit on the root edge, then spread it up the edge with a finger, so there's a thin layer of glue all along the edge. Then locate the place on the rocket where the base of the fin will sit - it's often, but not always, lined up with the base of the body tube (your kit's instructions will tell you where to put the fins - you may need to mark a spot on the body tube where they'll go). Put the fin exactly where you'll glue it down, pressing the glue to the body tube. Then remove the fin.
Yep. Remove it. We're going to let the glue on the fin edge and the body tube dry a bit. Then we'll re-glue it, and the "double glue joint" will set a lot faster, and be a lot stronger. Set the fin somewhere where the glued edge won't touch anything, and let the glue dry for a few minutes.
When I built my first rocket, the idea of getting the fins on straight was the part that made me hesitate. But I did pretty well with it. I did have to keep my hands on the rocket, and keep checking that I wasn't moving the fins, but I'm happy with the rocket.

The Estes Tube Marking Guide has a Kuhn-style fin jig at the end, which is helpful - sometimes. I've used mine on a few rockets, but I discovered quickly that if the fins are too thick, they'll barely fit, and if you're building a smaller rocket with more than three fins, it won't work at all...
 |
| Building the Estes Mini Honest John. With the Estes Tube Marking Guide fin jig, I can get opposite fins on, but not the two side fins. Those, I had to do by hand. |
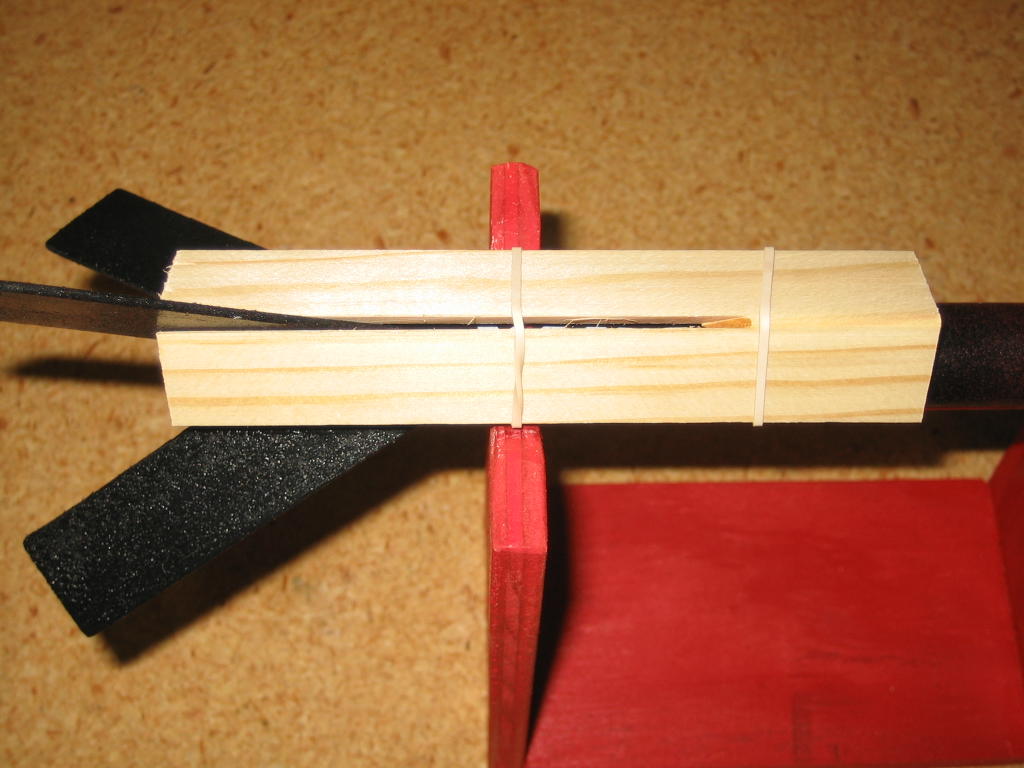
I recently invested in the coolest tool in my toolbox - the Guillotine Fin Jig, created by a guy named Ted Macklin, and sold by Apogee Components. Now, if you're just getting into rockets, and not sure how involved you're going to be, you might want to hold off on a lot of special tools. The Guillotine Fin Jig is not cheap - it's about $90. But it is so ingenious. It holds your rocket in place and holds your fins perfectly straight. So, if you're building your first rocket or so, do it by hand. But if you've decided that you really want to make more, better rockets, getting a fin jig like the Guillotine is a really nice investment.
It's also great for carrying stuff from one room to the other, if you tighten down all the nuts, because the body of it is basically a wooden box.
Back to gluing on fins! Once your glue has set for a few minutes, apply another thin layer of glue to the fin root edge, and carefully line the fin up with the fin line you marked on the body tube, and hold it - or jig it - in place. Let it set for a few minutes at least before you do anything. I leave mine in the fin jig for at least 20 minutes or so and get a snack or work on some other rocketry project.

 |
| There may be small gaps due to imperfections in the tube, or imperfect sanding - this is fine. Press the fin to the tube tightly for a moment and let the double glue joint do its work. We'll fill in any minor gaps later. |
 |
| Perfectly aligned fin. This is why I love good tools. You need skill to make a nice rocket, but a good tool can help you make a better rocket, with less of a struggle. |


Now the fins are on, and your rocket is starting to actually look like a friggin' rocket!
Next time, we'll apply glue fillets to the fins to reinforce them (and make them more aerodynamic), attach the launch lug, and maybe even prime this sucker and start painting! Stay tuned...
[Click here for Part 6]
Hello Daniel and welcome to the obsession! As you know by now, I'm the senior citizen who builds the Guillotine Fin Jig for Apogee Components and other neat stuff. I hope you will enjoy many fine builds using my contraption and post more pictures along your journey into this rewarding hobby. It is refreshing to see someone as enthusiastic as you are, especially considering that you got into this after reaching adulthood. And thanks again for your complementary review on my product!
ReplyDeleteTed Macklin
Van Alstyne, Texas