Tuesday, April 21, 2020

FlisKits Tres - A Challenging Build Part 3


Click here to go to the beginning of the build.

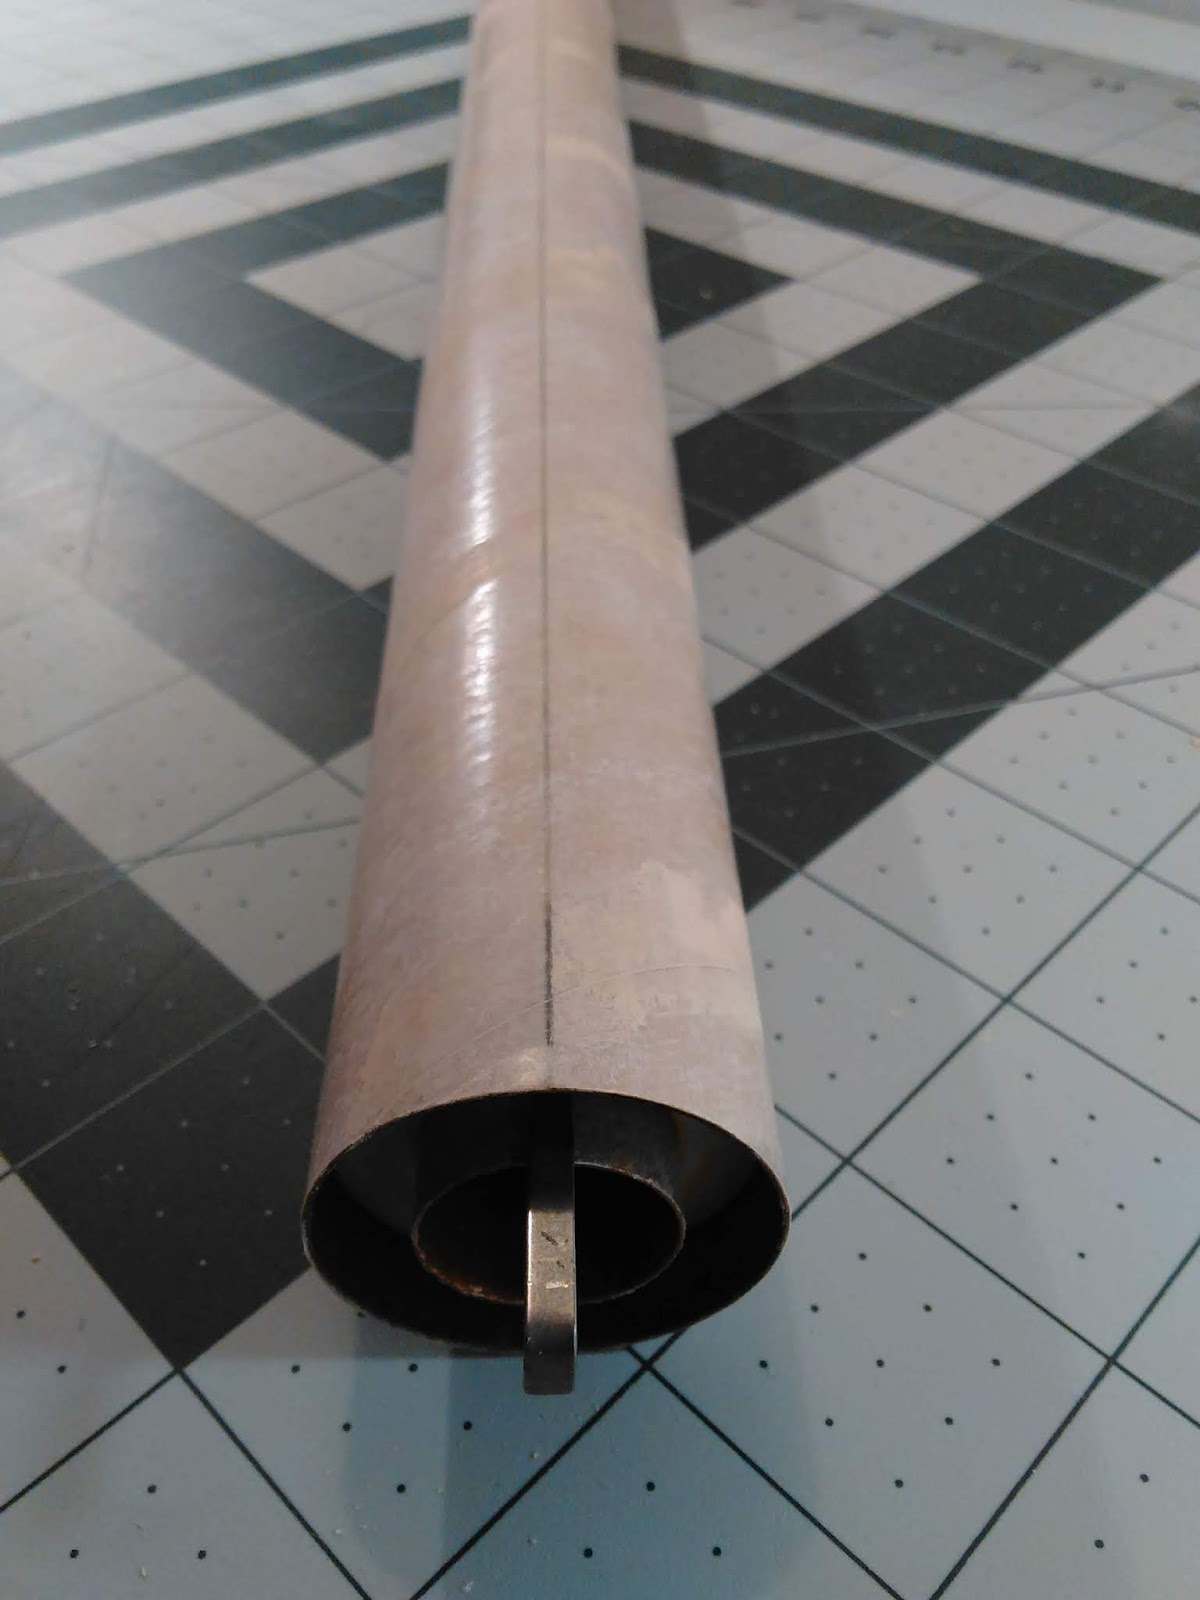
Once I had the motor mount installed in the FlisKits Tres, it looked pretty good and felt nice and solid. But there were small gaps between the motor tubes and the main BT-60 body tube. I suspect this may be the case for most, if not all, builders of this kit.

Those will need to be filled in. Now, it's not just that I don't like the way this looks. Remember that there is only one "centering ring" in this rocket, and it's at the very base, flush with the end of the body tube. So there's not a second ring at the top of the mount to make a nice, airtight seal.

When the ejection charges on the rocket motors go off, they need to pressurize the inside of the body tube in order to blow the nose cone off - and eject the parachute. If you have large gaps like the ones in the photo above, all the ejection charge gasses may just leak out the back. This would lead to a failure to deploy the parachute. The rocket would then come in ballistic, meaning it would nose dive fast and hard into the ground. This would most likely destroy the rocket - and is potentially dangerous, should it hit something or someone.

So, we'll need to fix that. To do this, we'll use glue and make a nice fillet around each of the engine tubes where they meet the body tube.

Even if your rocket has no gaps here, it's not a bad idea to put fillets around the motor tubes. It will hide any jagged edges you've got left, and will make the whole rocket look neater.

To make the fillets, I used the same thing I use for most of my fin fillets - Titebond No-Run, No-Drip molding and trim wood glue. Ever since hearing about this stuff from Chris Michielssen's Model Rocket Building blog, I've used it to make fillets. Swapping out the wide Titebond nozzle for an Elmer's fine point nozzle is a tip I picked up from Chris.


Because it's less prone to sagging and shrinking, and because it starts to dry quickly, this stuff is ideal for filleting these gaps.

I started by running a bead of glue from near the top of the motor tube to the end of the body tube.


You don't need such a thick bead, by the way. Most of this is coming off. When my bottle gets lower, sometimes I squeeze out a bead of glue, and there are gaps in it. So I went a little heavy here to make sure I had one, unbroken line of glue.

If you try to smooth the whole fillet in one swipe, you'll end up with a mess. By the time you get to the end, you'll have so much excess glue built up on your finger that it will end up overflowing the sides of your finger. It's better to do a few swipes and clean off your fingertip with a damp sponge or cloth.

So I started about a third of the way up from the back end, and swept the excess off toward the end of the tube.


I went another third of the way up, and again swiped to the bottom.


Finally, I flipped the rocket over, and attempted to smooth the last bit over the top end of the motor tube. My hope here was that with a few fillet layers, I could actually smooth that joint over, so it would look like the motor tube was simply a part of the body tube, like the branch of a tree, rather than having a sharp ridge where the tube was obviously poking through.

You may prefer to keep a sharp separation. It's an aesthetic choice.


As you can see, there was a bit of excess. That's easily cleaned up by going over it with a clean finger.


Allow the first fillets to dry, then do the other sides, allowing each to dry.

Don't worry if the glue shrinks slightly after the first fillet, leaving a little gap. Do another couple of layers and the fillets should not only close off any air leaks in the tube, but also look nicely rounded. This will show in the paint job.


Next up, the fins. That's my favorite part of a build - it's when the rocket really starts to look like something!

Follow me on Twitter.

Like my Facebook page for blog updates and extra stuff.

Have a question you'd like to see addressed on this blog? Email me at iamtherocketn00b@gmail.com. 

Sunday, April 19, 2020

FlisKits Tres - A Challenging Build Part 2


Click here for Part 1.

The three-motor cluster mount of the FlisKits Tres is canted, which means that, rather than pointing straight up through the rocket's body tube, the engine tubes stick out at an angle. Because of this cant, the tubes have to protrude through the body tube a little bit - you can't just slide the mount in like you would with a standard model rocket motor tube and centering rings.

This means you have to do some cutting through the body tube, and here's the part that might make a newcomer to model rocketry a bit nervous. You have to make some cuts with a hobby knife, and you have to do it freehand, so there's a possibility of making a critical mistake.

But it's not to worry. Unless you're extremely good with a hobby knife, the cuts will not be perfect, and even if they are, you'll probably have to do some cleaning up and fitting anyway. Go slowly, and even if the cuts are somewhat messy, they can be fixed. That's not to say you couldn't mess up and cut too far if you're not careful. Again, go slowly. You can do this.

On the card stock template sheet included with the kit are two fin marking guides. The "Main Fin Marking Guide" includes marks not only for the fin placement, but also for the motor tube cutouts.


On this rocket, the fins are evenly spaced between the canted motor tubes. Cut out this guide as you would with any fin marking guide.

On the guide are areas that will need to be taped to the rocket to keep the guide from moving. You'll be cutting right through this guide, and it's important that it not slide around. The guide gets wrapped around the BT-60 body tube and placed right at the end of the tube. Then put tape in the spots indicated on the guide.


It's important to be careful when taping. You're not only taping the guide to the outside of the rocket; on the bottom the tape will wrap around to the inside of the tube. You don't want to rip the tube when you take the guide off. So, either use a low tack tape, or stick the tape on your forehead or pants leg before taping it to the rocket. That will make the tape less sticky and you can remove it without pulling off any layers of paper from the tube.

Make pencil point marks where the arrows indicate for your fin lines. Then, you begin cutting.

What you want to do here is go slowly. Trace the cutout with your hobby knife. The goal is to cut through the guide, and lightly score the tube - so you are in fact cutting the tube, but you don't want to try and cut all the way through at this point.

Trace that line slowly, especially at the top end where it curves sharply. Don't expect it to be perfect - it almost certainly will not be, and that's OK. Try to keep your knife on the line, or as close to the inside of the line as possible.

When you're done cutting, it will look like this:


Remove the guide from the tube, taking care not to tear anything as you lift the tape.

Before continuing to cut, use an aluminum angle or door jamb to extend your fin marks all the way up the tube. It's best to do it now, because once the cutouts are removed, the tube end won't be as strong, and you may have a hard time drawing a straight line on the tube without the tube distorting.

Then, carefully go over the score marks to cut out the engine cutout area completely. Go slowly, don't press too hard, and just do your best to retrace the score marks you've already made. If you press too hard, you may find your knife suddenly cuts through and you end up with a slash mark all the way up the tube!

Once you've cut everything out, it will probably look pretty jagged.


Again, this is fine. You're going to have to clean it up anyway.

At this point, take your finished motor mount and test fit it into the body tube with the motor tubes in the cutouts. When you install the motor mount, the custom centering ring - that black disc with cutouts - should fit just inside the body tube and be flush with the end.

But, most likely, at this point, you won't even be able to fit the mount all the way into the tube. Your cutouts will be too narrow, and the motor tubes won't pass far enough into the tube. I suspect that even if you cut exactly on the lines of the cutting guide, the slots may still be too narrow.

Here's where you do your cleanup. You'll need a bit of sandpaper (probably about 220 grit will be just right) and a used rocket motor - one of the standard, 18mm A/B/C ones. Wrap the sandpaper around the motor casing, and use that as a tool to sand where you need. If you find it too awkward to hold, you can glue the sandpaper on.

I use self-adhesive sandpaper, so I just stuck that onto my used motor casing.


Test fit the mount into the body tube, and start by sanding away any edges which are too narrow and block the engine tubes from passing far enough into the rocket. You should be able to slide the motor mount in closer and closer to flush with each test fit.

When I first posted Part 1 of this build, there was something I forgot to mention. I've since gone back and edited it in. But I didn't think to do it when I was building, so that's why I forgot about it. Check to see that the centering ring actually fits into the body tube before building the motor mount!

Now, if, like me, you didn't do that, you may find, like I did, that the fit is too tight. In my case, the centering ring was just a little bigger than the inside diameter of the tube. You see this all the time in kits, and if your centering ring doesn't fit inside the body tube, just sand the edges lightly until it does.

If you've already built the motor mount, and the centering ring won't fit, you can still sand the edges with an emery board or sanding stick. It's not as easy as sanding with a bit of sandpaper before gluing everything together, but it's not too tedious.

When the motor mount fits and the shape of the cutouts is right, and the edges are relatively clean, you're supposed to sand a bevel on the inside forward edge of the cutouts with your motor casing, to give a better surface for gluing.

It should look something like this:


When everything looks like it dry fits correctly, you're ready to glue the motor mount into the rocket.


Put a thin bead of glue around the inside edge of the body tube where the centering ring will fit flush in the end, and a thin bead of glue on those beveled edges inside the tube where the motor tubes will butt up against them. Install the motor mount, and carefully tape all the edges of the body tube to the bottom of the centering ring.


This will ensure that the edges of the tube adhere to the centering ring, and that the motor mount doesn't push its way back out before the glue dries (a tight fit can make the assembly act a little springy).

Carefully remove the tape when the glue is dry. The mount should be solidly in place. You can pat yourself on the back. The hardest part of this build is complete.


You may notice there are gaps between the motor tubes and the BT-60 body tube. Not to worry - we're going to take care of that next.

Click here for Part 3.

Follow me on Twitter.

Like my Facebook page for blog updates and extra stuff.

Have a question you'd like to see addressed on this blog? Email me at iamtherocketn00b@gmail.com. 

Saturday, April 18, 2020

Nothing Flies Like a Flis - The Model Rocket Show - Episode 2 - FlisKits

Claude Maina's Streaming UFFO lifts off. Photo courtesy Jim Flis.

Episode 2 of The Model Rocket Show podcast is up, and I'm pleased how it turned out.

This show was meant to come out a year and a half ago, on The Rocketry Show, but one thing and another happened, and... well, I think we finally have a good episode.

Curtis Heisey's upscale FlisKits Deuces Wild

We're talking about FlisKits, and in the first half of the show we revisit the final FlisKits Anniversary Launch from September of 2018. Then we spend time talking to Ray DiPaola, one of the current owners of FlisKits.

Jim Flis, the company's founder, has already told me he liked the show, which was my hope. I love seeing Jim at launches. He's a great guy, and I know he was probably looking forward to hearing what we recorded so long ago.

Jim Flis holding a Saturn V prototype. Photo courtesy Curtis Heisey

The show is on most podcast apps or on the show's website (with some show notes and photos), if you prefer to listen on the web (click here to go to the website and show notes).

Give it a listen. I hope you'll enjoy it.

Part 2 of my FlisKits Tres build is coming soon.

Follow me on Twitter.

Like my Facebook page for blog updates and extra stuff.

Have a question you'd like to see addressed on this blog? Email me at iamtherocketn00b@gmail.com. 

Wednesday, April 15, 2020

FlisKits Tres - A Challenging Build


To get better at building more challenging rockets, you have to build more challenging rockets. Often, rocketeers will hold on to a model for years, thinking "I'm not up to that skill level yet," or "I need to do this one justice!"

It's understandable. Some models - scale kits, particularly - hold a special place in rocketeers' hearts. And their wallets. And they can tend to be difficult to build perfectly.

Some rocketeers look at the "skill level" on an Estes kit and think Level 3? Level 5?? Expert??? No way!

I used to try for perfection, and since I always make some mistake, there are rockets I waited ages to build, and some I figured I'd never be able to tackle. But it helps to realize that, while some advanced rockets truly are harder, there's no ajudicating body on "skill level." Even if you build an advanced rocket beyond what you've done in the past, it's unlikely you'll end up with something that's not flyable. And if you take your time, it will probably turn out better than you thought it would.

In any case, if you want to have nice looking, harder to build rockets, you have to be willing to build beyond your skill level and just try it. Challenge yourselves, newbie rocketeers, I say!

Maybe don't start with something rare, out of production, or really expensive. But other than that, just give it a shot. Instead of perfection, I now aim for pretty good - as good as I can get it - but I don't beat myself up over mistakes. And I usually have pretty good results.

* * *

Anyway... FlisKits!

The next episode of The Model Rocket Show, dropping early this Saturday, is all about FlisKits, a small indie model rocket company from New England. The episode has been a year and a half in the making. I know, this is only the second episode of the podcast, so how could it have taken over a year to make this episode???

Well, it's a long story. Just listen to the show.

I decided recently, since we're all stuck at home and I'm finally putting this show together, I should actually build that FlisKits Tres I bought directly from Jim Flis over four years ago.

The Tres is a large, 3-motor cluster model with canted motor tubes. If you look at the image at the top of this post, you'll see that means the motors stick out the sides a little. This makes for a wide jet of flame and smoke, and it's a fun rocket to watch fly.

But that motor mount is the main thing that's the challenge in this rocket. I thought I'd do a build on the subject.

I have no picture of just the parts laid out on the table, but the rocket is made up of one 18 inch BT-60 tube and one 18-inch BT-55 tube, balsa nose cone and transition, and balsa sheet - that means no precut fins!

Since this is a cluster rocket, there are three 18mm motor tubes (that's A/B/C sized engine tubes for you fellow Rocket N00bs).

Here they are:


Each tube has a mark 3/4 inch from the bottom. Going through that is a straight line all the way up the tube. Use a small piece of aluminum angle for that, if you have it, or just use a door jamb as you would with fin lines on any model rocket.

Engine block rings (also known as "thrust rings") are glued inside the tops, flush with the ends. So far, so easy. These are your motor tubes. No engine hooks will be necessary for this rocket.

There is a sheet of card stock in this kit you'll use for a number of parts of construction. To assemble the motor mount, there is a small shroud you must cut out from this card stock. You'll also use the custom centering ring, which is more of a round card stock plate with three little divots cut out.


You cut the shroud out with a hobby knife and straightedge. Instructions tell you to "lightly score" all the fold lines on the shroud with a hobby knife.

Be very careful not to cut the shroud at this point! I happened to have a very dull knife blade handy, so that worked. But all you are doing is making sharp fold lines in the card stock, not actually trying to cut it. If you don't have a dull blade, or are worried about using too heavy a hand with the knife, you could use a small dowel you've sharpened to a point in your pencil sharpener, or even a thumbnail.

Apply a very small amount of glue to the glue tab and glue the shroud together.

EDIT: When I first posted this, I should have mentioned that it's a good idea to test fit the custom centering ring into the bottom of the BT-60 body tube. It should just fit inside the tube, like a standard centering ring. If it's slightly too large, you can sand it before proceeding to build the motor mount.

I didn't check, and when I went to install the motor mount, the centering ring butted up against the body tube - it was almost the same diameter as the tube itself. Not a problem if this happens to you - you can still sand that ring. It's just harder, with all the engine tubes glued on. But I did it rather quickly, using an emery board. Most mistakes are fixable.

Once the glue has dried, you can put a thin bead of glue onto the bottom edges of the shroud, carefully line the corners up to the divots in the custom centering ring, and then glue the shroud to the ring.


This might seem pretty flimsy at this point, but believe me, this will work! Once the glue has dried, you can put a thin fillet around the base of the shroud where it contacts the centering ring, for added strength.

I don't have pictures of every step in the next part of building the motor mount, so I'll try and describe it as best I can.

Run a bead of glue down one corner of the shroud, and on the edge of the same cutout in the centering ring. You want a thin layer of glue here, I think. You don't want a large glob of glue.

At this point, I'd recommend waiting 60 seconds before gluing the motor tube on. If you apply the tube immediately, and have a lot of glue, you're going to have to hold the tube in place for a long time. You might involuntarily move the tube out of alignment. You might drop it and get glue everywhere.

So, wait 60 seconds. The thin layer of glue will start to get tacky. Then you can lay the motor tube in place. Line up the 3/4 inch mark on the tube with the centering ring, and use the mark up the tube as a gluing guide for the shroud.

Hold it in place until it sticks, then set it safely aside for it to dry a bit, before proceeding with the other two tubes.

For good measure, I applied fillets between the motor tubes and the shroud and centering ring, everywhere they came into contact. The whole construction seemed pretty solid and really neat when it was complete.


That's the canted motor mount for the FlisKits Tres. As you can see, it's not that hard if you work carefully.

Wait... Installing the motor mount - that's the hard part.

But it's also not too hard. We'll hit that next time.

Click here for Part 2.

Follow me on Twitter.

Like my Facebook page for blog updates and extra stuff.

Have a question you'd like to see addressed on this blog? Email me at iamtherocketn00b@gmail.com. 

Thursday, April 9, 2020

The NAR Announces More COVID-19 Delays


From National Association of Rocketry President, John Hochheimer:

NARAM 62 Update: The COVID-19 pandemic creates significant uncertainty associated with holding our planned summer events. Therefore, the NAR is postponing NARAM 62 and will hold it in 2021. Please note, by making the decision now, the NAR minimizes its substantial financial risk associated with making a decision to postpone or cancel at a later date. We are working closely with the host Section's leaders and the Contest Director, the launch site owners, and the hotels and meeting spaces to reschedule. I will announce updates as soon as we can finalize all the arrangements. All currently paid registration fees will be refunded as soon as possible.

NRC 2020 Update: In accordance with guidance I issued on 3/292020, NRC launches, as well as sport launches, remain suspended until at least April 16, 2020. When NAR launch activities resume, Dan Wolf, the Contest Board Chair, will provide details on how the 2019-2020 NRC will continue into 2021.

NSL 2020 Update: The NAR continues to have flexibility and minimal financial risk in the go/no-go decision process for the National Sport Launch 2020. Because we have no financial burden, the NAR will wait until early May to make a final decision. In the event of cancellation, all registration fees paid prior to cancellation will be refunded.

Annual NAR Meeting and Board of Trustee Elections: Since we are postponing NARAM, there will not be an in-person meeting of the Association and in-person voting of trustees. We are working on options to hold some form of association meeting and will provide details when they are available. Our election of trustees will be held as usual, with the exception of the capacity to vote in-person. On-line voting will be available, as will paper ballots that will be mailed in the next edition of Sport Rocketry.
An update on large group gatherings (such as launches and meetings) will be issued by April 15.

Follow me on Twitter.

Like my Facebook page for blog updates and extra stuff.

Have a question you'd like to see addressed on this blog? Email me at iamtherocketn00b@gmail.com. 

Sunday, April 5, 2020

Building Model Rockets Out of Order - When I Deviate from the Instructions


I often build model rockets out of order.

The Handbook of Model Rocketry emphasizes time and again "Always read the instructions!" And while this is good advice, after you've built a number of rockets, you might find it helpful to deviate slightly from those instructions from time to time. Here's an example.

Estes' instructions usually have the build order go as such:
  1.  Prep fins
  2.  Assemble engine mount
  3.  Mark the body tube for fin placement
  4.  Glue the fins on
  5.  Glue on the launch lug
  6.  Glue the engine mount into the body tube
Et cetera...


I don't like doing it this way! You'll notice numbers 3-6 in the above list are italicized. That's because I always, always do those steps out of sequence when building a model. I do this for a few reasons.

I want the launch lug to line up with the engine hook. Many models have the motor tube flush with the base of the body tube, which means I'll often use a tool, such as my sanding block, to push the engine mount flush with the back of the rocket. I like to give the motor mount a twist when installing it, to ensure there's a nice bead of glue all the way around the centering rings for a good bond. And, because I'm a fussy builder, I often use a tool to make sure my launch lug is on perfectly straight.

Now, I find it easy to forget to pay attention to the marks on the outside of the body tube when installing the motor mount. Some models, especially those like the Big Bertha, have fins that are far swept back, meaning it can be hard to get a tool up to the base of the rocket if the fins are already glued on. And if the glue catches when the motor mount is only partway in, you may have to give a bit of a push - I don't want to break any fins off while installing the motor mount! Sometimes far swept fins can make it tricky to get even your fingers up in there to do some adjusting. And the fins would usually be in the way if I wanted to use a piece of aluminum angle to check the alignment of the launch lug.

The order I usually do the steps above is: 6, 3, 5, 4. I build and install the motor mount before anything else.

Before I make any marks at all on the body tube, I install the motor mount. Once it is glued in place, and the glue is holding (so that the mount won't slide in or out or rotate in place), I will mark the launch lug line.

I line up an aluminum angle with the engine hook and make a line all the way up the tube.


Now I know that the launch lug will be in line with the engine hook. I'm not going to accidentally forget to turn the motor mount so the hook is lined up with a launch lug I've already marked and glued on.

There are two reasons it's best to put the hook and the launch lug on the same side. First, it's neater. The launch lug is essentially the back side of the rocket. With the rocket on the launch pad - or on display - you won't see a hook sticking out the bottom if it's on the back.

But the second reason is more critical. If the launch control clips touch the hook, they'll create a short circuit. Electrons are lazy - they take the easiest route. Since a metal hook has less resistance than the bridge wire of a starter (or igniter), the current will flow from clip to hook to clip again, and back to the launch controller without passing through the starter. The rocket motor won't ignite!

Keeping the engine hook on the back side makes it less likely you'll get a short.

So, I glue in the motor mount, not worrying one bit about aligning things. Then I mark the launch lug line. And then I wrap the fin marking guide around the rocket. I line up the marks for the launch lug with the line I've already made, then mark the fin line locations with a small pencil mark.


Then I remove the fin marking guide and draw the fin lines up the tube. You can use a door jamb for this, or a drawer's edge - either of which you might find in the instructions. But I prefer to use a piece of aluminum angle.

Cheap, and widely available at home improvement stores and online, aluminum angle is a great tool for model rocket builders.


Because of its shape, it sits perfectly on a tube, giving you a nice straight edge. It's like a ruler which won't move when placed on cylindrical stock.


Aluminum angle is thin and makes a sharper, straighter line than a door jamb. It comes in 3 foot lengths or more, so you can mark all the way up the body tube.


Some instructions suggest making a mark only a few inches long, but I always prefer to make my fin lines and launch lug line all the way up the length of the tube.

Someone at a club meeting recently asked me why I do this.

The reason is that it's easier to make sure things are on straight if you have a reference line going all the way up. You can sight through the launch lug and over the tips of your fins once their glued on, but before the glue has dried. This will help you determine if things are truly in line, or if they just look like they're straight.


So, my tip for you is to mark the whole length of the tube.

In the case of some kits, such as the Estes Nike-X, the instructions actually tell you to do this, because you're going to glue on some forward fins and some canards up near the top end of the rocket. But I recommend it for every build. It's just a helpful way to check your work.

Next, I usually glue on the launch lug. I do this before gluing fins on, because it enables me to use a piece of aluminum angle to ensure the launch lug is perfectly straight. I glue the lug on, and while the glue is still somewhat wet, I gently slide the aluminum angle in place next to the lug, and I can adjust the straightness of the lug using the angle as a straightedge.


If the fins were already glued on, this wouldn't really be possible, because they'd get in the way of the aluminum angle.

Now, I don't find this step too critical. It's not hard to get a launch lug on straight by siting up the line through the lug. But, as I said above, I'm a fussy builder, so I like the added assurance I've got the lug on nice and straight. And in the case of rockets with two lugs, I always do this.

I glue the first lug on, making sure it's straight with the aluminum angle. Once the glue has dried, I glue the other one on, pressing the angle gently against the dried lug, and using it to guide placement of the second lug. This ensures that the two lugs are perfectly in line.

If you don't want to bother with that, or don't have an aluminum angle, my tip of drawing the fin and launch lug lines all the way up the rocket will help you, because you can sight up the rocket through the launch lug, to make sure it's nice and straight.


When everything is lined up, I finally glue on the fins.

Follow me on Twitter.

Like my Facebook page for blog updates and extra stuff.

Have a question you'd like to see addressed on this blog? Email me at iamtherocketn00b@gmail.com.