A year ago, I did a fundraiser for the Bloomington Playwrights Project, called The Playoffs. As an incentive to donors, I offered to design and build rockets for anyone who donated in my name.
Longtime blog readers may remember a rocket I built, originally called "Keith's Rocket," then renamed the Copperhead.
It turned out really nice.
The design
The finished rocket
I liked the results so much, I'm now building one for myself.
I gave the rocket to Keith, but then moved to Boston, so I never got to see it fly... until he sent me the video.
So exciting to see one of your own designs get launched!
I designed this rocket with only about six months' experience as a rocketeer. Even if you're a rocket n00b, you can design and build your own rockets, and sometimes you come up with something really cool.
I can't wait to finish mine. I've even decided to add a booster, making it a two-stage rocket.
Like my Facebook page for blog updates, pictures of current projects, and extra stuff.
This post is about a current project I'm working on. Pictures of current projects will mostly appear on The Rocket N00b Facebook page, so I can focus the blog more on informative stuff for beginning rocketeers. But I think this post has some information for rocket n00bs, so here it is. Check out the Facebook page for more rocket pictures, blog updates, and links to cool stuff.
A few months back, I designed and created a little model rocket as a thank-you for a donor to a fundraiser I was doing for the Bloomington Playwrights Project. It's called The Copperhead.
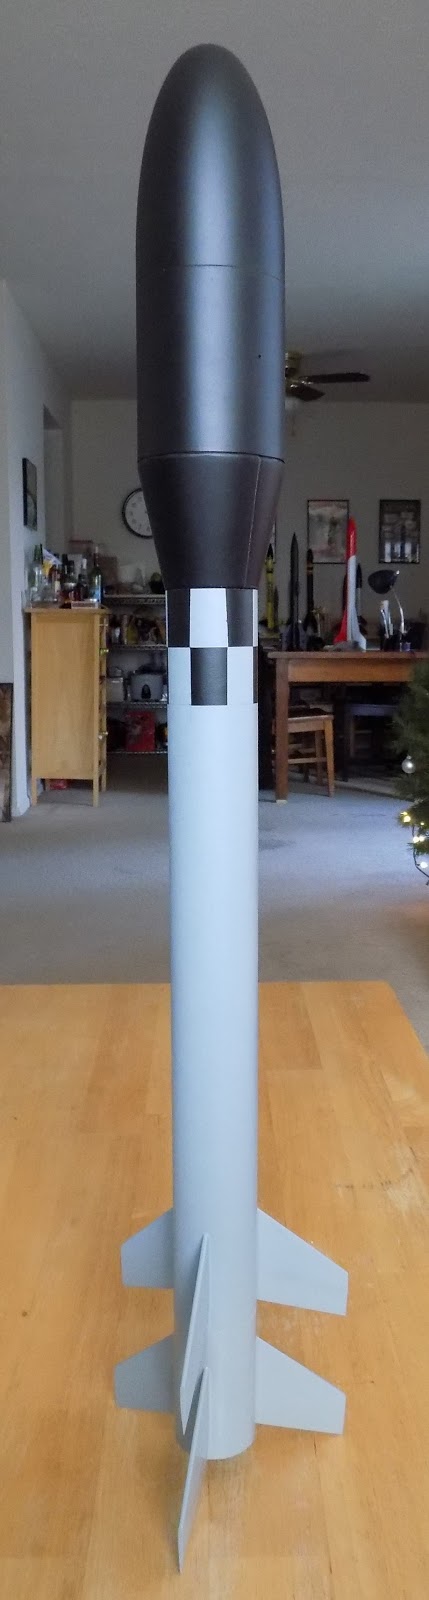
Once I'd built the rocket, I really loved it, but never got to see it fly. I decided to build one for myself. Last night, while working on about seven other rockets, I just started working on it.
The rocket has forward-swept fins and a small payload section. Look closely at the payload section - the fat upper part of the rocket. There are four tiny holes drilled into the side. That will allow me to use a barometric altimeter in the rocket, so that I can track how high it goes.
While the rocket looks really cool, it's always surprising to see how they come together. The parts alone don't look like much.
A few standard-sized tubes, a sheet of basswood, and a nose cone purchased online look kind of humble when you first begin building a rocket. The parts can come together quickly, though, and before you know it, you have a pretty great-looking rocket.
Much as I like the standard Copperhead, it suddenly hit me how easy it would be to put a booster stage on it, transforming it into a two-stage rocket. Here's what the design file looks like:
The first motor launches the rocket into the air. When the propellant is burned up, it ignites the motor inside the upper stage, and the booster is jettisoned and tumbles back to Earth.
Adding a stage to a rocket can boost its altitude - and its velocity - dramatically. Instead of launching the main part of the rocket - called the sustainer when it's part of a multistage rocket - from the ground, you're basically launching it from high in the air, already moving upwards. The results can be spectacular. Adding a booster to my Copperhead rocket will take its peak altitude of 740 feet up to over 1300 feet - nearly double!
If you understand the basics of rocket stability and model rocket staging, you could probably build a booster for just about any model rocket, adding altitude and speed. Imagine making that fat, heavy Big Bertha into a high-flyer! But beware, this increases the likelihood of losing the rocket! When launching a multistage rocket, you need a larger field, and may need to put less powerful motors in it.
But building a booster requires only a few extra parts, some knowledge of the staging process, and a little modification and care in building the rocket. I'll cover staging here more extensively in the future.
Here are all the parts I'll need to build this rocket with a booster stage, minus a shock cord and parachute:
The brown tube in the right is a tube coupler. I'll only need a 1-inch length of it. The motor mounts are already installed in the main body tube and the booster body tube.
Still looks like a pretty humble pile of parts, doesn't it?
That's one of the many cool things about rocketry. You start with some simple paper and plastic bits, and end up with an astonishing flying machine.
I like the forward-swept fins on this rocket, and with a booster in place, it will look even better.
OpenRocket allows you to create a kind of "artist's conception" of what the final rocket will look like in flight.
My schedule is all over the place. Sometimes I work late at night; sometimes early, early in the morning. All this back and forth has left me with less time than I'd like for rocket building or blogging. I get maybe two good building days a week, and I work slowly.
Fortunately, I have OpenRocket - free rocket design and simulation software.
As any gamer or couch potato can tell you, even if you're really tired, you can still spend hours fiddling around on your computer.
So, when I don't have the time or energy to build rockets or write about them, I play around with different designs. It's a way of staying an active rocketeer when I'm too busy to be actually building.
Once you know the basic principles of stability and rocket construction, it isn't that hard to design a basic rocket - or at least to get one started. You might need to make revisions, weigh components and change a few things, but you can come up with some cool basic designs in short order. I've even built and flown rockets that took me 20 minutes to conceive, and I only had to make minimal revisions.
Here are some designs I've been working on.
The Circe Series
I started this the other night. I wanted something simple to replace my lost Estes Hi Flier - a small, lightweight, high-flying rocket. It performs so well because it's a minimum diameter rocket - meaning it is only as big around as it needs to be to hold the motor. It has no motor mount - the body tube is the motor mount!
Circe A - a small rocket which will hold a standard 18mm diameter (A-C) motor, and go quite high
Though I am trying to build bigger and bigger rockets (and currently building two of my Estes Pro Series II rockets), I just had the urge to design this little thing.
OpenRocket has a scale function, so you can take a rocket of a particular size and scale everything up or down by the same amount. So while Circe A (pictured above) will only take a C sized motor, Circe B looks exactly the same, but is larger and will take a D or C motor. When you scale things up in OpenRocket, sometimes you have to adjust components, because, for example, the mass of the nose cone might actually end up being much greater than the part you actually have on hand. Other than that, it's pretty simple.
I went up to a BT60 sized rocket with the Circe series before going to bed. BT60 is a 1.637 inch diameter tube, and is the same size as the Big Bertha. The cool thing about the BT60 is that it's just the right size to fit a cluster of 3 standard motors.
Circe C2 - looks much the same, but has a cluster of 3 motors. You'll notice the nose cone is slightly shorter - this is due
to the size of nose cones I have on hand, which are a of slightly different ratio than the BT20 nose cones I have.
If you're an advanced rocketeer and are good at making stuff from scratch, you can make your own parts. All of them - even the body tubes. And, of course, nose cones.
I'm not to that level yet. I don't have access to a wood lathe, and I haven't picked up the skill of designing and making a custom-shaped nose cone. Fortunately, there are a lot of good parts on the market.
So what I do, for now, is look at the parts that are available - either in my parts box, or online, and design around that.
Here's a lovely balsa wood nose cone I picked up from JonRocket months ago.
This shape is a spherically blunted tangent ogive, and the nose cone fits a BT70 tube, which is about 2.2 inches in diameter. This is getting toward the higher end of body tube size you'll find for low power model rockets, and into the mid power range. If you're new to model rockets, this thing will look huge to you - there are not many BT70 kits out there!
I have realized I need to get more of these, or get some other BT70 nose cones, because over the months, I've designed a number of rockets around this very nose cone.
One of the first was called Horus.
The Horus Series
People give rockets all kinds of zany names. A quick look at an Estes catalog gives you some idea - Sizzler, Prospector, HiJinks, etc. A rocket can have any kind of name. But I guess I'm more of a classical kind of guy. I like to name my rockets after Greek, Roman, or sometimes Egyptian gods or mythological characters, or after celestial bodies. Horus is the falcon-headed Egyptian god of the sun.
Seemed like an appropriate name for a rocket.
I wanted to design my own rocket which looked vaguely like the Sirius Rocketry Eradicator - a beautiful rocket which has been on my wish list since I first saw it - but would be simpler to design and construct for a n00b.
The Eradicator, from Sirius Rocketry, available here
(Eradicator - there's an interesting one. I love this rocket, but the name reminds me of this Kids In the Hall sketch)
No offense, Sirius Rocketry - you guys are awesome!
Anyway, I love the two differentiated diameters of the airframe on the Eradicator. I designed this one:
Not too bad, I thought. But in order to get a minimum of 1 caliber stability, I needed to have 5 fins, if they were to be swept forward. I was able to decrease the number of fins to four by adding fin vanes.
This increases the surface area of the fins, moving the center of pressure aftward, without making the fin span inordinately wide.
The Eradicator has a lot of great detail - it looks like a real launch vehicle. That level of design was a bit advanced for me. That's not to say you can't add additional detail to the build, but it's tricky to add it to the OpenRocket design.
FMLV
This is a simple recent design, but one I like and am building now. It's another BT70 design with a 24mm motor mount. Like the Circe rocket, it's got swept back fins, but as you'll notice, the tips are not parallel to the rocket.
I've seen a few designs like this recently, and I like the look of it. Actually, a lot of classic kits have fins like this, but I've only just recently thought of changing the shape of the fins in OpenRocket.
You can select a few basic fin shapes in OpenRocket. I almost always opt for "trapezoidal," and then simply change the dimensions of the root chord, tip chord (chord is the distance from the leading edge to the trailing edge) and height (the distance from the airframe to the tip of the fin).
That means that most of my designs look like this:
Imperius, formerly known as the "Donor's Rocket"
See how the tips of the fins are parallel to the rocket body tube? Nothing wrong with that, of course.
But part of what gives a rocket its character is the shape of the fins. I went with a few designs that had the fins swept forward, like the Horus series above, and the Copperhead (formerly known as "Keith's Rocket").
And I like these designs. But you learn by playing with the tools you have, so I decided to try a different shape. Still simple enough to cut with a ruler and hobby knife, but a little different from what I'd made before.
FMLV stands for First Massachusetts Launch Vehicle, because it's the first scratch design rocket I'm building here in Boston. I'm using a 24mm Estes "quick release" screw-on motor retainer so that I can use my newly-acquired AeroTech 24mm reloadable casing, or an Estes black powder D or E motor.
That gives me a lot of motor options.
It will also be the first rocket I build from scratch which will have through the wall or TTW fin construction. This means that the fins have tabs at the base which will go through slots in the airframe and attach directly to the motor tube. You fins this as pretty standard in mid power and high power kits, and even some Estes low power kits, like the Cosmic Explorer.
Attaching fins to the Cosmic Explorer. In this kit, the slots are already cut for you.
Of course, in a kit, the slots are cut for you. For the FMLV, I'll have to cut my own fin slots for the first time.
BT80 Rockets
Also included in my parts box is a BT80 sized parabolic nose cone.
You may have noticed that this nose cone has a similar profile to the Big Bertha nose cone, but while the Bertha uses a BT60 body tube - 1.637 inches in diameter, the BT80 is 2.6 inches in diameter. For a beginning model rocketeer, that's really big!
Regular readers of the blog may also recognize this nose cone as part of the ICU2 camera payload bay from Make: Rockets: Down-to-Earth Rocket Science by Mike Westerfield, which I used in the design of the Janus II two-stage rocket.
Since I had another one, I played around a little with a few designs.
A really large rocket, called Titus, after my girlfriend's nephew.
Meh... This kid needs to have a cooler looking rocket named after him.
Also played around with a large two-stage rocket.
Could be fun, especially with the two large 24mm diameter motors. But still a little inelegant. It was probably late at night when I did this one.
I might make a larger, not-quite-proportional version of the Copperhead rocket pictured above.
A larger Copperhead design with the BT80 nose cone, and a 29mm motor mount, for E, F or G motors
Of course, the Janus II with its payload bay was lost on first flight, so I may just rebuild that...
Finally, a design I nearly forgot about. This must have been months ago.
Arrowhead
I had this idea when building both Sounder I, a tiny minimum diameter rocket I lost on its first flight, and the Ceres B booster, again from Mike Westerfield's book.
I stacked one on top of the other with a balsa transition I had in the parts box.
It reminded me of some of these:
This looks like a two-stage sounding rocket, but it's really just one stage. Not that you couldn't do a two-stager here, but it would require some electronics I haven't worked with just yet.
I haven't discussed staging on the blog yet, but in brief, most model rockets with multiple stages rely on the first motor igniting the second. The first motor has no delay grain or ejection charge, or even clay cap.
The propellant is exposed at the forward end of the motor, so when it burns up, hot particles shoot forward into the nozzle of the second motor, igniting the second stage propellant.
Many multi-stage rockets have the motors touching each other. This is known as contact staging. There can be a gap between them, in what is known as gap staging, but the gap can only be so wide - 12 inches is probably the maximum.
This rocket is longer than that, and the two parts are separated by a solid balsa transition, so there would be no way for the hot propellant particles to reach the top portion. You can make hollow paper transitions, but I'm not very good at that yet, and balsa transitions of all sizes are available online.
Again, for a beginning designer, working around available components is the easiest way to get started.
High power rocketeers do multi-stage rockets using altimeters, or sometimes timers, to electronically ignite upper stages in the air. This is known as an air start.
I feel guilty for not blogging much recently. Between teaching rocket camp, my day job, and preparing to move to Boston a week from Tuesday, I don't have much free time.
But camp has been going well. Several parents have told me that their kids have learned a lot. Which is great - and sort of surprising. These kids have absorbed a lot of technical information. Sometimes I've mentioned something once on one day, and half the kids don't look like they're even listening, and two days later, I'll ask a question, thinking I'll need to re-teach the information - but the kids know it! Concepts like total impulse and center of pressure are not easy to grasp at first, but these are some smart kids.
Anyway, rather than writing up each week in separate posts, I'll take what I've learned about teaching rocketry when I'm all done, after Friday. While this blog is partly for people who are n00bs to rocketry, maybe there are a few more experienced rocketeers who are n00bs to teaching rocketry, and maybe my experience will help you prepare.
In any case, I was able to get a little painting done. Ivy Tech has a really nice spray painting booth, and I was able to get Keith's Rocket painted. I'm pretty proud of it.
I'd originally bought the copper paint for the fins on the 3D Rocketry Nautilus II, but that rocket was lost before it was finished. Still, it looks great! I'm going to have to build one of these for myself.
The rocket has a payload compartment. Four small holes - known as static ports - allow you to fly with a barometric altimeter, such as the Jolly Logic. An altimeter needs to breathe to function, so you put static ports in your rocket to allow the payload compartment to equalize in pressure with the air outside the rocket.
I have four more Donor's Rockets to finish painting. I hope to launch these next week - after rocket school!
Here, the Ivy Tech Rocket Kids launch one of Chad's rockets: