Wednesday, January 26, 2022

I Made Something!


I made a mug! It's real, and it's here, and it's beautiful!

I've been working on building an Etsy shop (and a Redbubble shop as well), and this is sample of my first item - a Robert H. Goddard coffee mug!


And this is kind of a rough draft, too. I got so excited when I was making this, I ordered a sample right away. Then I decided to sharpen and color correct the image a little before finalizing the design, and I think I even made it slightly larger (though only a tiny bit). So, customers are going to get an even nicer looking version of this than I have.

Not only that, I could have ordered samples of some of my other products at the discounted rate if I'd just calmed down and thought it through... No matter, it's here, and I love it.

I really, really like this thing, and I've been counting the days until it arrived.

The shop is really new and has six items (eight, really, if you count the kids' sizes), but there's more on the way. If you're interested in checking it out, here's the link:

https://www.etsy.com/shop/RocketN00b

I post a lot of things on Instagram these days. Follow me here.


Like my Facebook page for blog updates and extra stuff.

Have a question you'd like to see addressed on this blog? Email me at iamtherocketn00b@gmail.com.


Saturday, January 15, 2022

The Estes V2 - Epoxy Fillets

I put epoxy fillets on the V2. A follower on Instagram suggested JB Weld epoxy for this model, which I always have on hand. After some thought, I decided to try it, and it turned out really well.

Since it's a steel-reinforced epoxy, I had assumed JB Weld wouldn't be sandable, so I'd have to get the fillets perfect on the first try or there would be no fixing it. This turned out to be wrong - you can sand JB Weld if you need.

When making epoxy fillets, I find it best to tape off the outline to keep it clean. To make a small radius, round fillet, I chose a bamboo chop stick.

I started by marking the edges of the fillets with the chop stick. Using a soft graphite sketching pencil, I rubbed the end of the chop stick with graphite and ran it along the root edges of the fins. 


Next, I taped along these marks.

The lighting is terrible because the blue tape completely threw off the white balance of my phone camera, and I couldn't fix it for the life of me.

Due to the curvature of the boat tail, I used multiple pieces of masking tape to follow the marking on the fin and get an appropriately shaped fillet.

To keep things relatively neat and reduce wasted epoxy, I sacrificed a medical dosing syringe to lay down a bead of epoxy. Just a little did the trick.


It may not look like enough for a good fillet, but once I smoothed it out with an alcohol-dipped chopstick, the fillets spread to fill the taped-off area and looked good.

Because it's so thick and doesn't sag or self-level, I was able to do all four sets of fillets in one go. I let about an hour or so pass before trying to do any touch up with an alcohol-soaked swab.

The end result is really great. Not too heavy on the back end, and even the one fin which was slightly loose is now solidly attached.

I wouldn't use JB Weld for larger fillets, as it comes in small tubes and might get a little expensive if you use it for something large. But I can see turning to this for some smaller projects.

The basic build is done. Apart from some cleaning up of the nose cone ridges, the V2 basically ready for primer and paint. I'm pretty pleased with how this turned out and look forward to painting it and showing it off at the field next season.

I post a lot of things on Instagram these days. Follow me here.


Like my Facebook page for blog updates and extra stuff.

Have a question you'd like to see addressed on this blog? Email me at iamtherocketn00b@gmail.com.

Wednesday, January 12, 2022

Estes V2 - Fins On!

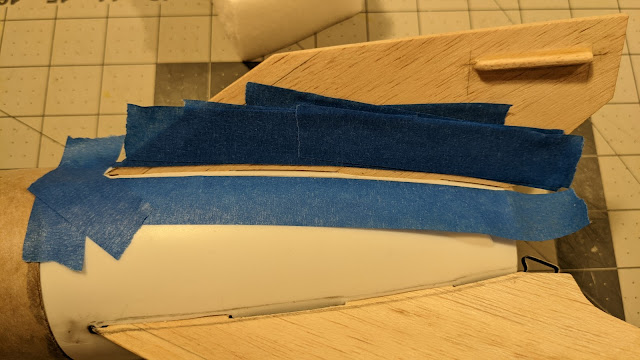
Fins are on the V2, and it's looking good!

Wood glue worked. Even the fin with the slight gap between the tab root and the motor tube is attached - but only just. There is a bit of wiggle. The forward tab is probably not attached at all. Due to the way the rocket is constructed, there are gaps between the fin root and the boat tail.

Both of these issues will be taken care of by adding a good fillet to the fin roots. Instructions don't mention fillets, but there's good reason for them. The V-2 missile had significant fairings at the bases of their fins, so it makes sense from a scale modeling standpoint.

From Wikimedia Commons. Photo Credit: Jan B.H.A. Vervloedt (photo) Ad Meskens (scan)

For most low and mid power rockets, I prefer simple glue fillets. But here, because of the plastic, the significant gaps, and the weak fin attachment, I'll opt for epoxy fillets. This will also allow for larger radius fillets, for the look.

My original thought was to go with one of two choices - Bob Smith 30 minute epoxy thickened with microballoons, or some kind of epoxy clay.

I already have microballoons on hand. I've used them before with good results. Microballoons make epoxy lighter, but thicker and less prone to sagging while it cures. It's easier to sand if needed.

The downside is that adding microballoons to epoxy makes it brittle. I have one rocket with cracks in its beautiful fillets, even though it's never had a terribly hard landing, because of the microballoons. (They're made of silica glass, so they make epoxy much more glass-like.) And though it's less prone to sagging than straight epoxy, this mixture can still run a little as it cures. Since these fillets will be on the boat tail, I'd probably need to keep a close eye on them for at least 15-20 minutes to make sure they aren't pooling on the tail end, or running off. And, of course, epoxy is messy.

Epoxy clay seems easy to shape and work with. It is apparently sandable when it cures. It won't sag or run.

But, I don't have any, I've never worked with it, and it's dense, so it'll add some tail weight. Since I trimmed the fins, I need to shift the CG forward. Extra weight in the fillets means extra weight in the nose, and if I add too much I'll need more powerful motors for a decent flight.

Apogee Components sells a product called Fixit Epoxy Clay. There are others as well. But since I've never used it before, I would have to spend the money to try it out - and what if I didn't like it?

A follower on Instagram gave me a suggestion, and after mulling it over for a bit, I decided to try it. That's coming up in the next post.

I post a lot of things on Instagram these days. Follow me here.


Like my Facebook page for blog updates and extra stuff.

Have a question you'd like to see addressed on this blog? Email me at iamtherocketn00b@gmail.com.

Sunday, January 9, 2022

Estes V2 - I Encountered a Fin Fit Problem


The fins on the V2 don't get glued directly to the outside of the rocket as on most model rockets. The fins have tabs which go through the slots in the boat tail and make contact with the motor tube. It's the fin tab roots which attach to the motor tube. This is called through-the-wall construction, and usually it adds strength to the fin attachment. It's used a lot in high power rocketry.

But while test fitting the fins, it became apparent to me that the V2 fin tabs made solid contact with the motor tube on three sides, but on the fourth side, there was a tiny gap. Wood glue is great adhesive for model rockets, but it's not very good at gap filling. To get a strong bond, the two parts have to touch.

At first, I thought maybe I had installed the motor mount crooked. But looking at the boat tail from the bottom end, it looked like maybe it was slightly out of round. If I gave it a squeeze, I could get the parts to touch.

So, what to do?

I could use a thicker adhesive, like epoxy. That would fill the gap, and I could also use it to attach the fin roots to the outside of the plastic boat tail, for extra strength, if I wanted to.

But I prefer not to use epoxy with paper rockets. For wood to paper, it's no better and adhesive than wood glue, and also, it's heavy. With smaller fins, I want to keep the excess tail weight to a minimum. I'm already likely to use a small amount of epoxy for fillets. So I'd prefer to use wood glue here.

Then I had the idea - what if I could reshape the boat tail by hand, and get it back to a round shape? I could warm the plastic and try and mold it while it was soft.

I got out a hair dryer and warmed up the part. I got it so hot I had to use an oven mitt to handle the plastic boat tail.

The good news is that it worked - sort of. I was able to squeeze it and change the shape, which set when it cooled.

The bad news is that I didn't shape it correctly, and the fin still didn't quite touch the motor tube. In fact, I kinda made the boat tail look worse.

But only slightly, and you have to look closely at the back end to tell. The picture above is the before shot, and I forgot to take an after, but it doesn't look any better.

So, I'd have to figure out the best way to adhere the fins to the rocket with the boat tail out of round...

I figured it out and will tell you how it went in the next post.

I post a lot of things on Instagram these days. Follow me here.


Like my Facebook page for blog updates and extra stuff.

Have a question you'd like to see addressed on this blog? Email me at iamtherocketn00b@gmail.com.

Tuesday, January 4, 2022

Estes V2 - Body Tube


Busy week this week, but here's a brief update on the Estes V2 build.

I decided to use the body tube that came with the Estes V2 after all. The minor stretching of one end won't be noticeable, and I'll use that end for the aft end of the airframe, where the tail cone gets glued in. The snugger end of the body tube will have the nose cone.

As I usually do, I filled the tube spiral with Elmer's Carpenters Wood Filler. This wide groove filled quite easily, and the tube is so short, it took no time.

Some people feel you're wasting your time if you fill in tube spirals. Not me - I enjoy the process and the results, and with a scale project like this one, I think there's a stronger argument in favor of doing it.

But it's a cosmetic thing - if you don't like it, you certainly don't have to bother. Rocketry has a lot of different things to offer as a hobby. You should do the things you like doing, and don't let others' opinions make you feel bad. I've seen plenty of the "that's not how I do it" types of comments in various forums, that I feel the need to make these points whenever I bring up tube spirals.

I would never call someone out for not filling spirals on their rockets (I've seen someone do that on a forum before). I'd also never tell someone they're wasting their time pursuing some part of the craft I'm not into (which I've also seen). It's your rocket - do as you please.

My method for filling spirals is HERE.

I post a lot of things on Instagram these days. Follow me here.


Like my Facebook page for blog updates and extra stuff.

Have a question you'd like to see addressed on this blog? Email me at iamtherocketn00b@gmail.com.