Showing posts with label rocket camp. Show all posts

Monday, August 1, 2016

Rocket Camp - Construction: Building Model Rockets With Young Beginners (Part 1: Tools and Materials)


Click here for the beginning of this series.

Building model rockets with a group of young kids who have no experience doing it is one of the more challenging aspects of teaching rocketry. Building a simple Skill Level 1 rocket isn't hard, but there are steps which must be followed in order. There are small parts which must not be lost, or the rocket won't work properly. Time must be allotted for glue to dry before moving from one step to another, and some kids get impatient and try to rush. There are fragile parts which may break if there is horseplay. And kids without a lot of craft-building experience tend to use far too much glue.

Building a model rocket isn't hard, but kids building one for the first time require a little guidance.

Although this blog is largely aimed at people just getting into rocketry, a lot of my readers are experienced rocketeers. Some people reading this will have a lot of experience both building rockets and teaching rocketry to kids. More may have lots of experience building and flying, but haven't actually taught rocketry at a school or camp or scout troop before. Some readers may have no experience at all building rockets, but wish to incorporate model rocketry into a school curriculum, and need some guidance. With the next few posts, I hope to address readers of all levels.

* * *

In earlier posts in this series, I have mentioned the fact that, due to the amount of time I had with my rocket camp kids, I didn't always go by the advice of others in online rocketry forums to "keep it simple." I managed to teach some advanced stuff to these kids.

But when it comes to building rockets with young newbies you definitely do want to keep it simple! Many experienced rocketeers will do their own thing, altering the rocket from the strictures of the instructions. They may add a payload section which doesn't come with the kit, so the rocket can be flown with an altimeter. They may do a "kit bash," using the parts of one kit to make a different rocket from the one pictured on the package. They may clip the thumb tab off the end of a motor hook/engine hook, either because it looks better, or because the hook is too long and the rocket won't stand on its fins with a thumb tab. Or, they may leave out the hook and the thrust ring/engine block so that a wide variety of motors may be used. I myself will often at least use a larger sized motor mount, so I can fly a C motor rocket on a D or E motor if I want to. They might even decide not to use a launch lug, but instead replace it with micro rail buttons, so the rocket can be flown off a more sturdy launch rail, such as the MakerBeam.

When building with kids for the first time, however, it's best to "build stock." In other words, stick to the instructions and don't change too many things. This may seem obvious to most people, but I'd bet a lot of rocketeers get to a point where they don't look too closely at the instructions for a basic rocket build, because they know how a basic build goes, and they tend to enhance or upgrade most of their low power model rockets.

A lot of us will take certain steps to hide the spiral groove in the paper body tube and fill in the rough wood grain on balsa fins - with materials like Elmer's Carpenter's Wood Filler or sanding sealer, or by adding paper skins to the fins to strengthen them and make them smooth.


This can certainly make a rocket look much nicer, and may help the rocket fly much higher, since a smooth rocket has less aerodynamic drag than a rough rocket. But these steps can be messy. Carpenter's Wood Filler (CWF) creates a lot of dust when sanded smooth. Sanding sealer puts out strong fumes and must be used in a well-ventilated area. Papering fins is tricky to a beginner with underdeveloped manual dexterity. And all of these techniques are at least somewhat time-consuming. A lot of kids will get bored, and ask "Do we have to do this?" Bored kids may act up and disrupt the class, or, at the very least, decide that rocketry isn't for them, and give it up once the camp or class is over.

A beginner's rocket doesn't have to be beautiful. It must be functional and safe. For most classroom applications, you should skip the extra steps of filling in wood grain and spiral grooves, and just build the rocket as depicted in the instructions.


An exception to this would be if you are working with older students, in, as I mentioned in the previous post, an art class or as a project in a shop class, where the point is to make something that looks nice. Or, if you have kids who are really interested in the finer points of craftsmanship and model building. In that case, you could surely consider showing them some tips for making finer-looking rockets.

* * *

As I mentioned in the post about kit selection, you will hopefully have built one of the kits you'll be using before class begins. If you are totally unfamiliar with model rocket building - perhaps you are a teacher who wants to incorporate rocketry into your curriculum, but not an obsessive rocket hobbyist like the rest of us - this is especially important. Not only will you go into the class knowing how the rocket is to be constructed from start to finish, but you'll know what tools and materials you'll need for each step. Let's start there.

Tools

Here are the basics you will most likely need for any rocket kit.

Hobby knives with #11 blades
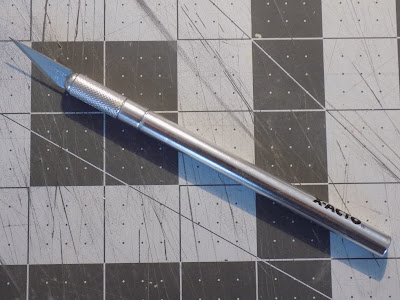

These are often called "X-Acto" knives, but X-Acto is just a brand name. It's like the Kleenex of the hobby knife world. With a Skill Level 1 kit, or even an easy-to-assemble "E2X" kit, there is at least some bit of cutting you'll have to do. This might be nothing more than cutting a tiny slit into the motor tube to install a motor retention hook, or "engine hook."
Do you give each kid a hobby knife and let them do their own cutting? This is a tricky judgment call, and I can't really answer that question. Hobby knives are razor sharp, and fragile. Not only can they slice very easily, but if you apply too much pressure to them when cutting, the tip can break off - that can end up flying back into an eye.

Last year, we had a bunch of hobby knives and smaller groups, and the kids seemed pretty competent. Kids of this age group have been building rockets for decades, and the camp had used hobby knives in the past, so while I let kids make their own cuts, I gave them some basic rules on knife safety and made it clear that this is not a toy. I told them I would do the cutting for them if they wanted me to, and I kept a sharp eye on all the kids while they were doing it. It made me very nervous, but everything went well, and once the cutting was done, I made sure to collect all the knives.

Between last year and this year, at least one box of the camp's supplies had been lost somewhere. We had no hobby knives, so I bought one. Only a single cut was necessary per rocket. And I had a lot more kids this year. The larger group dynamic meant that the kids were rowdier and didn't listen as well. Rather than pass around the knife, I erred on the side of caution, and went around and made the cut myself. When in doubt, you do the cutting.

Rulers


Most model rocketeers prefer a metal ruler with a cork back. A metal straightedge is necessary when used as a guide for cutting things like fins with a hobby knife, and the cork prevents the ruler from slipping.


But most beginner's kits come with fins which are already cut out. You merely need to remove them from the balsa sheet in which they come. There are some small tabs holding the fins in place, but those can either be cut without using a ruler, or the fins may simply be snapped out (there may be some minor fin damage, but if you're careful, it should be fine).

Still, you do need to make a few measurements, so a handful of plastic or wooden rulers will do fine, if that's what's available to you.

Pencils

The kids will have to make some marks on the body of the rockets. Always use pencils - never pens or markers. Pencil marks are erasable if kids make mistakes (they will), and pen or marker ink can bleed through a paint job.

Sandpaper

Even if you're not trying to build beautiful models with a fine finish, some sanding will probably be necessary. Get a few sheets of sandpaper and cut them into small squares to pass around. Don't get anything too coarse - an inexperienced kid can really sand things out of shape with 150 grit sandpaper! Anything between 220 grit and 400 grit will serve you just fine. Sanding blocks cut from 1X4 wood are nice to have, but probably not necessary for a rocket camp build. I requested sanding blocks for my camp, but they never materialized. In the end, it wouldn't have made a difference to how the rockets turned out.

Aluminum angle


This is an optional tool, but I highly recommend it. When building rockets, with a few exceptions, kids will have to mark straight lines all the way up the body tubes to mark where fins and launch lugs go. It's hard to draw a straight vertical line on a curved object like that.

For decades, model rocketeers have used either the lip of a drawer or a door jamb to do this task, and it works just fine.

A door jamb is an acceptable way to mark
lines up a body tube - in a jam.

But you probably won't have a dresser drawer in your classroom, and a lot of schools have metal door jambs with round corners. Wooden door jambs often have nicks in them, so it's hard to get a good line. Plus, the school or camp where you're working may not want pencil marks all over their doors.

Many rocket builders today use aluminum angle, available at hardware stores in 3-foot lengths, to accomplish this task.


Simply place the angle open end down on the body tube, and it forms a perfect straightedge all the way up the tube.


Aluminum angle makes the perfect straightedge for drawing lines straight up the body tube.

Aluminum angle is pretty cheap. You can get one or two 3-foot lengths, cut them into shorter pieces with a hacksaw, sand off any rough edges with coarse sandpaper, and then pass them around the class when it's time to mark up the tubes. 1/2-inch wide aluminum angle, as seen in the above photos, is the perfect size for small, classroom rocket building projects.

Craft Dowels or Craft Sticks


This is another optional tool, but you might find it nice to have on hand. Kids will have to apply glue to the insides of the rocket body tubes. Usually, using fingers will work, but kids with small hands might find it difficult to get glue into the right place. A dab of glue on a dowel or craft "Popsicle" stick will do the trick. I applying glue inside a round tube easier with a round dowel than with a flat craft stick, but either will work.

Cardboard Boxes


This is one that's so simple, I can't believe I didn't think of it before I started.

Rocket kits have a lot of small parts, and some of them tend to get lost in a classroom full of kids. There's always at least one kid who loses a nose cone and several who lose launch lugs. Launch lugs are tiny, and until launch day, kids don't see how important it is not to lose them. Unless you want to go to the trouble of building a launch tower - which you probably don't - you need the launch lugs.

A launch tower is used to launch rockets with no launch lugs. They're mainly used in competition
rocketry, where you want to reduce aerodynamic drag as much as possible. Image from nar.org.

The first couple of times I did the camp, when the day was finished, I had each rocketeer make a little pile of his or her parts on the tables at the side of the classroom. "Put your stuff where you know you'll find it tomorrow," I said. This really didn't work. It finally dawned on me that I needed some kind of storage for half-built rockets.

The simple solution is to have a shoe box for each kid to put his or her stuff in at the end of each day. As seen in the photo above, by cutting a V-shaped notch in opposite ends of each box, you have also made the storage box double as a rocket cradle, perfect for holding the rocket horizontal while allowing glue to dry on fin fillets or while doing other work on the rocket.

Scissors

You're probably going to need scissors for a lot of things, especially cutting out tube marking guides (these are used to mark where the fins go on the rocket, and are included in the instruction sheets in just about every rocket kit) and probably for cutting out shock cord mounts (especially if you use Estes rockets). That's not to mention the dozens of other used you'll find for scissors in the classroom. 

Materials

Adhesives

For most rocket-building tasks, you will need either white glue or yellow glue, more commonly known as wood glue or carpenter's glue.

Wood glue, sometimes called "yellow glue," and is technically called aliphatic resin, on the left;
white glue, or polyvinyl acetate, on the right. Either one will work well for model rocketry.

Either will work well for kids building rockets. Don't ask "which one is better?" because that opens a whole can of worms. "What's the best glue?" is a question which sparks heated debate in online rocketry forums. Either one should be plenty strong for a Skill Level 1 model rocket.

I went with wood glue, because I know the bond it creates is stronger than both the paper body tube and the balsa fins we'd be gluing together, and it's what I use at home. You can also find multi-packs of small bottles of white glue in a lot of craft stores.

What you don't want to use, however is "school glue," or anything labeled as "washable." White glue and wood glue can be cleaned up with water if they're not totally dry, but washable glues can be removed with water even when dry. The bond isn't as strong, and you don't want your rockets falling apart if it starts to rain on launch day!

Plastic Cement

 
Some model rockets - including the Apogee Avion, which I built with my kids this year - require some use of plastic cement, either to assemble a two-part nose cone, or to attach plastic parts to the paper body tube. A common plastic cement is Testor's, and it comes in a red tube. Beware - this stuff is toxic. There is a "non-toxic" variety, but it's not as strong. In my camp, I assembled all the nose cones myself before class. I didn't want any kids getting plastic cement on their fingers or in their mouths.

Stay Away from CA!

Thin and thick varieties of cyanoacrylate - commonly called CA - found in hobby shops and online

Inevitably, you'll have some kids asking "Why can't we just use Superglue?" Adhesives marketed as Superglue or Krazy Glue are in fact cyanoacrylate, which hobbyists abbreviate CA. It's sold at hobby stores in thin, medium and thick viscosities for model builders, and in medium thick or gel form, as found in hardware stores, for household use. It does bond very quickly, but there are some good reasons to steer clear of CA.
First, CA is brittle, and it gets even more brittle with age. A hard landing can easily knock a fin off a rocket if it's glued on with CA.

But, more importantly, CA is too dangerous to use with kids. CA is a monomer with small molecules capable of attaching themselves to each other. When it cures, it polymerizes - the molecules bond firmly together to form long chains. CA's bonding power is activated by moisture, such as the moisture in the air. But the moisture of human skin makes CA bond instantly. You can quite literally glue your fingers together, or glue them to a rocket part!

Not to mention, when CA cures, it has what's known as an ectothermic reaction, meaning it generates heat. The faster CA cures, the hotter it gets. When you get CA on your skin, it can get hot enough to cause a bad burn, especially in large quantities.

When my kids asked me why we couldn't use Superglue, I was prepared. I showed them this picture.
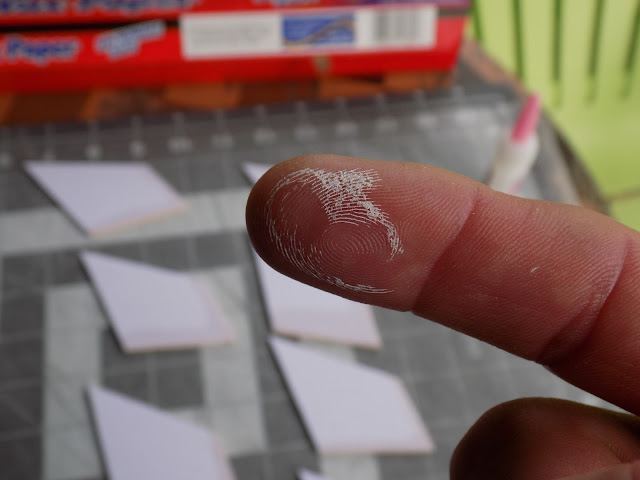


This happened when I accidentally got thin CA on myself and glued my finger to the bottle. Luckily, I had some CA de-bonder on hand, and was able to work my finger loose - but I did get a bad burn.

Un-Cure, a CA de-bonder, available in hobby shops and online

Don't mess with CA when building with young kids. Instead, teach them to be a little patient and wait for the wood glue or white glue to dry.

There is a possible exception to this, however, if: a) you are building with older kids, and b) you either need to build quickly or you are doing an altitude competition and need the rockets to be ultra-light, and c) you don't mind if the rockets only last a few flights, then you might consider using CA for construction.

If you do, make sure you use protection. Builders should wear nitrile exam gloves. If CA gets onto the gloves, they will stick, but that's better than getting CA on the fingers. Don't use the super-thin CA - it goes everywhere, and is not good for attaching fins to rockets. It also cures lightning-fast, meaning if you do get it on your skin, it can get very hot. Furthermore, thin CA can splash back, and if it gets in someone's eye you will have a medical emergency on your hands. Use a medium or thick CA, or perhaps a gel Superglue. Since medium and thick CAs cure more slowly, you might want to have a CA accelerator - often called "kicker" - on hand. It cures the CA instantly. Once CA is cured, it's safe to touch.
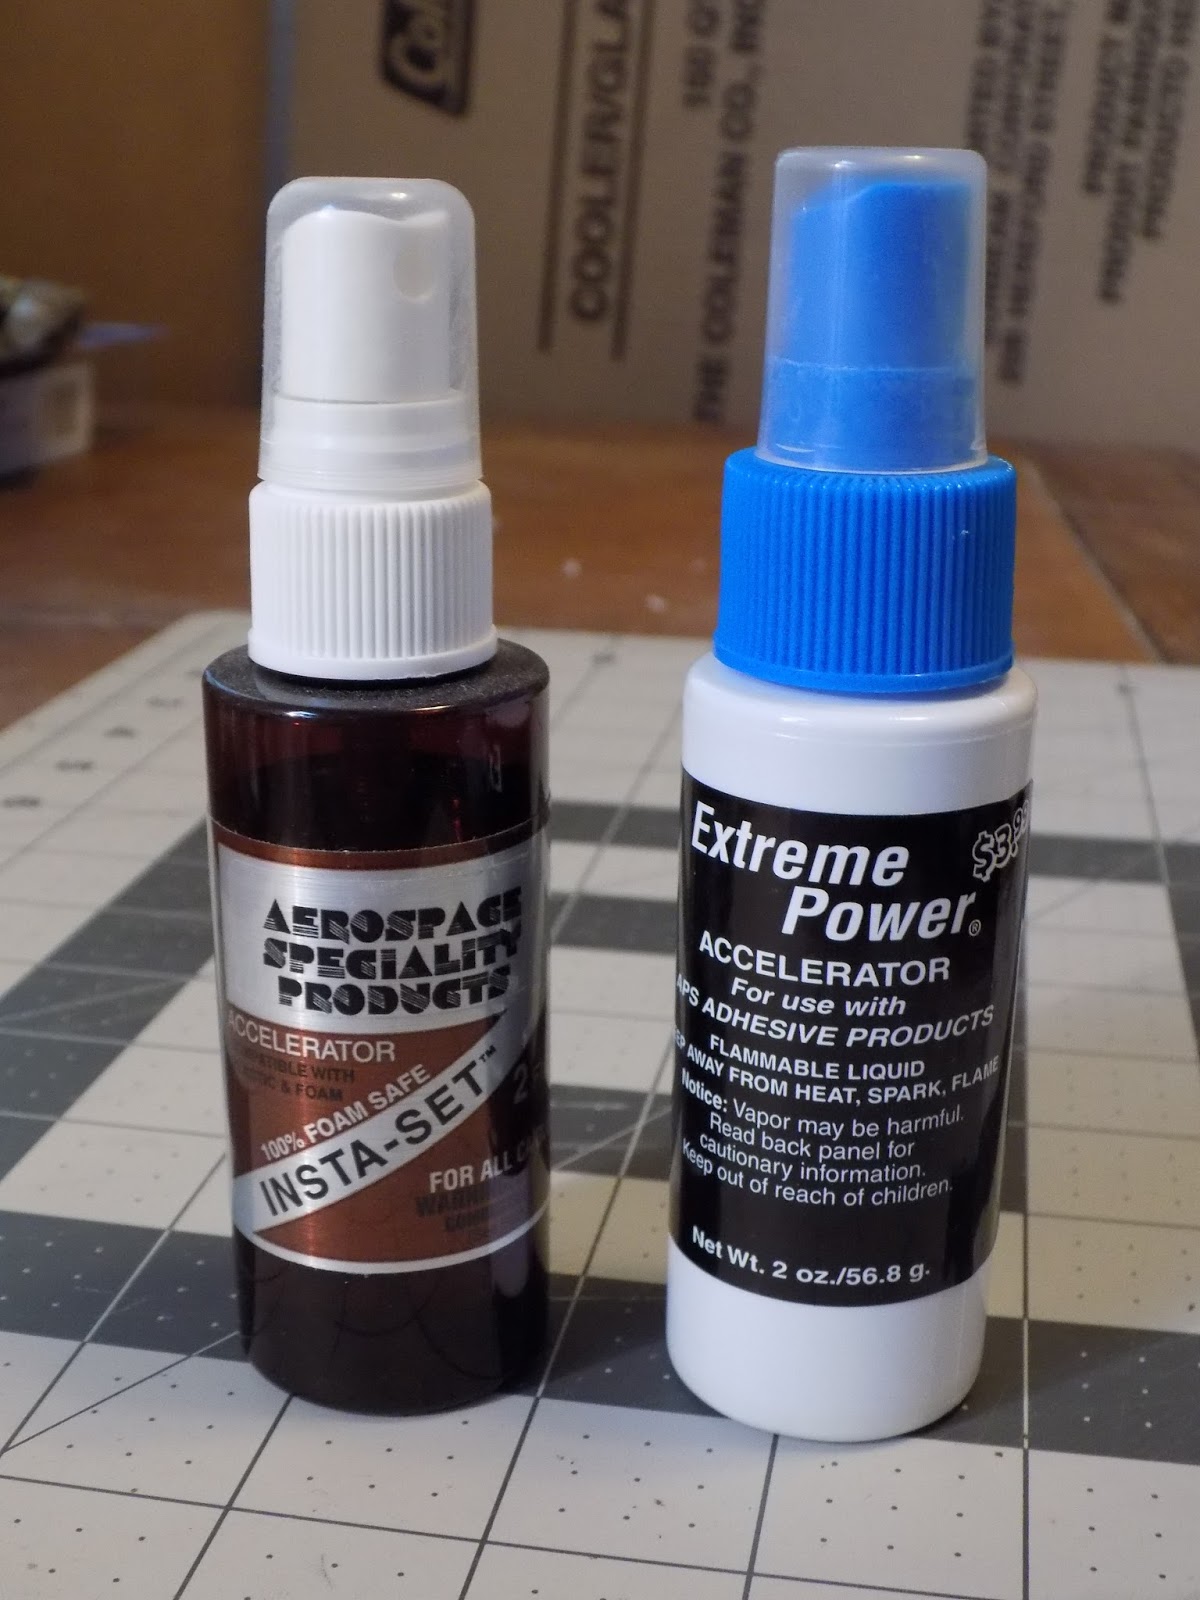
Two brands of CA accelerator, found in hobby shops and online
Make sure you have some CA de-bonder or acetone on hand in case someone glues their fingers together. And as you would with kids using hobby knives, keep a close eye on everyone to make sure someone isn't absentmindedly making a dangerous mistake.

Tape

You may be painting the rockets with your kids, or you may not. Either way, you'll probably find you need some tape. Regular Scotch tape will work well. We got some really cheap blue painter's tape. It's not great - I would never use it for my own builds. But for rocket camp, it's fine.

Waxed Paper

Kids can be messy, especially when working with glue for the first time. Lay a sheet of waxed paper at each kid's work space, and it will help prevent the need for major cleanup at the end of class - which will probably fall to you.

Alternately, dollar store cutting mats, which often come in 3-packs, and which are meant for the kitchen, are good work station tools. If you do have to have the kids do any cutting with a hobby knife, they will also protect the tables or desks from damage. 
 
Paper Towels

You will have glue everywhere, and probably some sanding dust as well. There will be a lot of kids with a lot of gluey fingers. Make sure you have something to clean up with. A damp sponge might also be a good idea.

Paint

We'll actually discuss paint in a later post. Whether you use spray paint or opt for brushes - or even markers or colored tape - will depend on your setup.

* * * 
In the next Rocket Camp post, we'll actually discuss construction of the rockets themselves.


Like my Facebook page for blog updates and extra stuff.

Tuesday, July 12, 2016

Rocket Camp - Kit Selection


Click here for the previous post.

Click here for the first post of this series

One of the first and most important decisions you'll make when teaching a rocketry camp or unit, be it at a middle school, high school, scout troop or public library will be: What rockets will we build? There are a lot of choices available, and the answer you come up with will depend on the parameters of the class. You'll want to consider the age group of the kids you're teaching, the likely experience level they'll have, and the length of time you'll have with them.

The obvious choice for leading a group of kids in a rocketry class is an Educator's Bulk Pack. Most major model rocket manufacturers carry these. Estes and Quest Aerospace, the two biggest, have a pretty good selection of bulk packs, but there are others to consider. Apogee Components has bulk packs of different skill levels, as does FlisKits, and even Balsa Machining Services, which mainly specializes in rocket parts, has a  "School Rocket."

The School Rocket from Balsa Machining Services.

You'll need to decide on the skill level of kits, the type, and whether you want a variety pack with several different designs, or a bulk pack of the same kit. You should also consider the size of the field you will launch from, as well as the surface - whether it be grass, gravel, asphalt, etc.

What "Skill Level" means varies from company to company, and even rocket to rocket. There are some Skill Level 2 rockets which are very simple, and some Skill Level 1 rockets which have more parts or require cutting plastic. There's not much rhyme or reason to it, other than that once you get to Skill Level 3 and beyond, it's going to be too difficult and frustrating for first-time builders.

The Estes Goblin - a Skill Level 2 rocket which is simple to build.It does fly very high on
D motors, though, and does not come in a bulk pack. I just mention it as an example.
If you're working with younger kids or have a limited amount of time - say, a single afternoon - or if you are looking for something simple, for example, to demonstrate some principles of basic physics, then Ready-To-Fly (what Estes calls "RTF," and requires no assembly), or Easy-To-Assemble ("E2X," which requires some very simple assembly) kits will probably be best.

But if you have more time, older kids, kids with more experience, or if you are trying to teach the kids the craft of rocketry, so that they will feel comfortable continuing on their own when they leave your camp or class, you'll probably want to choose something that takes a little longer and a bit more attention to build.

When I mention students' experience, I'm not necessarily talking about experience with model rockets. You may be working with a scout troop who have built pinewood derby cars. Maybe you're doing something with 4-H, with a group who have experience with various crafts. Perhaps you'll be going into a shop class or even incorporating rocket building into an art class, with students who are used to using paints and glues. These are all valuable, transferable skills to rocket building. Especially working with glue - your first-time builders are going to need some guidance with glue, believe me!

As for type, you'll consider whether to use simple 3-fins-and-a-nose-cone rockets, or something with a payload section, or an "odd-roc" - a rocket which doesn't look like a typical rocket. A saucer is a common kind of odd-roc.

Estes Blenders - a type of saucer "odd-roc." These are interesting and don't fly too high.
The Blender is a more advanced build. Image from eRockets.biz.

 Before you choose, try to find the instructions. For most Estes kits, you can download the instructions and read them ahead of time. Same is true for other companies as well. That way, you can see if you'll need any special tools. You might find a so-called "Skill Level 2" rocket which you like, and which in fact is pretty simple to build. You might also find Skill Level 1 rockets you'd rather avoid.

Whether you get a variety pack or a bulk pack of all the same rocket will also depend on the factors I've mentioned above. Younger kids and inexperienced builders will need some guidance. If you simply hand them the instructions and let them have at it, they will very likely build too quickly. Some kids don't have the patience to let glue dry on certain parts, and you might end up with a class full of rockets with iffy construction. When in doubt, I'd recommend everyone have the same kit, so that you can build with them, step by step, and you can guide when it's time to set the parts down to let the glue dry while you do something else with them.

Finally, consider the size and type of field you will launch from. If you're flying on a small field, you'll either want a rocket that doesn't go too high (which is largely due to the motors you use, but will also depend on the rocket - a lightweight, thin rocket will fly much higher than a fatter or heavier rocket), or you may want to select a rocket that uses streamer recovery instead of a parachute. If you're likely to land on a hard surface, such as rocky ground or asphalt, you'll probably want to go with parachute recovery*.

Whatever kits you decide on, I highly recommend building one yourself a few days before class begins. A lot of experienced builders will modify their rockets slightly, changing out the shock cord for another material, for example. But I would suggest you build according to the instructions, as the kids will build. This will alert you if there's anything you need to be on the lookout for. Are there parts which don't fit together just right? Does it come with a two-piece nose cone which requires plastic cement? Do you have to make your own parachute, and if so, how tricky might it be for little fingers? These are the things you'll want to figure out before you get into the classroom. It's also nice to have a well-built demonstration model to show the kids on the first day. It can be hard to visualize what a pack of parts can really look like when it's assembled, and most bulk packs do not come with a face card with a nice photo of the rocket.

I went with Skill Level 1 kits, preferring balsa fins over plastic or card stock.

*In my case, I had both a small launch area and asphalt, as we launched from a parking lot. The lot would be coned off, but there were still cars parked in the vicinity, and there was the community college roof to be concerned about, not to mention a busy road not too far away. My biggest concern was that road, and though we could launch pretty far back from it, I decided I'd need to keep our altitudes to about 300-350 feet with parachute recovery.

Launch site in the upper left corner lot. We could be nearly 1000 feet from the busy road at bottom, but the width of the site was only about 450 feet. Sometimes there were cars parked next to the building, so we had to pay attention to the wind.

 * * *

I had suspected last year that I'd need all the kids to have the same kit. My suspicions were confirmed after the Estes Alphas I had requested did not arrive, and the first week kids each ended up with different rockets. It was great that they got to build whatever they wanted, but it meant I couldn't guide them through it. There was the issue of kids using too much glue, or trying to stuff a motor mount into the back of a rocket before the glue was dry, or the one kid who glued on his launch lug directly in line with one of his fins, so that the rocket wouldn't be able to go onto the launch rod. (We pulled that one off before the glue had totally dried and got it in the right place, but I might have missed it).

For the second week, we got a pack of the Estes Viking, because it was available at a local hobby shop.


This is a nice little rocket with card stock fins, with a wide variety of fin configurations. Kids could build with three, four, or five fins, and they could be attached in a variety of directions, so that each kid could make a slightly different rocket. (Balsa fins must be attached with the wood grain parallel to the fin leading edge, so there is only one right way to attach a balsa fin).

The Viking is what's called "minimum diameter." It's very narrow - only as wide in diameter as it needs to be to accommodate the rocket motor. Narrow rockets have less aerodynamic drag than larger-diameter rockets. That means they can fly very high - which kids love, but which cost me some money (I'll explain when we get to altitude tracking)! Fortunately, they weren't likely to drift too far. The Viking uses streamer recovery, which isn't ideal for asphalt, but with such a lightweight rocket, hopefully we'd get them all back with minimal damage to the fins and body tubes.

One drawback to the Viking is that the rocket has no motor hook on the back. The motor hook is really convenient for kids, because it snaps into place and keeps the motor from falling out the back of the rocket. The Viking requires a "friction fit," which means you must wrap masking tape around the motor until it's nice and tight - just tight enough that it won't fall out when the ejection charge fires, but not so tight you can't get the motor out and put a new one in when you're done. It's a very fine line, and one I still have a bit of trouble judging. Kids will sometimes have a motor fall out at apogee, or never be able to get the used motor out without damaging the rocket.

Also, because the rocket is minimum diameter, it has no motor mount - the body tube is the motor mount. I really wanted to show the kids as typical a model rocket as possible, with all the parts they're likely to encounter on most builds.

My solution was to put together a quick scratch build, a rocket I called Sounder II.


It had all the basic parts, but I didn't glue the motor mount into place until after the first day. When I was showing the parts of a rocket on day one, before launching, I pulled the motor mount out of Sounder II, showing the centering rings, thrust ring/engine block, motor hook, etc. I then glued it in, showing how this was done.


Sounder II also turned out to be very useful later in the week when talking about stability and rocket design. And it flew very well. It's always good to show kids a few scratch builds - scratch building was pretty standard in the early days of model rocketry, and it's a good confidence builder. A kid who understands stability and how a rocket goes together should eventually be able to learn to design and build his or her own.

Sounder II, with markings for the center of gravity (CG) with an A8-3 motor and a C6-5 motor.
Also marked is the center of pressure (CP). Though the difference is small, the
rocket is stable with the A, and marginal with the C. This will come back later.

On week 3, I went in a different direction - the Quest Astra.


It's a great rocket, but different than a standard Estes Skill Level 1 kit. It has through-the-wall balsa fins, so the kids won't get the fins in the wrong spot. Instead of a rubber shock cord with a paper trifold "tea bag" mount, as is used in Estes rockets, it uses Kevlar thread, tied around the motor mount and passing under the forward centering ring. Some of the kids had a little difficulty with this method. On my own Astra, I was so busy helping the kids with their rockets, I never put the launch lug on mine. I painted it without one. (This wasn't a mistake - I decided it was more important for me to show the kids how to paint than to have one more rocket I could launch with them. You can launch a rocket without a launch lug, but you need a tower or piston launcher. These are advanced launch pads more used for competition rocketry.)

* * *

This year, I went in a different direction. Hoping to avoid any purchasing mistakes, and wanting to make sure I selected a rocket which any of the more experienced kids were unlikely to have built before, I turned to Apogee Components. We built the Apogee Avion.


Apogee has a number of great bulk packs. They're not the cheapest you'll find, but they have a variety of great kits, both of their own and from Quest Aerospace. They carry simple rockets, like the Avion, which has balsa fins, and the Apprentice, with a single-piece plastic "fin can." They also have payload-carrying rockets and even a two-stage bulk pack for the truly ambitious.

Another nice thing about buying bulk packs from Apogee is that you can download a free RockSim file for each rocket they sell. This will allow you to show the design file on rocket simulation/design software, such as RockSim, which is sold by Apogee Components, or OpenRocket, which is free. With simulation software, you can get a rough estimate of how high the rocket will go with different motors, and you can also use it to demonstrate principles of model rocket stability, aerodynamics, and design.

I had thought the Avion looked like a cool little rocket for some time, so I ordered those. As I built the demo model, I discovered a few things. The nose cone came in two parts, so we'd need plastic cement. The shock cord is Kevlar, and is supposed to be anchored to the motor mount. The Kevlar shock cord is also pretty short.

The full length of the Avion shock cord,
when built according to the kit insructions
 A short Kevlar shock cord can be a problem. Because it's not elastic, Kevlar can actually damage the rocket. If the parachute ejects when the rocket is moving too fast - either due to a motor delay which is too long or too short - the force of the parachute opening can pull the shock cord back against the opening at the top of the body tube. Because it is so stiff, this can cause the shock cord to rip through the body tube, causing a long, jagged tear known as a zipper.

A zipper - a jagged tear down the body tube of a rocket, caused by the shock cord.
Image from an Apogee Components YouTube video.
Because I had already known about the Kevlar cord, and I knew some of my students really had trouble with the Quest Astra shock cord last year, I decided we would use some sewing elastic and make an Estes-style paper trifold "tea bag" mount.


An Estes paper trifold shock cord mount, sometimes called a "tea bag mount"
Some experience rocket builders don't like the trifold mount, because they sometimes "fail." In fact, it isn't usually the mount itself that fails - it's that the shock cord breaks. A properly-glued paper mount should be quite secure, because wood glue and white glue are said to form a bond that is stronger than the paper tube itself. In reality, I'm sure a well-glued shock cord mount may occasionally come out, but more often than not it's a failure of the shock cord itself.

But first rockets are usually lost or damaged long before that happens. They end up stuck in a tree, breaking because of a poorly-packed parachute, or simply flying so high on a C6-5 motor that they simply "vanish," that an elastic trifold mounted shock cord is probably sufficient. Some elastic cords last decades.

Unfortunately, when I stopped in to check everything the Friday before class began, I discovered that the sewing elastic I'd requested had been forgotten. We'd still use a paper shock cord mount, but just with the Kevlar. Mounting the shock cord near the top of the tube would at least give us a little more length on the shock cord, and if there were a zipper, it wouldn't go more than an inch or two down the tube, stopping at the paper mount.

These Apogee Avions are nice! They are really great fliers - straight up every time. I don't know what it is about them, but I really enjoyed seeing these things launch. Since they're larger than a rocket like the Viking, they don't go as high, and you can keep your eye on them the entire flight (unless you fly on a C motor - then they're capable of reaching 1300 feet - if you've got a large enough field, go for it! Even on A motors, these are exciting rockets to watch. After building a demo version and one each week with the kids, I now have four of them!


In an upcoming post, we'll talk about the building process.

Click here for the next Rocket Camp post.


Like my Facebook page for blog updates and extra stuff.

Friday, July 8, 2016

Rocket Camp - Going Deep


Click here for Part 1

When I was a kid, I had a number of science-related and educational toys and kits.

I had a chemistry set. I mixed a few of the chemicals in test tubes a few times. Sometimes they changed color, sometimes not.

Eventually, I stopped playing with the chemistry set. I still know very little about chemistry.

I had a microscope, too. I pulled some hairs from my head, put them on a slide, and looked at how huge they were. I might have even seen some bacteria once or twice. It was pretty cool.

Eventually, I set the microscope aside, and hadn't learned that much about microbiology.

I also had a telescope, through which I couldn't figure out how to find any stars or planets. I think I managed to focus on the moon a couple times.

Not to mention my toy piano and my keyboard. I still can't play the piano.

And my model rocket kit? Well, I never built that, because I didn't think I was any good at making things with my hands.

It is often said that model rocketry is a good hobby for kids, because rocketry is educational. It certainly can be, but I would argue that it can just as easily not be. For every Lifelong Rocketeer or Born Again Rocketeer ("BAR") or aerospace engineer who started with a model rocket as a child, there are dozens or hundreds of people who got a model rocket at the age of 11 or 12, had fun launching it for a summer or two, and then got bored just seeing it go up and come down. Their rockets went into a closet or out with a garage sale, and they forgot all about them.

For these kids, it was fun for a while, but like me with the chemistry set, microscope and telescope, they never learned what made the rocket do what it did, or what the forces were that acted on the rocket, why some rockets perform better and fly higher than others, what interesting things can be done with model rockets, how to design their own rockets, or how their model rockets related to real space launch vehicles. In what ways are they similar to real rockets? How are they different? To a lot of kids, a model rocket is a fun toy that goes up and comes down, and that's about it.

Many kids probably never even learned the basics of the Model Rocket Safety Code, despite the fact that it comes with every kit and every pack of model rocket engines sold. Think of all the appliances you've bought as an adult, where you've opened the box, plugged it in, and thrown everything else out without bothering to read the manual.

Educational toys and hobbies are great for kids, but sometimes a little guidance is needed. Some kids are pretty motivated to learn more, but some don't know that there's more to learn or do. Sometimes, a little extra instruction can open eyes to wider possibilities. You can build rockets that fly higher. You can build rockets that carry interesting payloads. You can design your own and you can make them look cool.

And there's a little math, too. Think math is boring, kid? A little math can help you figure out how high that rocket flew! It isn't that hard, and it's more fun than just sending it up and watching it come down.


My second year of teaching rocket camp is finally done, and I'm back home in Boston. Now it's time to share my experience on this blog.

I'm going to try to break this down into bite-sized chunks, over the course of several blog posts, before getting back to writing stuff for total rocket n00bs. This is both for me and for you.

A lot happened during the three one-week classes I taught. I got several messages from readers who were looking forward to my stories from rocket camp last year. Immediately after finishing, I moved across the country, and as time passed, I kept thinking I need to write that rocket camp stuff. The more I felt like I needed to do it, the less I wanted to do it, and I never finished the series.

Also, as long-time blog readers are aware, I tend to write really long posts. Breaking this down will keep the writing more manageable for me and more readable for you. I'm going to try to keep each post focused on one thing.

And it's been a long time since I've written an informative post for rocketry beginners, which is what this blog is intended to be. In between rocket camp posts, there will probably be stuff for rocket n00bs, as well as updates on The Rocketry Show and whatever relevant news items happen to crop up.

We'll talk about things I did last year and things I did this year, what worked, what didn't, and how I illustrated certain tricky concepts of rocketry to middle schoolers. I hope you'll find something useful here that you can adapt if you get to teach rocketry to kids, whether it's a one-day demonstration or something longer, like in a week long summer camp or science class unit.

* * *

Last year, the weather was stormy all week, with a few minor breaks. Ideally, we'd build rockets all week, then go out for a big launch on Friday. That would probably not work, if the weather forecast was to be accurate (which it turned out to be). We would have to try to sneak in a launch when the weather broke, which meant Wednesday or Thursday. It also meant that we couldn't simply go out and launch every day. I would need to fill the 15 hours with some substance.

A teacher friend of mine advised me to have more material than I'd think I would need, because if I ran out of stuff to show or talk about, I would struggle to fill the time. The kids would get bored, some of them might act up, and the camp would be not much fun for them or me.

Though I tried to "keep it simple" the first week, while still teaching the kids some basics, I realized I needed more material.

So, what did I do?

Over the weekend, I went chapter by chapter in The Handbook of Model Rocketry, and used the headings as a kind of outline. I decided I'd teach the kids everything I knew - or whatever I had time for.


If time is limited to one day or less, you may decide to focus only on what makes rockets work (i.e., Newton's Laws of Motion) and safety, and then do a launch. If you have the kind of time I had, though, I say go for it.

Here's how class started. I went to collect the kids from the drop off point and brought them down to the class. I wore my NASA shirt with my name badge, and hanging from a lanyard around my neck, I had the bright red safety key for my home-built launch controller.

In the classroom, I had a number of my rockets set up on display on the front line of tables, and asked the kids to find a seat. I had the luxury last year of being able to bring all my best-looking, largest rockets. I also had a launch pad set up on the table with a rocket in place. There were a few launch controllers - some from Estes and my own.

I introduced myself, told them how long I'd been building rockets (not long), and then went around the room. I asked each kid his or her name and age, and if he or she had ever built or launched rockets before. The answer is often no, but some kids do have some experience. If they've built or launched before, I ask what rockets they'd flown. A lot of Estes kits are mentioned, and some I-don't-knows, and there are inevitably a few kids who mention that they've launched some bottle rockets or other fireworks.

The mention of fireworks can raise the hackles of some experienced, safety-minded hobby rocketeers, but I'd advise not to overreact when it comes up. I simply say, "OK, so you've launched some fireworks? Well, here we're going to be building and launching model rockets, which are a little different." Then move on.

The subject of fireworks will return when we discuss safety. You certainly don't want to mix the two in a model rocket class, but you'll probably have to have the conversation.

After introductions, I briefly show all the parts of a model rocket. There are some visual materials you can download from Apogee Components and other sources to show as slides or print off, but I prefer to pick up one of my real rockets and show each part. Interacting with the kids is key. "This little tube on the side of the rocket is called the launch lug," I said, and then pointed to one kid and asked, "What do you think this is for?"

From the Apogee Components Rocketry Education Pack, link above

After going over the parts of the rocket, it was time to kick things off with some excitement. "You guys ready to go see a rocket launch??" The answer is always a resounding Yes.

If you have a week-long class like this one, I think doing a launch first thing is important. It kicks things off nicely. The kids get excited and motivated to build something of their own, and you may refer to the flight when talking about this or that. And some kids will be very surprised by it. One of my kids last year remarked that she thought the rocket would only fly "about as high as the (street) lamp." Seeing something jump a few hundred feet in the air is a good motivator.

We all grab some stuff - a rocket, prepped and ready, launch pad, launch controller - and head outside to our designated area. In my case, we were in a parking lot which had been coned off for me by school security. The launch area wasn't huge.

A cheap, small, ready-to-fly rocket is perfect for a first day demo launch. If a fin breaks, your heart won't. No need to overdo it on the power of the motor - most of these kids have never done this before, and launching on an A motor will still thrill them all. You might be surprised that it thrills even you. Even if you are a High Power Rocketeer, the kids' excitement at liftoff is infectious.

For me, my go-to first day demo rocket is the Estes Hi Jinks, given to me by my friend Chad when he moved away. It's nearly identical to an Alpha or Alpha III, with plastic fins and a longer nose cone. It can fly very high on a C motor, but does a great job of demonstrating the phases of rocket flight on an A motor.


I show the kids every aspect of prepping the rocket at the pad - inserting a motor, installing an igniter and the little plastic plug that holds it in place, hooking up the launch controller. By the end of the week, I'll have them all do this for themselves with their own rockets. I tell them all, "We all need to scoot back fifteen feet!" and we all stand back.

"Look over at the flag," I say. "The wind is blowing this way. Which way do you think the rocket will fly?"

The kids will invariably indicate that the wind will fly with the wind, in the same direction that the flag is waving.

"Alright, let's find out!" I say.

At this point, I lift up the safety key hanging from my neck. "This is my launch controller safety key. This ensures I can't launch the rocket while I'm hooking up the igniters. See, pressing the launch button won't do anything if the key isn't in the launch controller," I say, pressing the launch button.

"OK, I'm going to insert the safety key into the launch controller." I put the key in, and the bright red LED continuity light comes on. "OK, my continuity light is on. That means we've got a good connection. We're going to do a countdown from 5! Ready?"

We all count down 5! 4! 3! 2! 1! Launch! and the rocket zips off the pad. The kids go bananas. So do I.

Near apogee, the rocket arcs over into the wind in the opposite direction from what the kids predicted. The parachute comes out, and the kids go chase down the rocket as it lands. That's the great thing about launching with kids - they recover your rockets for you.

We go back inside, and the kids have a seat. "So, did you see which way the rocket flew? It turned into the wind, right? We all thought it was going to go the other way, didn't we? We're going to talk about why that happened this week."

I said, "This week, we're going to build our own rockets, and we're going to launch them. I'm also going to teach you guys some stuff about rockets, so you can do this on your own. Here's what I am going to show you guys this week."

I went to the white board, and told them I'd teach them the following:
  • How a rocket works
  • Model rocket safety
  • How to build a rocket
  • All about model rocket motors - what do the letters and numbers mean, how to pick the right ones, what happens inside, etc.
  • What ground support equipment you'll need - launch pads, launch controllers, etc
  • Rocket stability - what makes the rocket fly straight up?
  • Recovery systems (parachutes, streamers, etc.)
  • Ignition systems - how does a launch controller work, and why do you need one?
  • Rocket aerodynamics - what makes a rocket fly higher and better
  • Payloads - what can you put inside a model rocket
  • Altitude tracking - how do you know how high the rocket flew
  • Clusters and multistage rockets - rockets with more than one motor or engine
  • How to design your own rockets - because you don't need to just build a kit someone buys you. If you understand rocket stability and know where to get the right parts you need, you can make a rocket of your own
  • Where to go from here - an introduction to High Power Rocketry
Now, some people may think this is crazy, especially considering that these are first-time rocketeers, aged 11-14. This is too much. This is too complicated. You need to keep it simple. And what about that thing about High Power Rocketry? These are kids! They can't do that stuff yet!

Let me address that last concern first. I want them to know that you don't have to stop flying rockets when you turn 14 or 15. There's more to look forward to. You can build larger rockets, and eventually fly something really powerful if you want to. Also, some of the class time would include waiting for glue to dry, and sometimes we'd be watching videos. HPR videos are pretty cool, and the kids love them.

But that's pretty much most of the stuff you'll find in The Handbook. Did I teach it all?

No, of course not. I would teach as much as I could, starting with the basics. If the kids seemed to be particularly interested in one topic or another, we'd focus on that. If they seemed not too attentive or not absorbing, we'd stick mainly to a few basics, including safety, and focus on building the rockets and watch some interesting rocket videos. I don't know that I ever got through all of this stuff. But I got through most of it, and I knew I wouldn't run out of material.

Besides, kids have been doing this for decades, and they're capable of a lot. The fact that this year's TARC winners were 8th graders was an added bonus - something to shoot for.

The Odle Middle School Space Potatoes won TARC this year. TARC teams design and build their own rockets.
The prize was $20,000 and a trip to the International Finals in London, England. They are in 8th grade.

Honestly, I didn't care if these kids became lifelong model rocketeers. But I wanted them to have fun, and to learn a few things. I wanted them to learn a little science - something that would come back when they reached high school physics. I wanted them to learn that maybe doing their math homework wasn't such a bad idea, since there is some fun stuff you can use it for (It may seem like a lofty goal, but I was hoping that in my small way I could contribute to them being better prepared for finding a good job when they're older). I wanted them to learn that they are capable of making things with their own hands. And I wanted them to learn that sometimes there's more than meets the eye - more, for example, to rocketry than simply watching something go up and come down.

Click here for the next Rocket Camp post.

Like my Facebook page for blog updates and extra stuff.

Follow me on Twitter.

Thursday, July 7, 2016

Rocket Camp Teaser


Rocket camp is done. Weather was great, launches were awesome.

I'm working on the posts about the whole thing right now. I'm going to break it down into small chunks, because a lot happened, and I tend to write posts that are too long.

Look for the first one in about a day or two.

Like my Facebook page for blog updates and extra stuff.

Follow me on Twitter.

Sunday, June 26, 2016

Rocket Camp Last Year - What I Learned

Launch last Friday - it never fails to blow their minds

Week Two of rocket camp ended with a launch on Friday. Tomorrow begins the final session of the summer.

My last post on this blog was two weeks ago, yet I still get regular page views each day. I certainly don't mean to leave you hanging, but I've been busy!

Teaching rocket camp has certainly been challenging, but quite rewarding. Week One this year, the camp was overbooked, and wrangling that many kids can be tough. But launch day makes the whole week worthwhile.

Sam preps his rocket.

* * *

Before I get into this year's report on Rocket Camp, let me talk about last summer's experience.

Last year was the first time I'd ever done this. The first time I'd taught anything, the first time I'd worked with kids, and the first time I'd had to come up with some kind of plan for a week's worth of group activities.

A lot of rocketeers have had some kind of opportunity to share rocketry with students. Some get asked to come in for an hour and give a quick talk on the subject. Some hold a small demo launch at a local middle school or high school. Some help Cub Scout or Boy Scout troops or 4-H clubs with build nights.

But I think I got a really rare opportunity here. I would teach three classes, each one week long, three hours per day for five days. That's 15 hours to focus on rocketry - a lot of time to fill! The fact that the day camp was run by a local community college meant that they had a pretty good budget, so I could submit a purchasing list and have all the rocket kits, motors, paint, etc. that I thought we'd need.

We would be in a large classroom with a white board, a computer, and a projector, and lots of electrical outlets, so I'd be able to do a lot of stuff - show videos and slide shows, demonstrate stability, design, and simulations with OpenRocket.

There was also a robot arm.

With as many hours as the class would last, it looked like it might be possible for me to really go into depth on the subject of rocketry. A lot of people would say - and some even advised me, when I asked questions in online forums - that you need to keep it simple! But I decided I'd have the time to challenge these students, and see what I could teach them. Kids can surprise you with what they are able to learn, especially if you make the subject fun and find interesting ways to explain or illustrate ideas. How simple or complicated you decide to get with your rocketry curriculum will depend on a lot of things, especially how much time you have.

A teacher friend of mine advised me to have more material than I thought I'd need for each day. If I ran out of time and didn't get to everything, I could drop some of the less important stuff or push something off to the next day. But if I ran out of stuff for the day, then I'd be struggling to fill the time. I came up with a plan for the first day, plotting out each activity we'd work on and how long I thought each thing would take, with a couple of optional things if we got through it faster than I'd anticipated. I walked in on Day One feeling pretty confident. By the end of Day One, I knew I'd need to revise my plan...

I learned a lot from the experience, not the least of which is that people who run camps like this will not necessarily know anything about rocketry. You must be very specific about what you need, and check and double-check that the tools and materials you're provided with are the correct ones. Ivy Tech College for Kids includes classes on cooking, magic, computer animation and several other subjects. The camp directors don't actually know that much about what I'm teaching.

Here's an example: I provided an exhaustively spelled-out shopping list last year, but failed to double-check on what items had actually been purchased. First decision I had to make was obviously what rocket kits we'd be building, and at what skill level.

I looked at several of the educational bulk packs of rocket kits available. Because of all the time, I decided I needed a Skill Level 1 rocket. If you have less time to build, an E2X or Easy-to-Assemble kit would be a better choice. But the point of this class was mainly "learn to build and fly rockets," and with all the time we'd have, I decided we'd need something that takes a little time to assemble.

I selected the Estes Alpha bulk pack, a classic "first rocket" kit used in a lot of rocketry camps. We'd have three weeks, with a possibility of 10 kids per week, so I asked for three bulk packs to be purchased.

Estes Alpha - a Skill Level 1 kit with balsa fins

When I arrived on the first day of class, I found that we only had one bulk pack - of the Estes Alpha III. I was pretty careful to spell this out, but you can see how the confusion happened - "Estes Alpha - 3 packs" got interpreted as "Estes Alpha III pack."

Obviously, this wouldn't be enough rockets for the whole three weeks, but the main problem that I had here is that while the Alpha is a Skill Level 1 kit which requires a little sanding, a little gluing, and a little time to build, the Alpha III is an E2X kit which takes only about 20 minutes. I built one in 10. The fins come in a single plastic unit, and gluing is minimal.

Estes Alpha III - similar to the Alpha, but much simpler to build


Oh, no! I thought. How am I going to fill the time? I should also mention here that the weather was supposed to be rainy most of the week, so it's not like we could go out launching every day.

An E2X kit is great if you don't have much time, and need something you can build quickly so you can get out there flying in a few hours. All you have to do is wait for the glue to dry, and you're ready.

For my purposes, though, I needed something which took some time. And I didn't want to merely go launch some rockets with these kids. I was trying to inspire them.

One reason I never built the model rocket kit I had as a kid was that I didn't believe I could. I'm no good with my hands, I told myself. I'll only mess this up. I want these kids to realize that they can build something with their own two hands that will fly at 200 miles per hour up into the sky, and it's safe and legal, and not that hard. We needed something which required just a bit more effort to assemble. That way, when they were done with the camp, perhaps they'd feel like they could do this on their own without me there to help.

The second major misinterpretation of the shopping list was the glue. While I'd asked for wood glue, specifying Titebond II (not because it's the "best glue," but because it's what I use at home and I'm familiar with it), what had been purchased was Elmer's Wood Glue Max.


I have no idea what this stuff is supposed to be used for, but model rockets ain't it! It's gritty and weird, and I couldn't get it to stick to anything! Perhaps it's great for wood projects if you press the pieces together in a vise or something. Fortunately, I had brought my tool kit with me, and happened to have a bottle of glue.

I also discovered on the first day that the Alpha had been built at the camp the year before, and a couple of the kids were not too keen on building the same rocket. They wanted to try something new.

I talked to the camp director and told him about the kit problem. At my suggestion, he ran to a local hobby shop and bought out every Estes Skill Level 1 rocket kit they had in stock. I had to buy time on Day One by starting assembly on the three left-over kits from a previous year, as a group project. There was a Wizard and a couple of Alphas. Eight kids working on three rockets together do not have much fun. It was a rough start.

The "Janky Wizard," one of the rockets we started together on Day One. One fin was damaged while sanding, so
I called it "janky." One of the kids decided he wanted this to be his rocket, so on Day Two he
completed the construction. Despite the janky fin, the rocket still flew well.

On Day Two, a bunch of different rockets had arrived. This was great, because now the kids had a choice. But it had an unforeseen consequence.

My intention was that we'd build together, step by step, allowing glue to dry while we learned something about rocketry, then move on to the next step. But because each kid had a different kit, all with slightly different instructions, I had to run from person to person helping with this or that, and couldn't build with them. Consequently, rather than, say, gluing centering rings onto a motor tube then waiting for the glue to dry, they'd look at the directions and move on to the next step.

The result was that all the rockets were finished way too quickly. Fins were a bit wonky, glue was everywhere, and despite starting the morning a day behind on our building, by the time the rockets were built, suddenly I had even more time to fill, and not enough stuff to do for the day. I was trying to figure out what else I could teach that day and ended up frantically searching YouTube for some good rocket videos to get us to the end of the day without everyone getting too bored.

On Wednesday, the camp director resigned. Week One was not going the way I'd imagined.

We went into the paint shop to spray primer on the rockets. Due to the weather, we had to sneak the launch in on Thursday rather than Friday, as it was threatening to storm. We'd have to fly the rockets in primer only, and would paint on Friday.

Some of Week One's rockets - Hi Flier, Yankee, Baby Bertha, Hi Flier, Crossfire ISX. Unfinished Alpha in front.
By the end of Week One, I'd gotten a handle on things. I did manage to teach the kids some interesting stuff, which, to my surprise, they did absorb. Some of the parents told me they were surprised at how much physics the kids learned.

I came back for Week Two with a much better plan in mind. We'd all have the same kit - the Estes Viking. We'd skip the primer, as it took too much time. And completely forget "keeping it simple" - we were going to go deep.

Click here for the next part of this series.

Like my Facebook page for blog updates and more stuff.

Follow me on Twitter.