
New entries will be added to the top of the page.
Current Projects #3 - Lots of Words and Lots of Pretty Pictures - February 20, 2017

Admittedly, I've been sitting on this one for a while. Longer than I thought.
* * *
In December, I made a bad decision up in Maine. It was a windy day, the final launch of the season for me, and not good flying weather. The field up there is enormous, and perfectly flat. Nevertheless, it was cold and the wind was about umpteen miles per hour.
But we had rented a car, driven all the way up there, and I wouldn't get the chance to fly again until April. I had what the astronauts used to call Go Fever.
I had made a couple flights already with iffy results. The first was with my Quest Quadrunner, a four-motor cluster rocket.

The Quadrunner struggled off the pad and arced over without gaining much altitude. I thought it was due to the wind, which certainly was a factor, but when I got the rocket home, I discovered that one of the four motors failed to ignite.
 |
| Though it is charred from blowback, the motor at the bottom did not fire. |
A seven-second delay was too long for this flight. The nose cone popped off and chute opened when the rocket was perhaps 8 feet in the air or less. There was some fin damage.

My next flight was on the scratch built Ceres B booster, from the book Make: Rockets: Down-to-Earth Rocket Science by Mike Westerfield.

It carries a camera payload and can fly on just about any 24mm diameter motor I choose - black powder or composite.
I intended to make two flights with the Ceres B. The rocket had previously only flown with an Estes E9-6 black powder motor, to an altitude of 764 feet.
I was planning to fly once on an E15 and once on an F12, both AeroTech composite motors, and take the rocket to a higher altitude.
The E15 flight went just fine until landing. Then the wind grabbed the parachute and dragged the rocket a good 75-100 feet through the sand. I had to run to chase it down.
 |
| Tracks left from the fins. I could tell where the rocket had flipped over in the sand, as the tracks shifted positions. |

I was ready to give up flying for the day after those two launches. But here's the issue: While the E15 is a single-use motor - just pop it into the rocket and fly - the F12 is a reload. You have to assemble it.
 |
| Left: AeroTech F12-5 reload kit - 3 motors per kit. Right: AeroTech Reloadable Motor Systems (RMS) casing. |
Now, before I start rambling all about composite motors and reloads, etc. (I just deleted three whole paragraphs, due to that rambling), I'll just say this: you don't want to leave an assembled AeroTech reload just sitting around all winter and then try to use it months later. It has rubber O-rings and greased parts in it, and after a while, those parts can get compressed, and fail to spring back. When that happens, you can get hot gasses leaking where you don't want one, and the motor is likely to CATO - basically, the motor blows through the casing and can destroy the rocket.
On recovery, the Ceres B shock chord and chute got so tangled, and my hands were so cold, I couldn't possibly fly it again that day. It would require some major detangling at home.
But I had this motor. It was the first time I'd ever built an AeroTech reload. I couldn't just store it over the winter and use it in spring. And I wanted to know if I'd built it right (AeroTech reloads are generally more complicated to build than Cesaroni reloads. Cesaroni and AeroTech are the two most popular brands of reloadable composite motors).
 |
| The completed motor. The red cap on the lower left is the nozzle end. The red cap on the upper right is the ejection charge. |
So, I found myself in what seemed like a dilemma - on the one hand, I didn't want to fly any more, and risk losing or damaging one of my nice rockets. On the other, I had this unused AeroTech reload, and I needed to do something with it.
In retrospect, I suppose I could have taken the motor home, disassembled it, soaked the propellant in water to destroy it, and thrown it in the trash (that's how to properly dispose of a motor you don't plan on using - for example, if it's damaged and probably not safe to fly), and cleaned the grease off the casing. Call that motor a loss.
That's not what I did. Since this was my first time using an AT reload, it did not occur to me that this would have been a smarter thing to do.
Instead, I decided to fly the motor. One of the rockets I'd brought with me was one I was pretty proud of - my clone of the Estes Astron Sprint XL.

A very simple looking rocket, but I had gotten the paint about as perfect as can be expected. It was so shiny and smooth!
You may well ask why I would then risk flying this rocket in high winds. My reasoning is that, while I really love the way this rocket came out, it was basically built from scratch. I have the parts to make it over again, and in fact, it was only made as "practice" for the kit, which you can see unfinished at the top of this post, and which I started building over a year ago. I reasoned I could always build this one again, pretty cheaply, if, say, it got damaged by dragging through the dirt like Ceres B.
I installed the F12 motor into the Astron Sprint. There was some wiggle room between the aft end of the rocket and the motor hook, so to prevent the motor sliding back and forth during flight and ejection, I taped it in place. Not pretty, but I figured it should work.

Composite motors are more economical on a per-flight, total impulse basis. What I mean is that you get more power per flight per dollar than you would with black powder motors. A 3-pack of F12 reloads costs about $30, or about $10 per motor, which isn't bad at all, considering that these are F motors.
The casing, however, cost about $40. I didn't want to lose the casing, so I packed the chute using the Jolly Logic Chute Release, and set it to release the parachute at about 200 feet, if I remember correctly. This should have kept the rocket on the field, where I'd be able to recover it.
The Maine Missile Math and Science Club flies from a beautiful field in Berwick, Maine. It's a giant turf farm, with acres and acres of perfectly flat ground covered in short, soft grass. It's nearly like walking an a giant putting green - the grass is that soft. Flights to 10,000 feet are permitted there, and the landowner is happy to have us there. It's perfect for rocketry.
 |
| A mile and a quarter long by nearly a mile wide - a great launch site for New England |
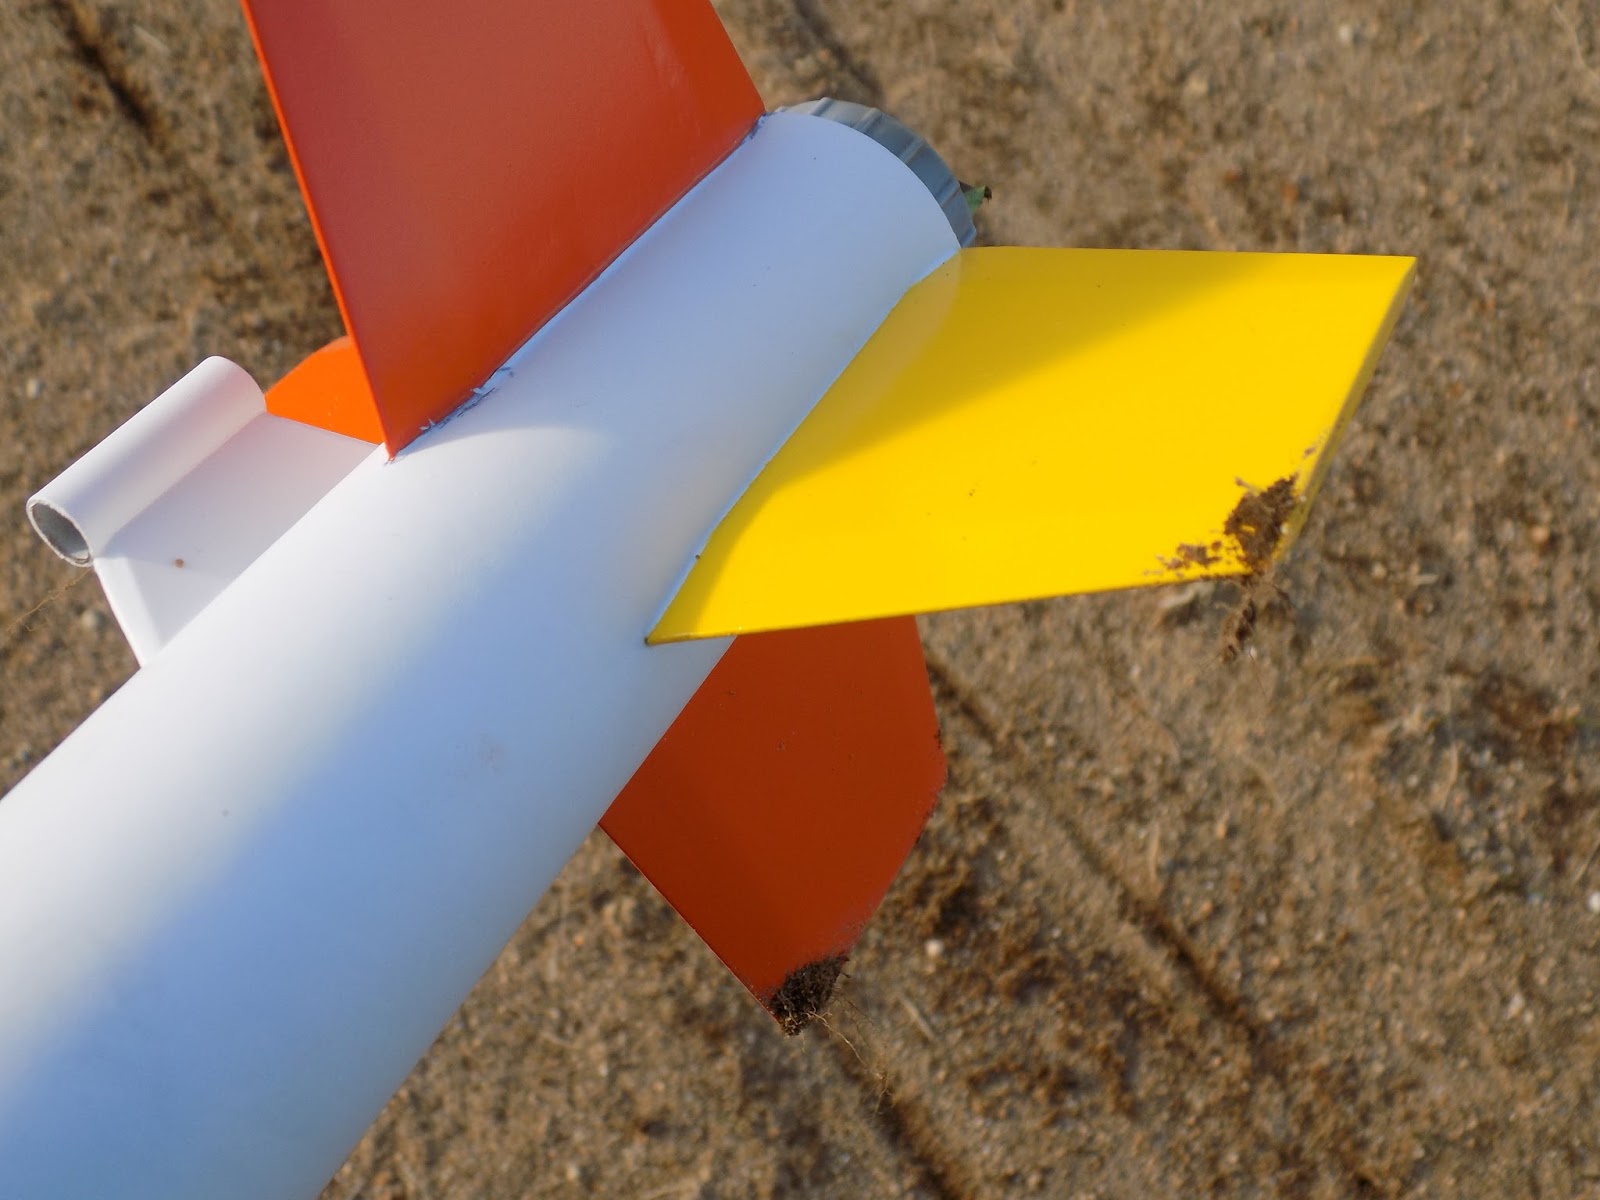
The Launch Control Officer counted down from five and pushed the ignition button - and the Astron Sprint XL took off like a shot! The F12 is a longer-burning, lower-thrust motor, but for a lightweight model rocket like the Aston Sprint XL, it's got plenty of kick. The rocket climbed a tower of thick black smoke, arced into the wind and nearly disappeared from sight.
At apogee, the nose cone popped off, and the rocket began to tumble. Despite having the parachute tightly held shut by the Chute Release, the wind took the rocket quickly down the field. At around 200 feet, the Chute Release opened, but the parachute was stuck shut - which, considering the wind, was a blessing.
However - and this is the heartbreaking part - despite the fact that the rocket stayed on the field, and the fact that I never lost sight of it completely, it landed in the one bad spot in the middle of all that beautiful turf. There is one long, narrow patch of swampy brush, and the Sprint landed somewhere in there.

I carefully kept a bead on it with my eyes, but when I got to the edge of the swamp, my heart sank a little. It can be easy to walk off course when following a missing rocket, but I knew I was on the right path when I found the one clue - a bit of blue Quest recovery wadding, which I nearly always include in my fireproofing. It must have fallen out of my Sprint as it passed over the edge of the swamp.

Hoping it had perhaps overshot the swamp, I ran around to the other side, but it was no use. I would have to trudge through shoulder-high reeds, thorns, scrub, etc, hoping to locate the downed rocket.
I walked into this, and it got pretty rough in there.

I nearly twisted an ankle a few times, got thorns in my leg, got my foot pinned in some underbrush... And the rocket could have been anywhere. I could have walked right past it several times.
After about 45 minutes in there, I realized I may never find it. I'd have spent more time looking, but it was getting late and dark, and very cold and windy, and the launch was winding down.
So, I lost the Aston Sprint XL clone. But worse - I lost the AeroTech casing and the Jolly Logic Chute Release - a loss of about $170 in one flight, not counting the rocket!
All this brings me to what I've been working on recently.
* * *
In September, Chris Michielssen wrote an inspirational blog post on the Model Rocket Building blog entitled Jake Parker - Finished Not Perfect. It spoke to me.
At the top of this post, you see the beginning stages of a build of the Estes Astron Sprint XL kit. I posted that on my Current Projects page - in December 2015! I only recently realized I had started this simple build that long ago!
The
clone - the one I lost in December - was essentially "practice." I like
to streamline my fins and sand them into airfoil shapes. It's something
I don't find to difficult on a standard fin with four straight edges.
But with an elliptical fin, I wasn't sure how to do it or where to
begin. So I traced the kit fins onto some balsa, cut out some copies,
and started practicing.
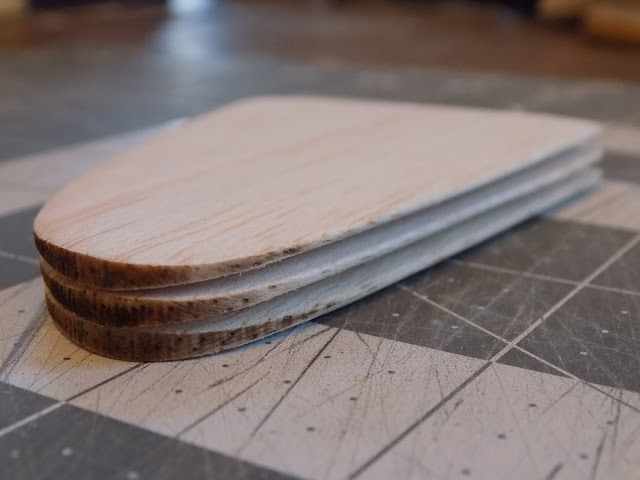
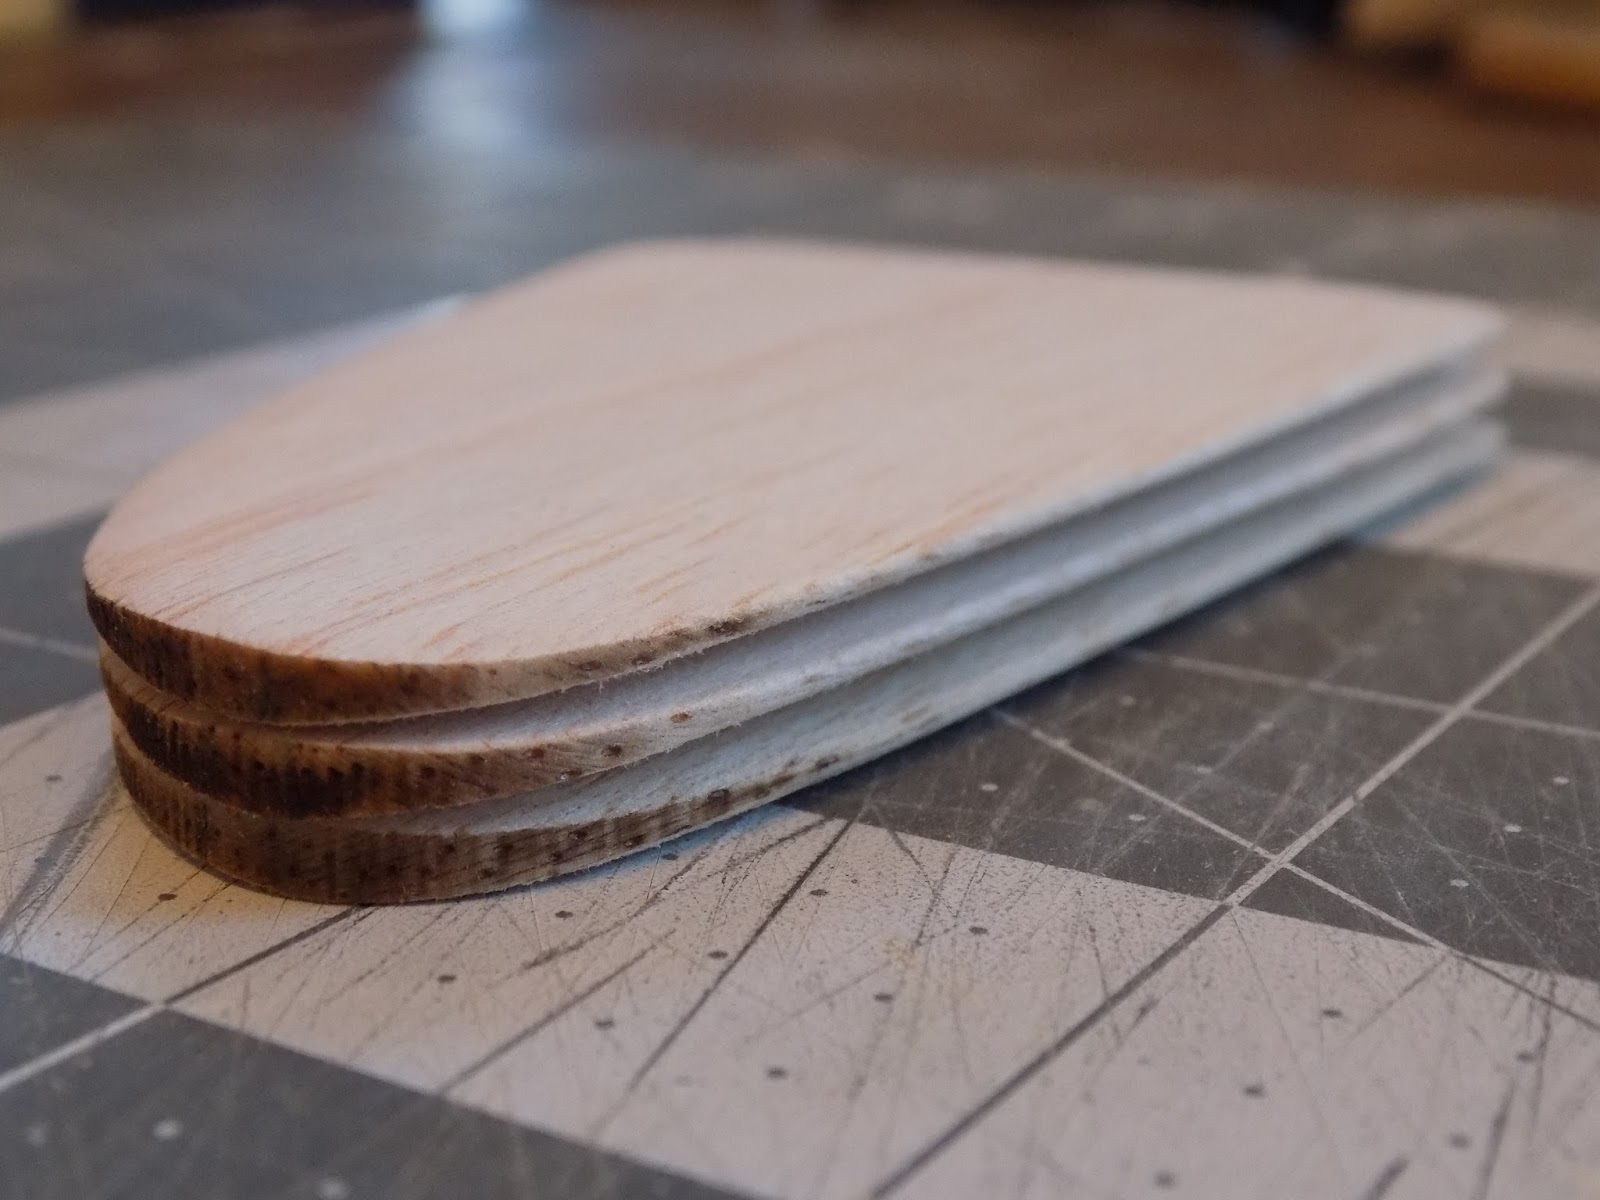
Here is a first attempt.

Pretty basic, not perfect, but I was able to do it pretty quickly without too much difficulty. It seemed like sanding a better airfoil - and getting all the fins the same - should be feasible. So I tried doing a set of three, with a longer beveled trailing edge.


Here is a first attempt.

 |
| The leading edge is simply rounded. |
 |
| The trailing edge is beveled, but the bevel doesn't go too far into the fin cord. |
 |
| A cross-section, seen from the tip edge |
Pretty basic, not perfect, but I was able to do it pretty quickly without too much difficulty. It seemed like sanding a better airfoil - and getting all the fins the same - should be feasible. So I tried doing a set of three, with a longer beveled trailing edge.

 |
| Marking a guide line down the root edge |
 |
| The guide lines will help me keep my beveled edges even - so I hope. |
 |
| A tip from the Model Rocket Building blog - medium CA - cyanoacrylate - on the fin edge, and a bit of black marker will aid in keeping my sanding straight on the outer edges of the fins. |
 |
| Guide marks for the beveled trailing edge |
 |


 |
| I've sanded a little closer to the center on one side of the fin than on the other. The guide line shows me where I need to even things out. |

 |
| Checking the evenness of the beveled trailing edges. They'll get sanded down further to nearly a sharp edge. |
Once
I had three fins which looked the same, I figured I had the technique
down. And the fins looked so good, I decided I'd build a whole rocket
around them. The current Estes BT-60 nose cone package you can buy
includes the nose cone and tail cone from the Astron Sprint XL, so it
would be simple to just make another one.
 |
| The nose cone pictured at the top is the Aston Sprint XL cone. The tail cone is attached. |
I figured I'd end up with two of them, finishing around the same time.
 |
| Putting the shaped fins on the rocket. The tail cone was used to install the motor mount to the correct depth, and was added later, once I had sanded off a slight overhang and filled in the seams from the molding process. |

Once
I got going, I spent a lot of time and care focusing on the clone. It
paid off - the rocket looked beautiful. But the fact that I'd done so
well on the clone made me hesitate on the kit - what if I messed up the
fins? What if the paint job wasn't as nice? I'll work on it next week, I kept thinking.
This
is what I've found. As I've gotten better at building and finishing,
better at making my rockets look nice, I sometimes hesitate. I'm not so
experienced that I can consistently get great results. I usually get pretty good results, sometimes really good, and sometimes horrible - especially with paint and sanding.
I
finally decided I had enough half-built rockets lying around, and how
hard could it be to airfoil those fins again, anyway? Besides, I could
always make more.
Not only that, but while the Astron Sprint XL clone looked really pretty, it actually wasn't that great a flyer. It rolled really badly! (For rocket n00bs: roll
is where the rocket spins around its vertical axis. Most model rockets
do it a little. Some do it a lot. It's nice when you build one that
doesn't roll at all - the goal for me with most rockets.)
Not only did it roll, but on its first flight, it rolled and wobbled.
Such an odd flight! It meant that the center of gravity was not in line
with its vertical axis. I wish I had video of that flight, because it
was so unusual.
So,
I did something when building the Sprint to make the rocket spin fast
on every flight. It may have been unevenly sanded fins - one potential
pitfall of trying to streamline them. I think a likely culprit was that I
got both launch lugs on slightly crooked, causing uneven airflow and
inducing roll.
The point is that the rocket looked pretty, but it was far from perfect - it was still just practice. There's nothing wrong with trying to improve your skills and make better and better rockets, but you actually have to build them and accept that you will make mistakes. That's always been a little tough for me.
The Astron Sprint XL needed to be finished, and I needed to start with those fins.


So,
I did it, and it wasn't that hard, and they turned out looking great. I
did these ones a little different than the last ones.
While
on the clone fins, I beveled the trailing edge and merely rounded over
the leading edge, on the kit fins I decided to do what I guess it's
appropriate to call an elliptically rounded leading edge. That
is, instead of simply rounding the edge, I beveled it to a narrower
thickness first, then rounded that. This was in an attempt to give the
fins a more "teardrop" cross section, appropriate for an airfoil. It's
what I tend to do on my rockets with straight-edged fins, when I decide
to airfoil them.

 |
| Guide marks at specific distances from the root edge |
 |
| Crossing those guide marks with more marks a specific depth from the edges |
 |
| Connecting the points where the guide marks cross. For most fins, I'd use a straightedge to mark a guide line. For these, I was able to use the leading and trailing edges of the fins to connect the points. |
 |
| Double-checking that the guide lines were the same distance from the leading edge. I had done the same thing for the trailing edges, which you can see here are already sanded. |
 |
| Once I got the trailing edges beveled, I gently rounded off any sharp corners left from sanding. You can see the fin changes from flat to beveled in a nice, even curve. |
 |
| I find guide lines important when airfoiling fins. Also important - checking my work against other fins. In this case, I was lucky. I had an extra set from a kit which was smashed in shipping. The fins survived. |
 |
| Once the leading edges were beveled to a narrower thickness, I rounded them over with a small piece of 220 grit sandpaper. |
 |
| Leading edges |
 |
| Trailing edges |

 |
| Not exactly "teardrop-shaped," but close. A sharper trailing edge (left) and an elliptically-rounded leading edge (right). |
 |
| Tip edge view |
That's where I am at the moment with the Aston Sprint XL.
Speaking
of fins, I'm also playing around with trying to shape fins on a scale
model, by building them up and sanding them down. Here's a sneak peek.


This is just a first study. It's a work in progress. When I finish this little experiment, I'll talk about it on the blog.
Editing on the video series on building the Quest Superbird
has gotten bogged down, so I've put that build on hold until I can sort
out the video I have. But I've completed five videos so far. Click here to check them out if you haven't seen them.
A fun modification I've decided to try is this:

That's an Estes Crossfire ISX with a drag-reducing tail cone. I'm doing it more to have something that looks cool rather than to reduce drag, but that's the idea.
The tail cone is made from a leftover nose cone from an Apogee Components' Avion kit, from last summer's Rocket Camp. One advantage of building rockets with kids is that there are inevitably some left over parts.

Because this is a modification from the Crossfire's original design, it will require me to double check the stability before flight. I'll surely have something about this on the blog in the future.
Apart
from that, I'm saving up to replace my AeroTech casing and Jolly Logic
Chute Release. I hope to have more successes than failures to write
about this year.
Follow me on Twitter.
Like my Facebook page for blog updates and extra stuff.
Have a question you'd like to see addressed on this blog? Email me at iamtherocketn00b@gmail.com.
Follow me on Twitter.
Like my Facebook page for blog updates and extra stuff.
Have a question you'd like to see addressed on this blog? Email me at iamtherocketn00b@gmail.com.
Current Projects #2 - August 19, 2016

I haven't posted anything on this blog in about two weeks. Apologies to my regular readers, particularly if you've been waiting for the most recent installment of the Rocket Camp series of posts. I write this blog when I have the time, and some posts - particularly the Rocket Camp ones - take a while to finish, as I don't want to leave anything out. I just finished a 7-day work week, so writing anything of substance had to wait.
But I thought I'd get the ball rolling again with a Current Projects post, an idea I had for a regular feature on the blog, which I haven't revisited since last December.
One reason I haven't been writing much lately is that I've been trying to finish a few rocket projects. The most recent I've finished is the Estes Leviathan, a hulking beast of a model rocket on which I started construction nearly a year ago.

Estes stopped making the Leviathan recently, and it's a real shame that they did. It's a very popular kit. The rocket is a big, beautiful, four-finned rocket, part of their Pro Series II lineup. It's three inches in diameter and over 41 inches tall, and has a 29mm diameter motor mount. It's designed to be a mid power rocket (mid power is generally considered to be any rocket which uses E-G impulse motors), but with its strong construction and 29mm mount, it can be flown on motors up to H impulse.
H is where high power rocketry ("HPR") begins, and the Leviathan is a popular rocket for Level 1 HPR certification flights. Because it was relatively inexpensive (especially when Estes was liquidating them at about $22 per kit) and simple to build and fly, it's ideal for certification, because if the flight failed, it didn't cost so much, and could easily be replaced on a lower budget. A lot of dedicated HPR rockets cost much more, so a failure could hurt the wallet a lot more.
Though when I started building the Leviathan, I figured I'd just use it on F and G motors, I've decided to use it for my L1 cert flight, which I plan to do in September.
Because this blog is mainly aimed at beginners - rocket n00bs - we haven't talked about HPR much. And there's lots of exciting stuff to do in LPR and MPR (low power and mid power rocketry, respectively), and a lot of beginner stuff I haven't touched on yet. But the basics of getting a Level 1 certification are pretty simple.
First of all, you do need a certification to fly HPR. You can build all the HPR rockets you want to, but in order to purchase the motors you'll need to fly them, you must be certified.
High Power Rocketry has three levels of certification. Level 1 allows you to fly rockets with H or I impulse motors (or clusters of lower power motors which exceed the propellant weight or combined total impulse allowed in model rocketry - more on this at another time). With a Level 2, you can fly J, K, or L motors. And at Level 3, the top level of HPR, you can fly M motors and above.
Since each letter essentially doubles the total impulse - the total power a motor can impart to the rocket - you can see how quickly the rockets flown by high power rocketeers can get bigger and louder, can fly higher, and certainly get much, much more expensive! And restrictive - there aren't many places in the country where you can fly an N, O, or P motor. But if you get to witness a flight like that, it's really impressive. Motors that powerful are - well, they're very much like "real" rockets (actually, even an Estes Alpha is a real rocket, but you know what I mean).
While Level 2 and 3 certifications are more complicated, including written tests - and redundant recovery system deployment required for L3 - a Level 1 certification flight can be very, very simple. Some people go for more complexity on their certification flight, using electronically-controlled recovery deployment, but an L1 flight can be as simple as a model rocket flight, just with a bigger rocket.
What's required is that you be a member of one of two rocketry associations - the National Association of Rocketry or Tripoli Rocketry Association. You must build the rocket yourself. It can be either a kit or scratch built. You have to fill out some basic paperwork (though there's no written exam). You must then fly the rocket with qualified witnesses, usually at a club-sponsored event. The rocket has to fly on either an H or I motor, must have a stable flight, and must be successfully recovered undamaged, and with the motor still in the rocket (in other words, the motor has not accidentally been ejected during flight). Undamaged in this context means that the rocket must be judged by the witnesses to be immediately flightworthy again without making any repairs. So, while a little chip in the paint job (which will probably happen to any rocket) is OK, losing a fin is not!
* * *
But, I'm getting off track. This isn't meant to be a primer on HPR - it's a Current Projects post.
It took me nearly a year to finish the Leviathan. That's much longer than you need - this is essentially a larger model rocket with pretty simple construction. But I had to make some decisions on how I was going to build it, and I wanted to make it look as nice as I could. For me, that takes a little extra work, and I didn't have the time to do it all at once.
One thing I had to decide - would I attempt to streamline the fins? On most of my smaller model rockets, I sand the balsa fins into airfoil shapes. I enjoy doing it, I'm getting pretty good at it, and I really like the way it makes a rocket look. And it may help increase your altitude significantly.
The Leviathan has fins made of birch plywood - much tougher than the balsa fins of a basic model rocket. I don't have any power tools for shaping, cutting or sanding. My only tool for that is my Great Planes hand sander.
Well, it takes a little longer, but it's no more difficult to streamline plywood fins with a sanding block than it is with balsa. I did about a fin a day, and it came out great.
The finished rocket is flat black with two thin silver bands. Instead of a launch lug, I installed two rail buttons for use with a launch rail - which is fast replacing launch rods on high power launch pads.

I'm pretty pleased with how the Leviathan turned out, and I can't wait to fly it.
Also nearly finished is the Estes Nike Smoke, another large Pro Series II rocket. This is a sport scale model of a NASA sounding rocket from the 1960s, and it's another impressive kit.
 |
| The Nike Smoke was flown during the 1960s, and was used to test wind shear. |
It has also taken me a year to complete. I worked on a lot of rockets at once - probably too many - so it took me a little longer.
Painting the Nike Smoke has given me major problems. My first three attempts at a white undercoat came out terribly - horrible, sharp bumps all over the rocket!
 |
| After my first attempt at painting the Nike Smoke |
 |
| The results of my third attempt... |


In a day or two, I'll move on to the orange and yellow fins, followed by the United States decals, and finally a flat clear top coat (scale models are often painted with a flat top coat - real launch vehicles are rarely shiny like a nice sport model rocket, and flat colors make a model look larger).
Also nearing completion, though lagging behind, is a third Pro Series II kit, the Ventris.

This is a nice tall rocket with a larger payload section. The build has come along slowly but well, and I can't wait to finish it and fly, hopefully in September. I have a launch this weekend, but at a smaller field, and I'm not going to fly the Leviathan until my Level 1 attempt. I hope to show up at the field with all three of these, because they're pretty impressive-looking.
I also finished and flew the Copperhead a while back. The Copperhead is a rocket I designed and built for a friend, and I liked it so much I built my own. I decided to add a booster, transforming it into a two-stage rocket.

I've flown it three times - once with the booster, and twice as a single-stage rocket. I've already broken a fin off both the booster and the sustainer. I glued them back on, so the rocket can fly again. It's not as pretty as it was when I finished it, but they never are after your first flight.
* * *

Back in April, I flew a number of new things, including a rocket from the book Make: Rockets: Down-to-Earth Rocket Science, by Mike Westerfield. This rocket is called Ceres B, and has a hidden camera payload.

The Ceres B has a 24mm motor mount. The original design, from the book, is meant to be flown on E9 black powder motors. But with a composite, you can fly much higher, and use motors up to G impulse.
I had ordered some composites for that launch by AeroTech, but they didn't arrive in time. Well, they're here now! In fact, a few days ago, I took inventory of all the motors I have.

My supply of C6 motors is dwindling. I have no idea where I got all the B6-4 motors. The G40-7 composite motors at the bottom will be used in my Pro Series II rockets. I've heard that these are impressive motors to watch - a decent 2.5-second burn time with a thick plume of white smoke. I'm excited to try these guys out!
Finally, I got a hat.
 |
| My official rocket hat |
Joking aside, if you spend lots of time in the sun launching rockets, you should consider getting a sun hat. Sun screen is a must, but you will probably need extra protection. If you join a club, you'll see lots of people wearing sun hats, and it's experience (and possibly a dermatologist) which has taught them that they need these.
Back to instructional posts soon.
I'll do full build posts of the Leviathan, Nike Smoke, and Ventris, when all of them are finished - and probably after they've flown. In the mean time, I am uploading photos of the build on The Rocketry Forum. You can find the Leviathan thread here, the Nike Smoke thread here, and the Ventris here.
Follow me on Twitter.
Like my Facebook page for blog updates and extra stuff.
Current Projects #1 - December 20, 2015
Astron Sprint XL

This is a large, BT-60 based rocket kit I've had my eye on for some time now. It's supposed to be a high-performance design, with elliptical fins (which are said to reduce induced drag) and a tail cone (which, if fit well to the airframe, reduces base drag - one of the highest sources of aerodynamic drag on a rocket in flight.
The rocket has a 24mm motor mount, and should fly nice and high on Estes E9-6 motors.
 |
| Filling the seams on the nose cone and tail cone with plastic putty. Squadron is a popular brand. I use Tamiya, because it's what was available at my local hobby shop when I started trying plastic putty, and I'm familiar with it. |
 |
| Slight gap at the tip of the nose cone. This will show through the paint. So I'll apply a dot of putty here and re-sand. |

 |
| Tail cone gets the putty treatment too. These seams are really tight - you wouldn't see them until paint goes on. Then they'd show up. |
Astron Sprint XL clone
I like to shape my fins, usually into an airfoil shape. This is easy to do with straight-edged fins, but I'd never tried it on an elliptical fin before. I needed to figure out what they should look like, and how to do it. So, before I finish the Estes kit, I'll make a clone - or six.
My first attempt at an airfoil isn't perfect, but it's not a bad first try. It also wasn't as hard as I'd thought.
I'll refine the process as I make more fins. Then I'll pick the best three for my clone. Once I'm satisfied I can do the airfoil well and consistently, I'll finish the kit.
 |
| I tried to buy some of the old Estes BT-60 nose cones, which come four to a pack - two Bertha style elliptical cones, and two black ogive cones. But they don't make them any more. I ended up getting six of these. The one in the middle is the Astron Sprint XL nose and tail cone. |
 |
| I used the fin stock piece from the kit to trace a few practice fins from balsa sheet. The three on the left are from the actual kit. |
 |
| This first attempt didn't come out perfect, but it's not a bad start. |


 |
| I haven't decided whether to make the tip sharp, or like this. I haven't found much online about the ideal elliptical airfoil. |

 |
| I'll make a longer taper than this on future fins. |


No comments:
Post a Comment