Saturday, December 13, 2014

Launching Your First Rocket (For N00bs)

Let's assume you've got a rocket. Maybe you built your first Skill Level 1 rocket, like the Big Bertha, or maybe you have a Ready-To-Fly or E2X (Estes' term for "easy to assemble") rocket. In any case, it's time to launch this sucker.

This post will be long, so I'm breaking it into two parts. I don't want you to think it's really complicated, or that launching a rocket takes a long time - it doesn't. But there are some details you need to get right to have a successful, safe, awesome rocket launch, and I don't want to leave anything out.

Rocket Flight

Here's basically what'll happen. You'll load up the rocket, put it on the launch pad, hook up the launch controller, press the launch button, and it should take off into the sky. The motor (or engine) will burn for a second or two (this phase is known as powered flight), and when it stops burning, the rocket will continue to coast upward. You'll see white smoke coming from the back of the rocket for several seconds as it does; this is the delay charge burning. The delay produces no thrust, but it allows the rocket to coast up to its apogee - the uppermost part of its flight. Then, the motor will fire the ejection charge - a tiny explosion that will push the nose cone off and eject the parachute. The parachute should open, and the rocket will drift back to earth.


What are you going to need?

Here are the basics:
  • A rocket
  • A launch pad - with a launch rod
  • A launch controller
  • Some rocket motors - or, as Estes and many people call them, engines
  • Some igniters - these usually come with motors or engines, so you shouldn't need to buy any
  • Some recovery wadding
  • Something to carry all this stuff
What is this stuff?

Well, as I've recommended in the previous post, you might want to get launch kit. You can get a basic Estes kit - or Quest - which will have the launch pad and rod, the launch controller, and a rocket for less than you'd pay for the pad and controller plus no rocket at all, if you'd bought them separately.

An Estes launch pad - with a round metal
blast deflector and a 33-inch launch rod. The
cap at the top of the rod comes off - it's to prevent you
gouging your eyes out when prepping the rocket!


A launch pad comes with a metal disk called a "blast deflector," and it's not optional! This will deflect the hot gasses and burning propellant away from the ground, and protect the plastic from melting.

The launch rod is usually about 3 feet long. The purpose of the rod has to do with rocket stability. The only thing keeping the rocket going upward instead of straight at the crowd is the fins. And for the fins to work, the rocket has to be moving upward, so there's wind moving past them. The launch rod keeps the rocket moving straight up until it is going fast enough - at least 30 miles per hour - for the fins to do their job. With model rockets, it takes only a fraction of a second to reach that velocity or much higher, so a 3-foot rod is usually plenty.

The Estes rods are 33 inches - close enough - and come in two parts which you have to push together. There's a narrow, curved bit of metal shoulder material in one half of the rod which you push into a hollow onto the other half. I found I had to crimp mine with pliers to get the halves together.

Tap one end of the rod on a concrete surface to get the pieces completely together - but don't try to hammer them. The rod will bend, and if that happens, you need a new rod!

Estes recommends using sand paper to smooth out the joint between the rods. Don't do this. What happened when I did this was that I scuffed the chrome coating off the rod, making it rougher! You could try some steel wool, but honestly, unless the joint is way off, you'll be fine.

The rod gets inserted into a little hole in the top of the launch pad. There's a little safety cap included which you place on top of the rod when you're not actually launching a rocket - this is to prevent you bending over the rod and gouging your eyes out. I've mentioned that rocketry has a great safety record - I read once that the most dangerous thing about launching rockets is that rod!

Arr! Don't be the guy who loses an eye launching rockets!

The launch controller is a plastic box with a button, a light, and a removable "key" - usually a bit of wire or metal with a plastic button on top of it - and a couple of wires coming out one end with little clips on the ends of them. The controller takes batteries, and it ignites the motors electrically. The key is a safety feature. Once you hook the rocket up, you cannot launch it accidentally by hitting the launch button with your thumb, because you have to put the key in the launch controller and press it down before it will work.

The light is known as a continuity light, and when you hook up the rocket igniters to the launch controller, and put in the key, this will light up. It tells you that electricity is flowing through the system, the batteries are good, and the igniters are not broken.

Typical Estes launch controller, from Chris Michielssen's
modelrocketbuilding.blogspot.com. If you haven't seen his
blog, you need to check it out!


The launch button... uh, launches the rocket.

***I do have to say something important here, in case you are not going strictly the Estes route for your first rocket launch. Currently, Quest motors and igniters are out of stock, but once Quest motors are back out again, this is very important: You cannot use an Estes launch controller with Quest igniters. Quest makes a very sensitive igniter. They require very little current to flow through them to actually cause them to fire - which is a good thing, for certain applications. But an Estes launch controller doesn't have enough resistance in it, and as soon as you put the safety key into the Estes launch controller, instead of just the continuity light coming on, a Quest igniter will get enough juice to fire prematurely. If there's someone at the launch pad making an adjustment, that can be dangerous!***

A rocket motor is a heavy paper cylinder  which encases a solid propellant - in this case, black powder. One end has a little hole in it - the nozzle - and the other end has a clay cap in it.

A typical 3-pack of black powder motors - in this case,
Estes B6-4. That's an average thrust of 6 Newtons
and a delay of 4 seconds.

The nozzle end - this sticks out the back of the rocket.

The clay cap end - goes into the rocket pointed toward the nose cone.
In A and B motors, this is further recessed into the motor, because
there's less propellant inside.
(If you don't see a clay cap, and instead see the dark black powder in the non-nozzle end, look at the side of the motor. Is the last number a 0? Then you have a special motor used only for the first stage of multistage rockets. Put that away for now - we'll get to those later. For now, it's definitely not what you need!)

The motor on the left has no clay cap - you can see the black powder propellant. This is
only for multistage rockets. Put that one away for now. We'll do staging later!
Rockets for beginners come in three basic classes - A, B, and C. The basic explanation of this is that each letter class is roughly twice as powerful as the previous one. C is twice as powerful as B, and four times as powerful as A. They are described by a letter and two numbers. The first is average thrust, and the second, after the dash, is the delay time, which is the time between when the motor stops burning propellant and the ejection charge going off. So, a C6-5 motor has an average thrust of 6 Newtons, and a delay time of 5 seconds. A Newton is about 0.225 pounds.

Your first rocket will come with a list of recommended motors to use. Read these. First time I launched the Big Bertha, it was kind of windy, and I didn't want to lose my beautiful new rocket. So, I put an A motor in it.

Problem is, the Bertha is kind of heavy. An A8-3 motor doesn't have enough power to properly lift it. It flew about 30-50 feet into the air, took a nose dive, and straight down for 3 seconds (that was the delay time!). The nose cone ejected about 5 feet from the ground, and the rocket drove itself into the damp earth.

The fancy, homemade launch controller makes me look like an "expert,"
but the crash landing goes to show that I'm still kind of a n00b.

I thought I knew what I was doing, but hadn't realized that the A8-3 is not on the list of recommended motors for this rocket! The weakest motor for the Bertha is a B-something. Oops!

There will be a list of appropriate motors with your rocket. There's usually one with an asterisk (often the least powerful one) that says "first flight." This is so that, if, say, it's windy, you're less likely to lose the rocket when the parachute drifts too far, or if you made some kind of catastrophic error in the construction of your rocket, the damage will be minimal.


The igniter is a little wire thing that comes with the motors. It's usually made of high-resistance nichrome wire. The resistance is important, because when electricity flows through a high-resistance wire, the wire heats up. This happens in an incandescent light bulb, and in the wires of a toaster - which are also made of nichrome. Most Estes igniters are also tipped with a combustible material called pyrogen.

To igniters - you snip these apart before using them.
Motor packs include tiny plastic plugs for
securing igniters into the nozzle of the motor.

You insert the motor into the back of the rocket with the nozzle end - the little hole - pointing out the back of the rocket. Secure the motor with the motor hook (or sometimes you tape it in, if the kit instructions tell you to do that). The motor hook should lock into place once the motor is all the way in. Tug on the motor gently to make sure that when it moves backward, the hook holds it in firmly by the edge.

Now, pull out the nose cone, parachute and shock cord. You need to protect the parachute from the burning particles of the ejection charge, or it will melt together and won't open. Into the rocket body, you put recovery wadding. Tear off individual sheets, and roll them loosely into little wadded balls of paper - not too tight! The instructions on your kit will tell you how many pieces you'll need for your particular rocket. Put them one by one into the body of the rocket, and if you need to, push them down very gently with a dowel rod.
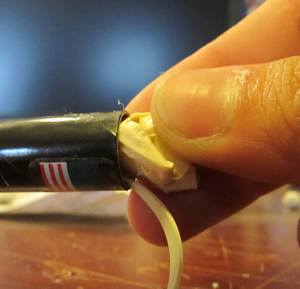
Picture from stormthecastle.com

Next, you need to fold the parachute and insert it and the shock cord into the rocket. There are lots of ways to fold parachutes, but some ways are better than others. Doing it by the instructions in the Estes kits is terrible - mine do not deploy at least 50% of the time when I do it this way. We're going to do it another way.
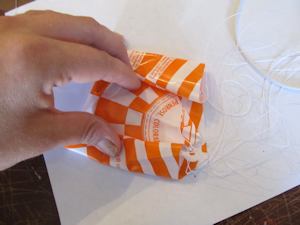
The Estes "fold over and roll both ends to the center"
technique - terrible. The shroud lines get tangled, and
the chutes often fail to deploy.

Plastic parachutes sometimes have problems deploying. This can be due to static electricity, or cold, or bad folding. In any case, you'll help the parachute properly deploy if you give it a few dashes of talcum powder or baby powder.

I prep my rockets before going to the flying field by laying the parachute open on a table. 
The Big Bertha 18-inch parachute ready for prep
I sprinkle a bit of baby powder on the underside of the parachute and lightly spread it around so it coats the whole chute. 
Sprinkle a little baby powder or talcum on the chute to aid deployment

Next, fold the chute in half, with two of the corners being at the top of the fold. Now you'll have half a hexagon, with four corners showing - two at the top and two at the bottom.


Take one of the top corners and fold it down to the bottom corner on the opposite side. Then do the same for the other top corner. You now have a triangle, with all the shroud lines - the strings on the parachute - coming off the two corners at the bottom.

Fold one of the top corners down to the opposite bottom corner - in this case, top right to bottom left.

Then do the same for the opposite top corner - here, top left to bottom right. You now
have a triangle with shroud lines coming from the bottom two corners.
Fold the parachute in half so that all the shroud lines are together. Now, you'll have a scalene triangle, with all the shroud lines coming out the bottom.


Take most of the extra slack that leads from the parachute to the nose cone and gently lay it on top of the parachute.


Gently lay the slack from the shroud lines on top of the folded parachute.


Fold that outside corner over the shroud lines, then fold the top corner down about a third of the way, then fold what you have down again.

Fold that outside corner over the shroud lines

Fold the top third of the parachute down.

Fold that down over the bottom third.

Next, roll the whole thing up into a little packet and gently wrap whatever is left of the shroud lines around the parachute into a helical shape, making sure you don't cross over what you've already rolled.

Roll the folded chute down into a sausage shape

Wrap the shroud lines in one bundle around the chute, moving from one end to another, in a helix.
Don't cross lines back over what you've already rolled!
Once this is done, you stuff the parachute and shock cord into the rocket. Some say you should put the shock cord in first - which is probably better. Some say the shock cord goes on top. It probably doesn't matter a ton, and in some small-diameter rockets, it's hard to get that shock cord in there - it's just rubbery enough that it doesn't want to go in on its own unless you're pushing it, and that's hard to do when you've got your rocket in one hand and a perfectly-rolled parachute in another. If I can't get the cord in first, I stuff in the chute, then pack the cord on top. I've rarely had a deployment problem with this.

The shock cord in a larger rocket like the Big Bertha goes in quite easily - put that in first.


Put the nose cone on top, and make sure it's snug, but not tight. You should be able to easily pull it out with your hand, but it shouldn't be so loose it falls out if you turn the rocket over and give a little shake. If it's too loose, add a little strip of masking tape to the shoulder. If it's too tight, sand the shoulder down a little bit.

The nose cone of my Cosmic Explorer is just a little too loose. A few
bits of masking tape makes it snug enough to fly.

You then insert the igniter into the nozzle of the motor, making sure it touches the propellant inside. It doesn't have to go very far, and you don't need to force it. Just set the tip of the igniter gently into the nozzle until it stops.

Don't insert the igniter until it's in the rocket and at the launch pad!I'm just doing it on the table here for the purpose of taking pictures.

Next, you'll secure the igniter into the nozzle with either a little plastic plug that comes with the motor (in the case of Estes motors), or with a piece of masking tape. Either way, this will bend the igniter's leads into a 90 degree angle. Make sure the two wires leading into the nozzle don't touch each other - this creates a short circuit, which means that when you press the launch button, nothing will happen.


Now, you'll bend the ends of the igniter wires away from each other. You can bend them into little rabbit-ear loops, or simply bend them away from each other at a wide angle. The rabbit ears are easier to connect to the clips, but as long as the two wire leads aren't near each other, you'll be fine.


The rocket is now prepped for flight.

In Part 2, we'll launch the sucker!

[Click here for Part 2]

Thursday, December 11, 2014

Getting Into Rocketry - How Much Does It Cost?

I recently showed a guy I know some of my rocket videos. He's a retired vet, nice guy, and I thought he'd get a kick out of them - and maybe I'd find someone else to talk rockets with. He thought they were pretty cool.

The other day, we were talking, and he asked when we were launching next. I told him I'd let him know, and hoped he'd join us. Then he said, "So, if I wanted to get into that, how much would it cost?"

Excellent question.

Sometimes, when I tell people I've gotten into rockets, they say "that sounds really expensive."

It can be. But it certainly doesn't have to be.

Advanced Rocketry Can Get Expensive...

If you get into high power rocketry, it certainly starts to get expensive. The kits get bigger and stronger, and are sometimes made of fiberglass, and they require stronger adhesives than mere white glue or wood glue. A lot of high power rocketeers put expensive electronics in their rockets. These are sometimes for fun (cameras or altimeters), and sometimes necessary - a two-stage high power rocket requires an electronic ignition system for an upper stage, for example, whereas a low power two-stage rocket, like my Janus I, is far simpler.


And a lot of high power rocketeers use something called "dual deployment," which is a system where a small drogue parachute comes out of the rocket at apogee (the highest point of altitude in its flight), and a larger parachute comes out much nearer the ground. This stuff all requires special electronics.

And then there's the fact that even the most basic rocketry need - a rocket motor - gets more expensive when you get to high power. Check out this coffee mug:

See Benjamin Franklin?

Actually, the other day, I was thinking "I bet if they'd had rockets back in the 1700's, Ben Franklin would definitely be into HPR." I forget why I was thinking about that... My mind goes weird places sometimes.

I just acquired this from BuyRocketMotors.com:

This is a realoadable casing for composite propellant rocket motors. This is for mid power rockets, larger model rockets with a motor mount of 29 millimeters in diameter - much bigger than a beginner's rocket motor, which is much smaller and uses black powder as a propellant. I got the casing - on sale - for $39. Which is expensive. But the casing is the expensive part. The fuel grain, which is the actual propellant which goes inside, is much cheaper per launch than getting single-use motors. You keep the casing and use it again and again.

Anyway, point is, advanced rocketry can cost a lot. But that's something you build up to.

...But Getting Started In Rocketry Is Quite Affordable

Now, rockets for beginners are really quite reasonable. You can buy lots of fancy tools and electronics - they do make altimeters for model rockets, which cost anywhere from 30 to maybe 80 dollars - but that stuff really isn't necessary, if you're just starting out. Launching a rocket, even a small one, is far more exciting than you'd think it was unless you saw it happen, and even really tiny rockets that use mini motors can go really high and really fast - and they're cheap!

My Estes Star Trooper, for example, is only 5 inches tall, but it goes over 900 feet high - and the kit only cost 7 bucks!


So, what are you gonna need to get started, and how much is it going to set you back? Well, if you go launching with a friend who has basic launch equipment, and you use his or her stuff, then you won't have to worry about that, and all you'd need would be rockets and motors.

But, let's assume you want your own equipment, so you can launch whenever you like.

Here's what you need to start out:
  • Rocket(s)
  • Rocket motors
  • Launch pad
  • Launch controller
  • Recovery wadding
If you plan to build kits rather than simply buying ready-to-fly rockets (which I'm sure you do, because it's much more fun to build them than to buy-and-fly), you'll need a few basics to build your rockets:
  • Pencils
  • Hobby knife (X-Acto)
  • Cutting mat
  • Sand paper
  • Glue
  • Metal ruler
  • Primer and spray paint
That's it! Let's break this down.

Rockets/Launch Pad/Launch Controller

For the moment, we're going to stick with Estes rockets and equipment, because that is the company that's the most prevalent in model rocketry for beginners, and most of the basics are pretty affordable.

I recommend for a beginner that you get a launch kit or launch set. You absolutely need a launch pad - a squat little tripod with a long metal rod coming out the top and a metal plate at the bottom - the blast deflector - to deflect the hot gasses from the rocket motor away from the ground and pad. And you need a launch controller - which ignites the rocket motor and launches the rocket. And you need rockets. A launch kit has all three of these things - for less than you'd pay if you bought a launch pad and launch controller separately, and didn't buy any rockets.

Now, you can make your own stuff, if you're inclined to do so. I made a launch controller, because I wanted something more flexible and powerful than the Estes controller that came with my kit. But that was after I'd been messing around with rockets for a while, so I was already familiar with what these things did. And I'd say it wasn't any cheaper - in fact, if I added up all the parts and tools I bought (I needed a soldering iron, for example, and 40 feet of pure copper wire), I'd probably have been surprised at the price tag. That was a labor of love, however, so I just decided I didn't care.

But to start out, a launch kit is great. One I recommend is the Estes Tandem-X launch set.


As of this writing, it's $22.22 on Amazon.com, with free shipping if you have Amazon Prime. It's also available from plenty of other vendors.

With this set, you get the pad, the controller, and two Skill Level 1 rockets, the the zippy, high-flying Crossfire ISX and the big, slower Amazon. They're both impressive - the Crossfire zooms up to altitude at really impressive speeds, and the Amazon lifts off more slowly, so you can really see it. A slow rocket may not sound impressive, but a lot of people prefer it - there's actually a common launch event called "low-and-slow," where the whole point is to get a slow lift and not get lost from view. Since it's heavier, it looks a lot more like a "real" rocket, in that it starts more slowly and doesn't disappear from sight in 1.5 seconds.

Here, Chad and I race our Crossfires:


Speaking of Amazon.com, I'm sure you know that their prices change often. Sometimes a price will drop drastically for a day. I had the Big Bertha in my shopping cart for about a month. It cost about $21, but one day I happened to be looking at my cart, and the Bertha had dropped to about $9.95. That's less than half price! I bought it immediately.


Stuff to Build Rockets With

Great! You got some rockets, now you need stuff to put them together. Now, if you read my long series of posts on building a Skill Level 1 rocket, you know that there are a lot of extras you can get to make a rocket look nicer - carpenter's wood filler, for example, and plastic putty. But maybe you don't care about spiral grooves or wood grain showing through your paint job, and you're fine with a little bit of the seam showing on the nose cone. The rocket will fly just fine, and for your first few rockets, you can skip the extras. Some rocketeers never use those extras - and their builds take much less time!

A hobby knife, often called an X-Acto knife (just a brand name) will run you between 2 and 5 bucks, depending on what brand you get and where you get it. You can get these anywhere - craft stores, hardware stores, probably even at a grocery store - and they're basically all the same. They (usually) have a metal handle and a chuck you stick a blade into. Most of them come with the #11 blade you'll use for most rocket projects. Get a pack of extras - they dull and the tips break easily.

This knife needs a new blade already - a five-pack costs just a couple dollars.
You should have a cutting mat or board. In the old days of model rocketry, a wooden cutting board was the norm, but now most people use a nice, self-healing cutting mat. Olfa makes the most popular brand, but it's also more expensive. I went with Fiskars, because I recognize the name from my mother's quilting gear - and if anybody thinks I have too much rocket-building gear, I'll just take them to see my mother's quilting room some time.

You could get by with a thick layer of newspaper for a little while - and when I say "thick layer," I mean most of the Sunday New York Times - but don't complain to me if you cut through that and mess up your table. Hobby knives are sharp!

I got my cutting mat for less than $10. It was priced higher, but another money saving tip is that when I went to the local Michael's Crafts, I found I had a 40% off coupon - they email these out regularly, so if you have a Michael's near you, just sign up at their website.


Double-sided self-healing cutting mat
 A bottle of glue - I prefer wood glue, but a lot of people use "white glue" - Elmer's Glue All is one of these (do NOT get "School Glue." Anything "washable" is no good for rockets). A bottle is... I don't know - two bucks? I've bought a lot of glue, so I get a larger bottle now, but Elmer's or Titebond (which I like better) has small bottles for maybe 2-4 bucks.

A metal ruler is a must for measuring and also making precise cuts. Sometimes you have to cut fins out of balsa wood - they come "laser cut," but they're still held in with little tabs of wood. I use the ruler to make sure I'm only cutting the tabs, not cutting into the fins themselves. You want metal, because you'll use this in conjunction with your hobby knife. You can get these all over - craft stores, Menard's, Wal-Mart probably. Get metal. With a cork base - it will keep the ruler from sliding around. I started with a 6-inch ruler, but moved up to a 12-inch, and probably should have gotten 18. I use both of them pretty regularly. Look around, and you can get one for 5-10 bucks.

Sandpaper - I would get maybe 220-grit and 400-grit for starters. The higher the grit, the finer the sandpaper, so higher grits are for finishing surfaces. At the very least, you'll need to sand the fins a little to make them square and even. I get large sheets and cut them to size. I think they cost less than $3 a pack, though bulk packs are probably cheaper.

You can shop around for spray paint - or if you really don't care, you can fly your rockets naked, with no paint job. A bit ugly, but they will fly just fine.

Pencils are basically free. Who doesn't have a million pencils from who knows where?

The basic tools you need to build most Skill Level 1 rockets


A really rough calculation of what I think I'd have spent for this basic list so far tells me we've spent about $60. I don't know what you earn, and I don't need to. Maybe $60 sounds like a lot to you, or maybe that's peanuts. Either way, bear in mind that you don't have to get all this stuff on Day One. First you get the rockets. Then, if you've ordered them online, you wait a couple days. Then you build the rockets - that takes a couple days at least, unless you're in a hurry. I like to take my time. Then you paint the rockets. If you're using several colors, this can take several days, including using primer first and allowing each color to fully dry. So, over one week, if we've rushed out and gotten everything and then built and painted as quickly as we can, we've spent a total of $60 on rockets.

Now, some of that is one-time-only expense, like the cutting mat, ruler, hobby knife (minus the blades - you do need to replace those frequently), the launch controller, the launch pad, etc. You won't have to replace  most of these things until they wear out, or until you're ready to move up to something bigger. And if you're careful launching, you can launch the same rockets over and over - that's kind of the point. You do lose rockets occasionally, of course - to trees, lakes excited children stomping on them, dogs thinking they're a cool toy, etc.. But if you're careful, a rocket can last you years.

Recovery Wadding

Recovery wadding is flame retardant paper which looks like toilet paper. In the old days, Estes actually treated cheap toilet paper with flame retardant chemicals. Perhaps that's what they still do.


Anyway, you stuff this in the rocket before putting in the parachute when you are getting ready to launch. It protects the plastic parachute from melting or burning when the recovery charge goes off, which ejects the parachute so the rocket can land safely. A packet of this stuff is 5 or 6 bucks, and will last you a couple of launch sessions.

However, there's a much cheaper alternative! If you're serious about this, go to Lowe's or Home Depot and get yourself a bale of cellulose insulation. This is recycled paper which has been treated for flame retardancy, shredded, and is used in home insulation. Rocketeers commonly refer to this stuff as "dog barf," because that's what it looks like. A bale of this will cost maybe 7 bucks at most, and can apparently last for years of launches.

"Dog barf" cellulose insulation, used for recovery wadding. This is a tiny fraction of the huge bale I bought for
less than $7. And you can see, I've barely made a dent in this. A giant bale of this costs about the same as a tiny
packet of the "toilet paper" wadding you get from Estes or Quest. It's biodegradable, in case you were wondering.

Motors, or Engines, or Whatever You Want to Call Them

Finally, you'll need motors (Estes calls them "engines," but most rocketeers use the word motors). This is where rocketry can get more expensive, and it's the most expensive part, even though beginner's motors don't cost much. It's just that you'll need new ones each time you launch.

When you start out, you will use motors that use black powder as a propellant, and you'll buy from three motor classes - A, B, and C. We'll get into motor basics soon, but a quick explanation for now is that each letter is up to twice as powerful as the previous one. C is up to twice as powerful as a B, which is up to twice as powerful as an A. There are small rockets that take mini motors, the 1/2 A and 1/4 A.

A selection of Estes black powder motors, with a mini A motor on the left The two on the right are larger,
more powerful (and more expensive) D and E motors - you don't need to worry about those for now.
The more powerful the motor, the more propellant it has, and that's largely what drive the cost.

Here's a three-pack of B motors. This class is capable of launching most of the rockets you'll build as a beginner.

This cost about 10-ish dollars at a local hobby store. A pack of A motors cost about 9-ish, and a pack of C's cost about 12-ish. Mini motors come in four packs, and cost 8-9 bucks.

Each time you launch a rocket, you need a new motor. When I launch with friends, we send up about 8-12 rockets in a 1-2 hour period. So, a launch can cost a few dollars. But I only launch about once every month or so. I'd like to do it more often, but I prefer to launch with friends, and getting everyone together, plus weather, has made it a little impractical.

So, you can see that a launch itself might cost you a few bucks, depending on how often you launch. However, you can buy bulk packs. A bulk pack of 24 Estes C6-5 motors is currently about $57 on Amazon, with free shipping. (If you buy directly from Estes, you get hit with a HazMat shipping charge, which isn't strictly necessary on small black powder motors, I think, because you don't have to pay that on Amazon.) That brings the price of each motor down from over $4 to just over $2. That cuts your launch cost nearly in half! And a "Blast Off Flight Pack" with A, B and C motors is only about $46!

As Chad once remarked to me, "this isn't the most expensive hobby around, but it certainly isn't cheap!" True, but there are ways to cut costs. And if you find rocketry as deeply rewarding as I do - and ask my friends, I've become obsessed - the price tag is worth it.

By the way - the Janus I - the rocket I designed and built from scratch? Very, very cheap. If you want to scratch build some low power rockets, you can find components for very reasonable prices.

But, we'll get into designing and building another time...


Wednesday, December 10, 2014

Three Nearly Finished Rockets

I've been working on a couple of posts for a few days now - including the long-promised "Launching Your First Rocket (For N00bs)" post, plus one on the financial cost of starting out in rocketry. These are taking a while, so I thought I'd do a quick post to show you what I've been up to, rocket-wise.

Last weekend, I had two days off in a row. Due to the nature of my job, this never happens. I got so much rocket stuff done last weekend - it was awesome! The only regret is that I had to scrub a launch, because Chad wasn't available, and we wanted to launch his Apogee Aspire rocket.

Well, first of all, Orion was awesome!

I was at work, and we watched a bit there - missed the launch by ten minutes, but we did see the splashdown. I'd never seen a capsule splash down in real time; I grew up in the Shuttle era.

I finished the 3D Rocketry Nautilus II build - with the exception of attaching the nose cone to the shock cord. I like to finish painting first. The rocket is primed, but not painted:

I love the way a rocket looks when it's primed. It looks solid, serious, and like it's one
piece. I'm sometimes tempted to leave the thing gray and have that be its final color.

I also finished Janus II, my second two-stage design with a camera payload bay. This isn't even primed. All I need to do now is prime and paint it, then attach the nose to the rocket, and it's time to shoot some awesome POV launch videos.
Initial drilling out of the camera well with a Dremel tool
Attaching fins to both the booster and sustainer stages
The camera bay - this will be painted matte black
The completed rocket. It's my tallest one so far.

This payload bay has enough space to take
an altimeter as well - need to get one of those!

I can't wait to see how this performs - and to get video back!
I'll post the complete build soon, so you can see how I went from design to construction - and then to launch! If I can get this painted, we'll launch it on December 27 - along with Chad's Aspire.

I also started designing a camera chase rocket that I hope to launch with the Janus II, in order to get some interesting footage.

This rocket is intended to have a camera in the nose pointed skyward, and to chase the Janus II. I don't know if I'll get around to building it, or if it will even work - model rockets are unguided, so there's no guarantee the two rockets will even go in the same direction - but my hope is to see a vertical POV from this rocket of the Janus II slowly pulling away as is flies higher. Maybe next spring you'll see something interesting on the Youtube channel.

Finally, I got the Quad Runner, a 4-motor cluster rocket by Quest Aerospace, nearly assembled. This gave me a bit of anxiety, due to the compound fins, but it's looking good, and I'm working on fin fillets at the moment.

FOUR MOTORS AT ONCE!!

Love that Guillotine Fin Jig!

I just love the way this looks


This rocket is looking so beautiful.

I think Quest estimates the altitude of this rocket at 2400 feet - I'll have to take care not to lose it, as it's been weeks building for me! Again, I'll post on this build in the future.

Now, if only I can get these painted, these will be some great-looking rockets!

Oh, and I unpacked one of my new mid power rockets - the Estes Pro Series II Leviathan. The thing is freaking huge! I want to get building it, but I need to seek some construction advice, as I plan to make a few changes for strength, performance, and cosmetic reasons. And I need to build something to launch it from. This rocket is heavier than my others, and uses a 29mm motor - much bigger than what I've used so far.

A 29mm AeroTech reloadable motor casing, with an Estes C6-5 18mm motor in the foreground. The C6-5 is the
most powerful motor I've launched with so far, but I've built several rockets that use something larger. I just
need to get them out to the launch pad to see how they do!
Instead of using a plain metal launch rod, I may try to construct a launch rail - something higher power rockets use, as it's much sturdier.

The nose cone of the Leviathan is nearly the size of my head!

It's after 2 a.m. Bed time for Bonzo...

Sunday, December 7, 2014

Beware Of "Rocket-Eating Trees"

I've read about so-called "rocket-eating trees."

I think I found one...

To the stars!

Saturday, December 6, 2014

N00b Mistakes #1 - The Wrong Amount of Glue

I'm starting a new, occasional series of posts on this blog - N00b Mistakes. These are mistakes I've made while building (or launching) rockets, and hopefully, things I've done to fix them. If you are new to rockets, I hope you'll find these useful, as they may help you from screwing up something in your builds. Or maybe they'll give you ideas for fixing problems; sometimes, it looks like you've "ruined" a kit, when in fact, you can fix many little flaws with a little patience and care.

This first N00b Mistake is about glue. How much do you need?

Well, for most applications, particularly attaching fins to your rocket, you don't want too much. A thin layer of wood glue or white glue will often be much stronger than a thick, globby layer.

Here, I'm building a rocket with compound fins - made of two pieces
which must be carefully joined together before attaching to the rocket...

This is where a very thin layer of glue is much better and stronger
than a thick layer, which would make more mess, and be less strong.
 This is also where a double glue joint will help you a lot - you apply a thin layer of glue to the fin root edge, stick it in place on the rocket, then remove it, and let it dry for a few minutes. Then, when you apply a new, thin layer of glue to the fin edge, and attach it to the rocket, it will be much stronger, and take less drying time. I have no idea why this is - probably something to do with polymers or chemicals or magic or something.

But sometimes, you do want a more generous amount of glue, and that's what I'm going to address here.

What Have I Done??

When building the Estes Cosmic Explorer, I needed to join two body tubes with a tube coupler. This is a short, slightly narrower section of tube which goes inside the two main sections of body tube, and it's used to make longer rockets. It's also used to join the stages of a multistage rocket, like my Janus I, although in that case, you're not gluing the tubes together, you're holding them together with friction - you want them to separate in flight!

An assortment of couplers for various sized tubes


I digress...

Anyway, I was building the Cosmic Explorer, and went to join the two body tubes. First, I glued the coupler into  the bottom tube, sticking halfway out.

The red coupler inserted into the lower body tube section

Knowing that less glue is stronger than too much glue, I applied a thin ring of glue inside the upper tube, and shoved the two together.

Then... disaster! Wood glue and white glue tend to seize up when they get spread really thin. This is what happened with my tube coupler.

GAAAAHHHH!!!

I have read that this tends to happen a lot with the Estes red couplers, particularly with Elmer's Glue All white glue (they changed formulas not long ago, and I guess a lot of rocketeers have had issues with it).

As I pushed the two body tubes together, there was a gap. I could see the red coupler between the two white tubes, and could not get them together. I pushed as hard as I could, trying to get the tube ends flush with one another, but it wouldn't budge - I even crimped the body of the rocket!

Trying to force the two tubes together didn't work - and it only gave me this nasty crimp in the body tube.
 How Did I Fix This?

Well, once the tubes were glued together, they were together forever, like Romeo and Juliet.

Primer did nothing to hide the gap in the tubes - primer, in fact, only magnifies flaws you didn't see before.


I used the trick for filling in those ugly spiral grooves in the tube - CWF (carpenter's wood filler). I brushed a ring of it over the gap, let it dry, and sanded it down.


I hadn't perfected my tube filling yet, so if you look at the finished rocket really, really closely, you can see a slight bulge from the filler. But this is pretty well masked by the fact that the color of the paint job switches from white to black at that point - so it's nearly invisible.

Conclusion, or How To Avoid This In the First Place

When building rockets, there are a number of things you must glue inside other things. The motor mount, of course, but also sometimes a tube coupler, or even an ejection baffle - a little device that allows gas from the ejection charge to push the nose cone and parachute out at apogee - the top of a rocket's flight - while protecting the parachute from flaming particles of black powder. It's an alternative to using recovery wadding on every flight.

An ejection baffle is inserted halfway into the body tube.
It allows ejection gas to pass through to eject the nose cone and
parachute, but protects the parachute from burning particles.
Hence, no need for recovery wadding.


Here's a picture of an ejection baffle inside my 3D Rocketry Nautilus II rocket. I got it in there successfully, but I made another really dumb n00b mistake when I installed this. Can you guess what it was?

Hint: The little metal thing in the middle of the baffle is a screw eye. Guess
what I forgot to do... (I'll cover this in another N00b Mistakes for you Rocket Noobs).
 Anyway, whenever you need to glue a thing inside something else, you should do several things. First, you should always "dry fit" the part - basically stick it in at least partway without any glue to make sure you can get it in there in the first place. If you put glue in place and then try to slide the motor mount in without checking the fit first, you might find that you can't get it in all the way, because one of the centering rings needs a little sanding. Then, you're pretty much in trouble, because the glue will start to set as you try to get the motor mount in or out of the rocket and fix the problem.

Always test internal parts to make sure they fit
before trying to glue them into place.

See - the aft centering ring needs to be sanded just a bit so it slides into
place. If I'd already applied glue to this before testing, I'd have a problem.

Second, make sure there's enough glue so that the part will slide in easily. You don't need to overdo it, but a paperthin layer of glue is probably too little. Kit instructions will tell you to apply a ring of glue inside a body tube with a craft stick or dowel rod, but whenever possible, I find the best way to do this is to use my fingers to apply the glue in the first place.

Sometimes this isn't possible - you need to get glue too far into too tight a space to use your fingers, and you have to put a bead of glue on the end of a dowel rod or craft (popsicle) stick. In that case, just make sure you get a good amount in there. But if you can use your fingers, do. You can feel with your fingertips if the glue is thick enough to slide easily, or if it's really thin and tries to grab hold of your fingers.

Finally, insert the component in smoothly and in one motion. Once it's in place, you can give it a little twist if you're able to, to make sure the glue is evenly spread. But once it's in, leave it alone.

While you do want to be conservative with glue on things like fins and launch lugs - and then strengthen those joints later with glue fillets - when installing something on the inside of a tube, just make sure you get enough glue around the inside of the tube so that it slides into place smoothly before it grabs hold of the parts. 

It's also important to remember that when you're putting in something that receives a lot of force during rocket flight, like a motor mount, you want there to be an internal fillet to reinforce the joint. Using a little extra glue will create a fillet when you push the part in place, because it will form a thick little ring of glue wherever you stop pushing it.

In the end, though I thought I'd really screwed this rocket up, it's become one of my favorites. It flies really straight, and barely rolls at all! Here's a video of the launch - a full launch, from liftoff to landing. There's a treat at the end - a slo-mo replay of the launch.

Tuesday, November 25, 2014

Bill Stine Himself on Quest Igniters

I think something incredible just happened.

If you're new to rockets, this might not mean anything to you, but stick with me. I'll explain.

So, Estes is not the only rocket company in the rocket biz. There are lots. One of them, Quest Aerospace (perhaps Estes' biggest rival in the low power rocket arena) is another. I have a few of their rockets, including the Magnum Sport Loader, a two-motor cluster rocket. Here's the video:


Quest has a line of motors and igniters. The igniters are called Q2G2, and they're sought after because they're very reliable - especially if you do cluster launches of low power, black powder motors (that's all I'm up to at this point). They require very low amperage to get them to fire, which means it takes less juice to get them to work quickly and properly - very important, since you want all your motors to ignite at the same time in a cluster rocket.

Problem is, Quest motors and starters have been out of stock for months - since long before I got involved in clusters. I kept hearing they'd be back in stock "in November," but, they're just not. Apogee Components has lately been saying "July 15."

I posted a thread on The Rocketry Forum to ask what the deal was. Were they ever coming back? Some insisted that, no, they are gone for good. Something to do with a recent merger between Quest and AeroTech (a company that specializes more in mid and high power rockets and motors). This Quest Q2G2 issue has been a hot topic in rocketry circles lately, and the thread has generated a lot of replies.

OK, that's Part One.

There's a guy named Bill Stine. He's basically been around hobby rocketry since the beginning, and he's the author - along with his father, the late G. Harry Stine (one of the founding members of model rocketry) - of The Handbook of Model Rocketry. If you're serious about pursuing rocketry as a hobby, and want to understand more about it, this book is required reading. I bought a copy for my Kindle and devoured it a few months back, and I turn back to it frequently. Seriously, get this book - it has a lot of information important to understanding rocketry basics. Point is, Bill Stine is one of the biggest names in hobby rocketry. He's like the Richard Leakey of model rockets.


Well, it appears as though Bill Stine himself responded to my thread.

Here's what he had to say:


Originally Posted by OldRocketeer"II"

OK, here's an official response from Quest:

First, NO, Q2G2 igniters are NOT gone forever and you will be able to purchase them again soon (both shorts and longs). The version that comes packed with the motors will not have any difference at all from the "originals" you guys love! But due to new pending BATF regulations, the ones sold as accessories are going to have a slightly different pyrogen on them - but you likely won't notice any difference.

And yes, we have been out of stock on A's, and then B's and then C6-5's. New production was completed in September and was expected to arrive via ocean freight then. Some regulations on shipping HazMat materials have recently changed in China - and we had to test new shipping cartons. Unexpected after unexpected delays just keep happening, and therefore I won't announce a "solid" arrival date now. but it will be soon...

We appreciate your patience and loyalty.

As to quality, the Quest China motors are very bit as reliable and safe as Estes BP motors (NAR MESS reports certainly support this). They are not made in a fireworks factory and the AQL process and testing is every bit as tough as it was in our own US factory years ago. In fact they are made from military grade BP - it just has a slightly slower burn rate than the US BP does. Most folks love our slightly slower burns, especially the C's. Teachers especially like the slower burn times because the kids get a bigger thrill out of slower boost that they can see...

The merger with AeroTech has been great, but of course there have been some "bumps". Running out of motors certainly was the biggest one...

We hope to have some new product announcements soon that I think the rocketry community will get a big buzz out of.

Bill Stine
Wow, I thought, Bill Stine saw my TRF thread? He REPLIED to my thread? THE Bill Stine?? For real?? Am I reading this right???

I went to his profile page. Looks like he's been on TRF for almost six years, and though I may simply not be understanding what I'm seeing on the website... it looks like my post on TRF is the only one he's ever responded to.

And if that's actually true... it kind of blows my mind.

Anyway, whether or not Bill Stine wrote this post himself, or it's someone quoting Bill, it's good to know Quest will eventually put out new starters, because I want to build bigger clusters, and I want them to launch correctly.

And I choose to believe Bill Stine thought my post worthy of comment. Because... wow...