Wednesday, April 15, 2020

FlisKits Tres - A Challenging Build


To get better at building more challenging rockets, you have to build more challenging rockets. Often, rocketeers will hold on to a model for years, thinking "I'm not up to that skill level yet," or "I need to do this one justice!"

It's understandable. Some models - scale kits, particularly - hold a special place in rocketeers' hearts. And their wallets. And they can tend to be difficult to build perfectly.

Some rocketeers look at the "skill level" on an Estes kit and think Level 3? Level 5?? Expert??? No way!

I used to try for perfection, and since I always make some mistake, there are rockets I waited ages to build, and some I figured I'd never be able to tackle. But it helps to realize that, while some advanced rockets truly are harder, there's no ajudicating body on "skill level." Even if you build an advanced rocket beyond what you've done in the past, it's unlikely you'll end up with something that's not flyable. And if you take your time, it will probably turn out better than you thought it would.

In any case, if you want to have nice looking, harder to build rockets, you have to be willing to build beyond your skill level and just try it. Challenge yourselves, newbie rocketeers, I say!

Maybe don't start with something rare, out of production, or really expensive. But other than that, just give it a shot. Instead of perfection, I now aim for pretty good - as good as I can get it - but I don't beat myself up over mistakes. And I usually have pretty good results.

* * *

Anyway... FlisKits!

The next episode of The Model Rocket Show, dropping early this Saturday, is all about FlisKits, a small indie model rocket company from New England. The episode has been a year and a half in the making. I know, this is only the second episode of the podcast, so how could it have taken over a year to make this episode???

Well, it's a long story. Just listen to the show.

I decided recently, since we're all stuck at home and I'm finally putting this show together, I should actually build that FlisKits Tres I bought directly from Jim Flis over four years ago.

The Tres is a large, 3-motor cluster model with canted motor tubes. If you look at the image at the top of this post, you'll see that means the motors stick out the sides a little. This makes for a wide jet of flame and smoke, and it's a fun rocket to watch fly.

But that motor mount is the main thing that's the challenge in this rocket. I thought I'd do a build on the subject.

I have no picture of just the parts laid out on the table, but the rocket is made up of one 18 inch BT-60 tube and one 18-inch BT-55 tube, balsa nose cone and transition, and balsa sheet - that means no precut fins!

Since this is a cluster rocket, there are three 18mm motor tubes (that's A/B/C sized engine tubes for you fellow Rocket N00bs).

Here they are:


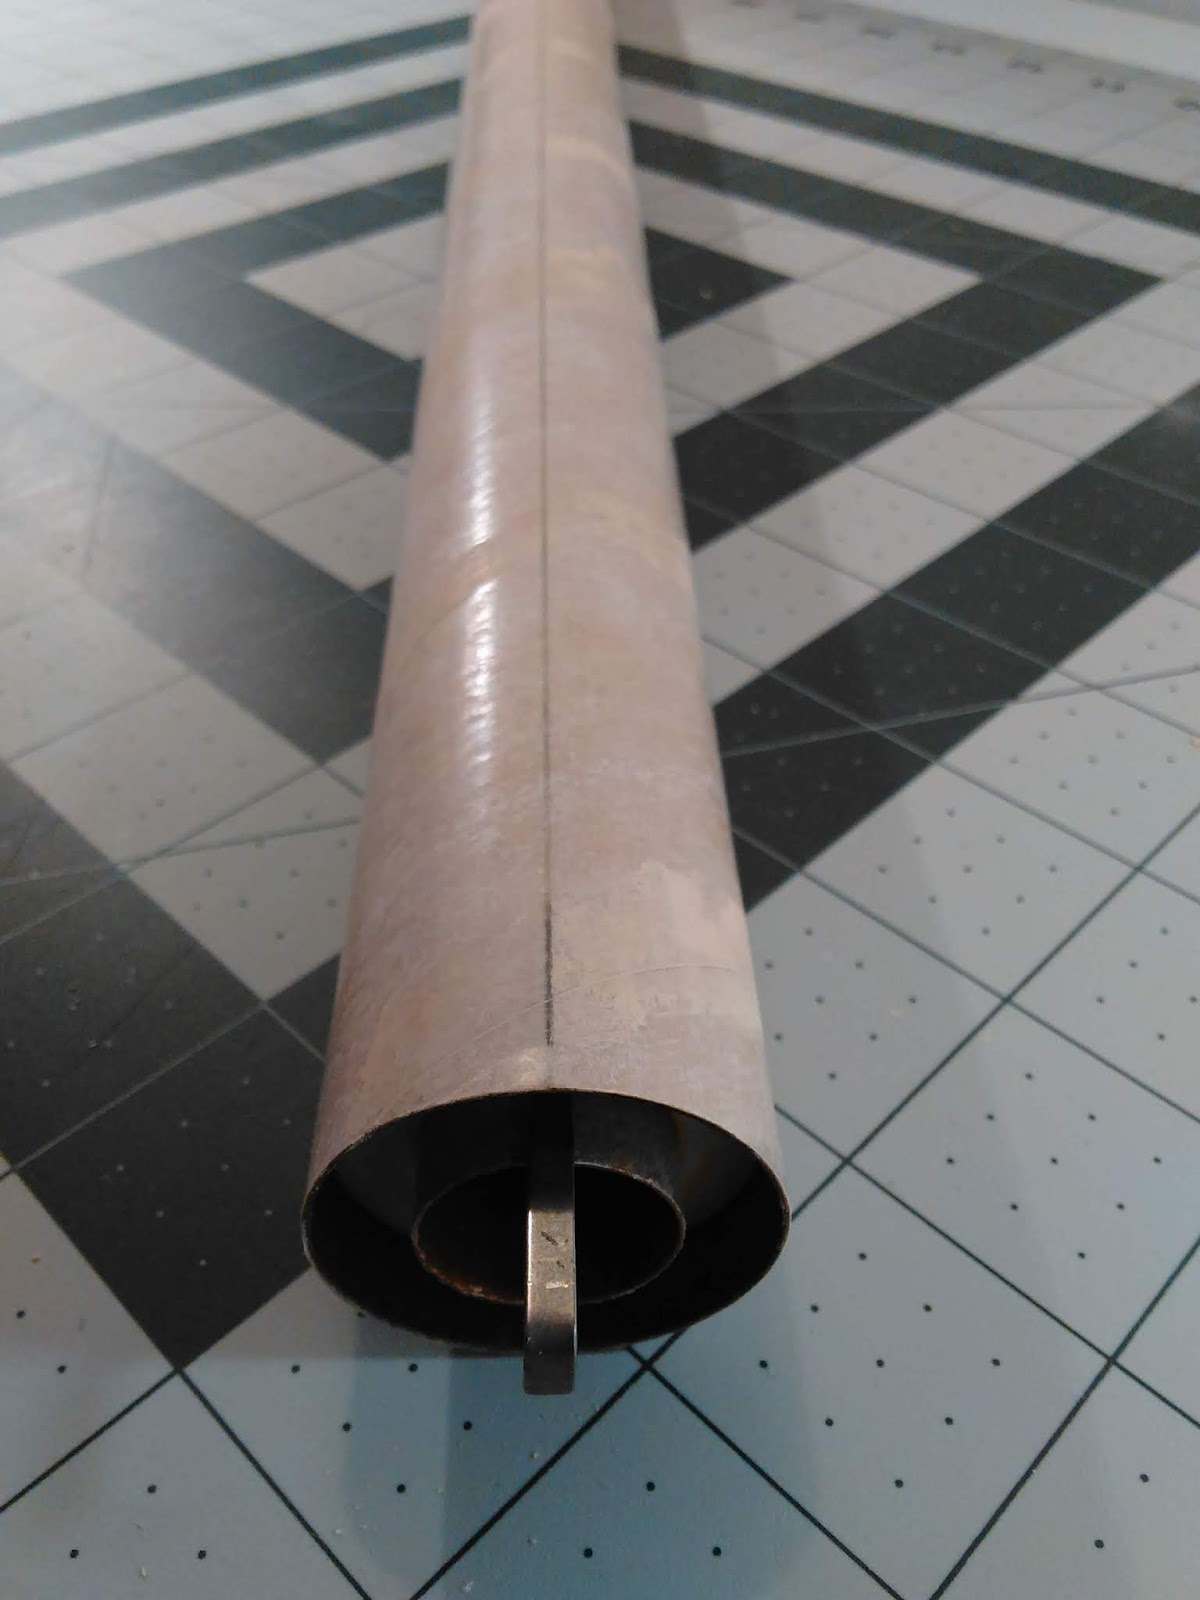
Each tube has a mark 3/4 inch from the bottom. Going through that is a straight line all the way up the tube. Use a small piece of aluminum angle for that, if you have it, or just use a door jamb as you would with fin lines on any model rocket.

Engine block rings (also known as "thrust rings") are glued inside the tops, flush with the ends. So far, so easy. These are your motor tubes. No engine hooks will be necessary for this rocket.

There is a sheet of card stock in this kit you'll use for a number of parts of construction. To assemble the motor mount, there is a small shroud you must cut out from this card stock. You'll also use the custom centering ring, which is more of a round card stock plate with three little divots cut out.


You cut the shroud out with a hobby knife and straightedge. Instructions tell you to "lightly score" all the fold lines on the shroud with a hobby knife.

Be very careful not to cut the shroud at this point! I happened to have a very dull knife blade handy, so that worked. But all you are doing is making sharp fold lines in the card stock, not actually trying to cut it. If you don't have a dull blade, or are worried about using too heavy a hand with the knife, you could use a small dowel you've sharpened to a point in your pencil sharpener, or even a thumbnail.

Apply a very small amount of glue to the glue tab and glue the shroud together.

EDIT: When I first posted this, I should have mentioned that it's a good idea to test fit the custom centering ring into the bottom of the BT-60 body tube. It should just fit inside the tube, like a standard centering ring. If it's slightly too large, you can sand it before proceeding to build the motor mount.

I didn't check, and when I went to install the motor mount, the centering ring butted up against the body tube - it was almost the same diameter as the tube itself. Not a problem if this happens to you - you can still sand that ring. It's just harder, with all the engine tubes glued on. But I did it rather quickly, using an emery board. Most mistakes are fixable.

Once the glue has dried, you can put a thin bead of glue onto the bottom edges of the shroud, carefully line the corners up to the divots in the custom centering ring, and then glue the shroud to the ring.


This might seem pretty flimsy at this point, but believe me, this will work! Once the glue has dried, you can put a thin fillet around the base of the shroud where it contacts the centering ring, for added strength.

I don't have pictures of every step in the next part of building the motor mount, so I'll try and describe it as best I can.

Run a bead of glue down one corner of the shroud, and on the edge of the same cutout in the centering ring. You want a thin layer of glue here, I think. You don't want a large glob of glue.

At this point, I'd recommend waiting 60 seconds before gluing the motor tube on. If you apply the tube immediately, and have a lot of glue, you're going to have to hold the tube in place for a long time. You might involuntarily move the tube out of alignment. You might drop it and get glue everywhere.

So, wait 60 seconds. The thin layer of glue will start to get tacky. Then you can lay the motor tube in place. Line up the 3/4 inch mark on the tube with the centering ring, and use the mark up the tube as a gluing guide for the shroud.

Hold it in place until it sticks, then set it safely aside for it to dry a bit, before proceeding with the other two tubes.

For good measure, I applied fillets between the motor tubes and the shroud and centering ring, everywhere they came into contact. The whole construction seemed pretty solid and really neat when it was complete.


That's the canted motor mount for the FlisKits Tres. As you can see, it's not that hard if you work carefully.

Wait... Installing the motor mount - that's the hard part.

But it's also not too hard. We'll hit that next time.

Click here for Part 2.

Follow me on Twitter.

Like my Facebook page for blog updates and extra stuff.

Have a question you'd like to see addressed on this blog? Email me at iamtherocketn00b@gmail.com. 

Thursday, April 9, 2020

The NAR Announces More COVID-19 Delays


From National Association of Rocketry President, John Hochheimer:

NARAM 62 Update: The COVID-19 pandemic creates significant uncertainty associated with holding our planned summer events. Therefore, the NAR is postponing NARAM 62 and will hold it in 2021. Please note, by making the decision now, the NAR minimizes its substantial financial risk associated with making a decision to postpone or cancel at a later date. We are working closely with the host Section's leaders and the Contest Director, the launch site owners, and the hotels and meeting spaces to reschedule. I will announce updates as soon as we can finalize all the arrangements. All currently paid registration fees will be refunded as soon as possible.

NRC 2020 Update: In accordance with guidance I issued on 3/292020, NRC launches, as well as sport launches, remain suspended until at least April 16, 2020. When NAR launch activities resume, Dan Wolf, the Contest Board Chair, will provide details on how the 2019-2020 NRC will continue into 2021.

NSL 2020 Update: The NAR continues to have flexibility and minimal financial risk in the go/no-go decision process for the National Sport Launch 2020. Because we have no financial burden, the NAR will wait until early May to make a final decision. In the event of cancellation, all registration fees paid prior to cancellation will be refunded.

Annual NAR Meeting and Board of Trustee Elections: Since we are postponing NARAM, there will not be an in-person meeting of the Association and in-person voting of trustees. We are working on options to hold some form of association meeting and will provide details when they are available. Our election of trustees will be held as usual, with the exception of the capacity to vote in-person. On-line voting will be available, as will paper ballots that will be mailed in the next edition of Sport Rocketry.
An update on large group gatherings (such as launches and meetings) will be issued by April 15.

Follow me on Twitter.

Like my Facebook page for blog updates and extra stuff.

Have a question you'd like to see addressed on this blog? Email me at iamtherocketn00b@gmail.com. 

Sunday, April 5, 2020

Building Model Rockets Out of Order - When I Deviate from the Instructions


I often build model rockets out of order.

The Handbook of Model Rocketry emphasizes time and again "Always read the instructions!" And while this is good advice, after you've built a number of rockets, you might find it helpful to deviate slightly from those instructions from time to time. Here's an example.

Estes' instructions usually have the build order go as such:
  1.  Prep fins
  2.  Assemble engine mount
  3.  Mark the body tube for fin placement
  4.  Glue the fins on
  5.  Glue on the launch lug
  6.  Glue the engine mount into the body tube
Et cetera...


I don't like doing it this way! You'll notice numbers 3-6 in the above list are italicized. That's because I always, always do those steps out of sequence when building a model. I do this for a few reasons.

I want the launch lug to line up with the engine hook. Many models have the motor tube flush with the base of the body tube, which means I'll often use a tool, such as my sanding block, to push the engine mount flush with the back of the rocket. I like to give the motor mount a twist when installing it, to ensure there's a nice bead of glue all the way around the centering rings for a good bond. And, because I'm a fussy builder, I often use a tool to make sure my launch lug is on perfectly straight.

Now, I find it easy to forget to pay attention to the marks on the outside of the body tube when installing the motor mount. Some models, especially those like the Big Bertha, have fins that are far swept back, meaning it can be hard to get a tool up to the base of the rocket if the fins are already glued on. And if the glue catches when the motor mount is only partway in, you may have to give a bit of a push - I don't want to break any fins off while installing the motor mount! Sometimes far swept fins can make it tricky to get even your fingers up in there to do some adjusting. And the fins would usually be in the way if I wanted to use a piece of aluminum angle to check the alignment of the launch lug.

The order I usually do the steps above is: 6, 3, 5, 4. I build and install the motor mount before anything else.

Before I make any marks at all on the body tube, I install the motor mount. Once it is glued in place, and the glue is holding (so that the mount won't slide in or out or rotate in place), I will mark the launch lug line.

I line up an aluminum angle with the engine hook and make a line all the way up the tube.


Now I know that the launch lug will be in line with the engine hook. I'm not going to accidentally forget to turn the motor mount so the hook is lined up with a launch lug I've already marked and glued on.

There are two reasons it's best to put the hook and the launch lug on the same side. First, it's neater. The launch lug is essentially the back side of the rocket. With the rocket on the launch pad - or on display - you won't see a hook sticking out the bottom if it's on the back.

But the second reason is more critical. If the launch control clips touch the hook, they'll create a short circuit. Electrons are lazy - they take the easiest route. Since a metal hook has less resistance than the bridge wire of a starter (or igniter), the current will flow from clip to hook to clip again, and back to the launch controller without passing through the starter. The rocket motor won't ignite!

Keeping the engine hook on the back side makes it less likely you'll get a short.

So, I glue in the motor mount, not worrying one bit about aligning things. Then I mark the launch lug line. And then I wrap the fin marking guide around the rocket. I line up the marks for the launch lug with the line I've already made, then mark the fin line locations with a small pencil mark.


Then I remove the fin marking guide and draw the fin lines up the tube. You can use a door jamb for this, or a drawer's edge - either of which you might find in the instructions. But I prefer to use a piece of aluminum angle.

Cheap, and widely available at home improvement stores and online, aluminum angle is a great tool for model rocket builders.


Because of its shape, it sits perfectly on a tube, giving you a nice straight edge. It's like a ruler which won't move when placed on cylindrical stock.


Aluminum angle is thin and makes a sharper, straighter line than a door jamb. It comes in 3 foot lengths or more, so you can mark all the way up the body tube.


Some instructions suggest making a mark only a few inches long, but I always prefer to make my fin lines and launch lug line all the way up the length of the tube.

Someone at a club meeting recently asked me why I do this.

The reason is that it's easier to make sure things are on straight if you have a reference line going all the way up. You can sight through the launch lug and over the tips of your fins once their glued on, but before the glue has dried. This will help you determine if things are truly in line, or if they just look like they're straight.


So, my tip for you is to mark the whole length of the tube.

In the case of some kits, such as the Estes Nike-X, the instructions actually tell you to do this, because you're going to glue on some forward fins and some canards up near the top end of the rocket. But I recommend it for every build. It's just a helpful way to check your work.

Next, I usually glue on the launch lug. I do this before gluing fins on, because it enables me to use a piece of aluminum angle to ensure the launch lug is perfectly straight. I glue the lug on, and while the glue is still somewhat wet, I gently slide the aluminum angle in place next to the lug, and I can adjust the straightness of the lug using the angle as a straightedge.


If the fins were already glued on, this wouldn't really be possible, because they'd get in the way of the aluminum angle.

Now, I don't find this step too critical. It's not hard to get a launch lug on straight by siting up the line through the lug. But, as I said above, I'm a fussy builder, so I like the added assurance I've got the lug on nice and straight. And in the case of rockets with two lugs, I always do this.

I glue the first lug on, making sure it's straight with the aluminum angle. Once the glue has dried, I glue the other one on, pressing the angle gently against the dried lug, and using it to guide placement of the second lug. This ensures that the two lugs are perfectly in line.

If you don't want to bother with that, or don't have an aluminum angle, my tip of drawing the fin and launch lug lines all the way up the rocket will help you, because you can sight up the rocket through the launch lug, to make sure it's nice and straight.


When everything is lined up, I finally glue on the fins.

Follow me on Twitter.

Like my Facebook page for blog updates and extra stuff.

Have a question you'd like to see addressed on this blog? Email me at iamtherocketn00b@gmail.com. 

Tuesday, March 24, 2020

New Podcast - The Model Rocket Show!


I'll be doing a new podcast, called The Model Rocket Show. It should be debuting the weekend of March 28. It's from LittleBeth Media, and is a spinoff of The Rocketry Show podcast.

The Rocketry Show tends to deal mainly with high power rocketry and really advanced stuff. But there's a need for people whose main interest in rocketry is in low power rocketry, whether they are beginners or longtime rocketeers who prefer model rocketry. And then there are those rocketeers who enjoy both sides of the hobby, and would like to hear more episodes focused on the model rocket side of things.

It can be difficult to address both ends of the hobby with one show. Some advanced rocketeers are no longer interested in model rockets, and some beginners may have a hard time following some of the more advanced episodes.


Look for all kinds of stuff on the new show - build techniques, interviews with people in the model rocket industry, TARC, listener questions, and maybe some first steps toward high power certification - like "what's a good first kit" type stuff.

So, whether you're a Rocket N00b or a longtime modeler, I hope you'll check out the new podcast when it comes out. You can hear the trailer by clicking here.

Follow me on Twitter.

Like my Facebook page for blog updates and extra stuff.

Have a question you'd like to see addressed on this blog? Email me at iamtherocketn00b@gmail.com. 

Tuesday, March 17, 2020

Update from the National Association of Rocketry re: COVID-19

Well, two posts in one day. A lot of stuff happening these days.

From the Facebook group of the National Association of Rocketry:

March 17: Update on COVID-19 for National Association of Rocketry

Recently, the recommendations from the White House and CDC on minimizing the risk and spread of COVID-19 have been updated to ask that all “Avoid social gatherings in groups of 10 people.” (Reference)

This recommendation is pretty clear and should be followed by all to help slow down and stop this rapidly growing health concern.

Based on the recommendation of the President and CDC, as the President of the NAR Board, I am instituting the following policy to take effect immediately and be in effect for a minimum of 15 days (March 17 -April 1, 2020):

1. All NAR Sections shall postpone or cancel Section launches, meetings, and other group activities during this period.

. There should be no organized launches, meetings, and other group activities of 10 or more persons during this period.

I will send an update on the policy on or before April 1.

I ask that all members please adhere to the intent and spirit of this policy and help to protect all who would be attending a launch from the possible infection of this virus. TARC launches have been suspended indefinitely by AIA and the NAR, so there will not be any TARC teams needing our help with qualification flights. I understand this is a potential hardship for some, but the desire to fly rockets in large groups does not supersede the potential risk of infecting someone attending a NAR launch.

Thank you and please be safe!

John N. Hochheimer
President National Association of Rocketry

These are indeed interesting times.

Follow me on Twitter.

Like my Facebook page for blog updates and extra stuff.

Have a question you'd like to see addressed on this blog? Email me at iamtherocketn00b@gmail.com. 
TARC Suspended Due to COVID-19


From an email issued by The American Rocketry Challenge, or TARC:

Hi Rocketeers, 
As always, one of our priorities is to ensure the safety and wellbeing of our entire community. Therefore, we ask that you follow all guidance you are receiving from your schools, as well as state and local health departments, on COVID-19. 
We are closely monitoring the situation with school closures across the country, as school groups compose a great number of our teams. Due to the growing number of extended closures, all qualification flight submissions are suspended effective immediately. At this time, we ask that you do not submit any additional qualification flight scores and cancel all scheduled launches. 
We are still determining when and in what form the National Finals may take place. We will keep you updated in the coming days regarding resumption of launches/submission of qualification flights. 
Additionally, we are also indefinitely extending the submission deadlines for the Engineering Notebook and Marketing Competitions. Please follow the instructions on the competition pages on our website to learn how to submit. 
Please let our team know if you have any questions in the meantime. 
Best, 
Jeremy Davis 
Program Manager, The American Rocketry Challenge

Follow me on Twitter.

Like my Facebook page for blog updates and extra stuff.

Have a question you'd like to see addressed on this blog? Email me at iamtherocketn00b@gmail.com. 

Friday, January 3, 2020

Test Shots


Happy New Year!

If you've listened to the latest episode of The Rocketry Show podcast, you know that I recently bought myself a nice, entry-level digital SLR camera. I'm hoping to get better photos of my family, of my rockets for this blog, and better video for my YouTube channel.

Here are just a few of my first shots - taken without totally knowing what I'm doing yet - that I took with my Canon Rebel SL3 - or 250D.

(It's known as an SL3 in the US and Canada and a 250D elsewhere. I bought it from a discount distributer in Brooklyn from eBay, and I got a non-US branded 250D. It's the same camera.)

No real sense to these. I'm mostly just playing around with the focus and depth of field.


With a wide aperture, I can focus on a specific point, separating it from foreground and background objects. See here how I focus on the N00b Tube in the first photo, then on the Astron Sprint XL decal in the second. This will be good for showing specific details in blog posts.


Shooting through the fleet to pick out just the Dr. Zooch Saturn V.


Even in pretty low light, I think this closeup of R2D2 looks pretty good. This action figure is only about 2 1/2 inches tall.


Some of Mrs. N00b's giraffes, mentioned on the show. Again, I'm just trying this thing out here. I don't even know how to do any post-production stuff on photos yet, so I have to say, I'm pretty pleased how well a quick shot like this comes out.


This fidget spinner was moving quite fast, but even in relatively low light, I was able to nearly freeze it with a fast shutter speed. If this were a rocket, and outdoors in brighter light, I'd probably get a nice still shot - if I managed to actually catch it with the shutter!


An artsy-fartsy photo of the Rocket Room (it's finally organized and clean!!)


Andy the Penguin hopes you had a good holiday season. Now, get to building rockets!

Follow me on Twitter.

Like my Facebook page for blog updates and extra stuff.

Have a question you'd like to see addressed on this blog? Email me at iamtherocketn00b@gmail.com.