Thursday, December 9, 2021

Estes V2 Motor Mount with an Alternative Shock Cord Anchor


I'll get back to the  Super Big Bertha in the next post. For now, here's more progress on the Estes V2.

The forward centering ring has a slit for the rubber shock cord to pass through. You're meant to push one end of the shock cord through and knot the other end to secure it to the rocket. There's no tri-fold "tea bag" mount included in this kit.

The advantage of Estes rubber shock cords is that the cord is much less likely to damage the end of the body tube if your parachute ejection doesn't happen right at apogee. This can be because you have the wrong delay for your flight, or the delay grain has a flaw, causing it to burn too long or short. Or, if you have to launch at an angle due to wind, sometimes the rocket doesn't slow down as much at apogee.

If the chute opens when the rocket is coasting, it can pull the cord against the opening of the body tube. This can pull hard on the shock cord, and a stiff Kevlar cord can sometimes damage your rocket when this happens. It can be minor damage, like a small nick in the tube, or a long rip, called a zipper.

This rocket has a very long Kevlar shock cord. Even with all textbook flights, it has had some damage.

While I do like a shock cord with some elasticity, I rarely use the ones supplied with the kit. I usually make a long shock cord made of two parts - a length of Kevlar thread to secure it to the rocket, and a very long piece of sewing elastic.

With a short rubber cord, sometimes the nose cone can snap back and hit the rocket, damaging the paint. A long cord gets the NC and chute away from the rocket and helps reduce the risk of damage.

Some rocketeers just use very long Kevlar thread for shock cords, and I've done so as well, but Kevlar is inflexible, and I've had some damage to the ends of body tubes even with very long shock cords. I like having a loop of Kevlar which ends just inside the body tube.

The Kevlar comes from emmakites.com, a kite supply website, and is meant to be for flying large kites. Their prices are good, and shipping is fast and free, and they have some very heavy duty stuff suitable for larger rockets. They even list some of their product now as "for rocketry." It seems they've caught on that we like their Kevlar.

For the V-2, I mounted it right to the motor mount.

The first step was to punch a hole through the forward centering ring. I cut a length of Kevlar longer than I would need, and tied a loop in one end.


I passed the free end through the loop, forming a kind of lasso, which I wrapped around the motor tube just behind the forward centering ring. The free end was threaded through the hole in the centering ring and the lasso was secured in place with a fillet of wood glue.

Once the glue was dry, I slid the motor mount into the rocket at the correct depth to see how long the Kevlar lead should be. I then removed the motor mount and tied a simple loop. 


After a couple of tries, I had the perfect length.

Having access to the Kevlar loop means I can attach a long piece of heavy sewing elastic, and I can replace it when the elastic gets brittle.


I post a lot of things on Instagram these days. Follow me here.


Like my Facebook page for blog updates and extra stuff.

Have a question you'd like to see addressed on this blog? Email me at iamtherocketn00b@gmail.com.

Tuesday, December 7, 2021

Super Big Bertha - Fin Filling, Fillets, and F- er, uh, Rail Guides


I moved on to writing up the Estes V2 build and nearly forgot to finish the Super Big Bertha series!

After the fins were assembled and the edges sanded square, I moved on to filling in the wood grain.

Brodak sanding sealer is my favorite way to fill balsa wood grain. Traditionally, you apply sanding sealer after gluing fins on. But I often apply a few coats and sand beforehand. It's easier to sand them smooth without the body tube in the way.

Before anyone chimes in, yes, you do need to take care to keep the sealer off the root edges, as they can impede a good glue bond. But I've literally never had a fin break off because of using this method.

If I accidentally get some sanding sealer on the root edge, I quickly wipe it off with a paper towel and give the edge a quick sanding. And you know what? It's fine.

Furthermore, with these fin tabs, there's no problem. And you can hold the fin by the tab and seal the whole fin at once, without getting sealer on your fingers.

Brodak is expensive, but I find the results worth the price. It's more cost effective to buy a large can, rather than several smaller ones. You can buy it online HERE (Note: Looking at it as I write this, Brodak sanding sealer is a lot more expensive today than it was when I bought two cans two years ago. Inflation is pretty high right now. That said, if I needed some, I would probably still spring for it. That's how much I  like the stuff. But there are definitely much cheaper options for balsa filling out there!)

If you're worried about getting a large can, because you've had sanding sealer quickly go bad once you open it if you don't use it all in a short period of time, don't worry. I've had a can open for a year and it's still as fresh as new. This is quality stuff.

I brushed three good coats on, then sanded them smooth before attaching the fins to the rocket.


Once the fins were glued on to the Bertha, fin fillets were applied.

These are wood glue fillets, using Titebond Molding and Trim Glue, 3 layers deep at this point. The molding and trim glue is less prone to sagging and shrinking, and makes a great fillet.

I put an Elmer's pointy cap on the bottle for better fillets and more precise gluing - the bottle necks are identical, and School Glue is always on sale for 99 cents. Not good for rocket building, but the caps are perfect replacements for the wide Titebond caps. I got this tip from Chris Michaels' Model Rocket Building blog, and I wouldn't do otherwise now.


The Bertha will get conformal rail guides instead of the 1/4 inch launch lugs it comes with. Since I almost always fly with a club, a launch rail will almost always be available when I feel like flying this rocket. A 1010 high power rail is less likely to whip when a rocket lifts off, and less likely to get bent.

A friend gave me a tip that I tried. Take a rail guide from Aerospace Specialty Products and cut it in half with a razor saw and miter box. You get 2 for 1 that way. The original rail guide is a couple inches long, and I decided this would be a good rocket to try that with.

It worked, but I probably won't do it again. Holding the guide still while cutting was difficult, because while the rail guide is long, half a rail guide is not. The saw kind of shredded the ends of the 3D printed part, which required a lot of cleanup. And a short segment of this guide is kind of hard to get on the rocket perfectly straight. While the guide does conform to the BT-80 body tube, the curve is very slight, and with a layer of epoxy between the guide and the tube, there's a bit of play, and I had to keep checking to see if I really got it on there straight. A short piece is harder to get on straight than a long piece, and I found lining up the second little bit of guide 11 1/2 inches away more difficult.

Besides, these rail guides from ASP are cheap and lightweight. I'll probably just use full length guides in the future. You can get them HERE.


After I put the rail guides on, my eyes kept playing tricks on me. Were they straight? Were they in alignment with one another?

I got out my camera and backed it as far as I could in the Rocket Room and zoomed in to see if I could better tell. I couldn't really tell what I was looking at, because it was pretty dark.

In this picture, the two guides don't look lined up, but that may be because the camera and rocket were off-center of each other. In the daylight, they look alright.

There is a chance that the upper guide is *slightly* crooked. Like, ever so slightly. I'm hoping it's fine. I guess we'll see when we get it on the pad.

I suppose I should get myself a length of 1010 rail so I can check these things at home.

It's probably fine...

I post a lot of things on Instagram these days. Follow me here.


Like my Facebook page for blog updates and extra stuff.

Have a question you'd like to see addressed on this blog? Email me at iamtherocketn00b@gmail.com.

Sunday, December 5, 2021

Build Thread - Estes V2


Why have I never built a V2? This fat model has always caught my eye, and I've been meaning to build one forever. I guess now's a good time to start.

Here are the parts.

I've had this kit on the pile for a few years, and the nose cone was stuffed pretty hard into the BT-80 body tube. I had to pull hard to get it out, and the end of the tube is stretched out just a little bit. It's hard to tell, but the fit on that end of the tube is loose, and looking at it very carefully, I can see that it's a little enlarged.

I might cut a new length of tube - I haven't decided yet. I hate to replace parts of a kit, but I do want a good fit. I can repurpose this tube as a payload section on a future scratch build.

Estes' customer service is excellent. They have been known to replace bad parts. They replaced an entire Pro Series kit for me once when all I asked was if it was possible to replace one bad fin. I opened my email to find out they had already shipped me a whole new rocket, which was a huge surprise.

But this kit is several years old - in fact, it's currently out of production. This probably didn't happen in the factory, and I really don't like asking for a replacement for minor damage - especially something I can just fix myself.

I might also just use it.

I post a lot of things on Instagram these days. Follow me here.


Like my Facebook page for blog updates and extra stuff.

Have a question you'd like to see addressed on this blog? Email me at iamtherocketn00b@gmail.com.

Wednesday, December 1, 2021

Breaking Super Big Bertha In Two - Payload Section

Super Big Bertha is a very tall model. It's made of two lengths of BT-80 body tube joined by a coupler you glue into both tubes. I decided to turn the upper tube into a payload section, sealing one end of the coupler with a bulkhead and only gluing it into the upper tube.

This would have two practical benefits. First, I could fly a payload, like an altimeter, without worrying about the delicate electronics being fouled up by ejection charges.

Second was transportation. I take most of my rockets to launches in a large box.


A box of rockets large and small. You can lay towels between layers to protect the paint, but if
you don't jostle them too much, it's usually fine to simply lay them in and take them out gently.

It's a long box; you can see my Pro Series Nike Smoke and Ventris in there, as well as my North Coast Rocketry Archer in there. But the Bertha is just a still much too tall to fit in the box in one piece. Having it come apart in the middle makes it much easier to pack away.

I swore I had some BT-80 plywood bulkheads somewhere, but I couldn't find them.


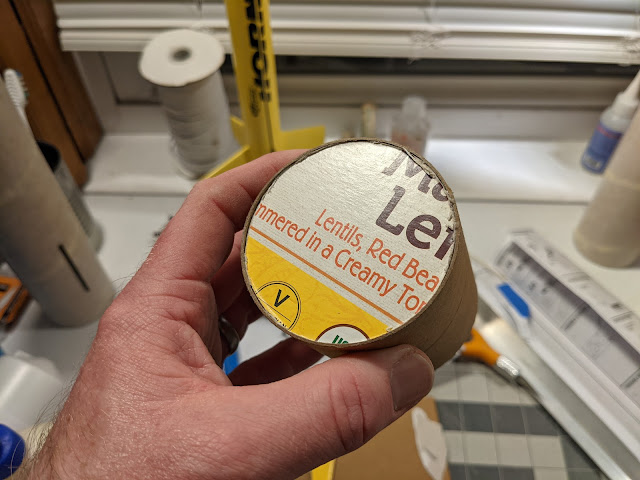
I was taking out the recycling, when it dawned on me - these Madras lentils from Costco are not only cheap, tasty, and healthy, the carton they come in is made of very hard, finely corrugated cardboard, and would be perfect.


First step was to trace around the coupler. Then I cut the shape out with scissors, slightly larger than the finished product would be.


I then sanded the bulkhead round until it fit snugly inside the coupler. 


I reinforced one side with a bit of packing tape and punched two clean holes through the bulkhead.


A good glue bond with fillets on the inside would hold it in place. I ran some Kevlar through the holes and tied it in a loop.


Finally, I plugged the holes with some Titebond Molding and Trim Glue.


Once everything was dry, I glued the bulkhead halfway into the upper payload tube.


The finished product is very solid.

I post a lot of things on Instagram these days. Follow me here.


Like my Facebook page for blog updates and extra stuff.

Have a question you'd like to see addressed on this blog? Email me at iamtherocketn00b@gmail.com.

Monday, November 29, 2021

How to Transport Model Rockets to a Lauch


I see a lot of posts on rocketry forums asking how people transport rockets to the launch site. My solution is pretty simple - a large cardboard box.

I have a few of these lying around of various large sizes. This one can hold more rockets than I'll launch in a day, and it's still easy to carry. And it holds larger rockets as well - you can see my Estes Ventris and Pro Series Nike Smoke, as well as my North Coast Rocketry SA Archer. And you can see there's still plenty of room to add more rockets if I feel ambitious.

Sometimes I put a layer of towels between layers of rockets if I'm worried about the paint jobs, but honestly, as long as you lay them in carefully and don't jostle the box too much, it's not really a problem.

Then I pad around the edges with large plastic zip lock bags of parachutes and "dog barf" cellulose wadding, and carry the whole thing to the trunk of the car.

The box is big, but even loaded up with model rockets, it's amazingly light.

When I first got started, I had this plan to build a custom crate for each and every rocket. But there's no need to complicate things. These days when everyone is getting tons of stuff delivered to the house (including large shipments of rocket stuff!) you can usually find a really good box to hold on to.


Have a question you'd like to see addressed on this blog? Email me at iamtherocketn00b@gmail.com.


Sunday, November 28, 2021

The Estes Super Big Bertha - Time to Get Back to Business


Recently I realized that I haven't built a new rocket start to finish in well over a year, partly due to this funk I've been in. It's been a hard couple of years. I put the finishing touches on my Estes Mercury Redstone, yes, and slapped together a quick model from spare parts of other rockets, but I haven't started and finished a new model in way too long.


It's time to remedy that. I grabbed the Estes Super Big Bertha off the build pile and started it during my week's vacation from work.

I like the built up fins. I've done multi-ply fins on some scratch builds I've made, and they can make for very strong fins. I don't plan on beefing up anything with plywood on this one. I want to keep it light and be able to fly it on F15 black powder motors. I bet I could even get away with a D12 in this and keep the altitude really low on small fields if I watch the weight. If I want to use something thrustier, maybe I'll make a second one with plywood centering rings.

Surprisingly, this will also be my first BT-80 rocket! I have built other 2.6 inch rockets before, but they all used heavier tubing.


The fins on the Super Big Bertha are really great. 1/8 inch balsa cores and 1/16 inch balsa skins make fins which are about 1/4 inch thick when assembled. Take your time - this part can be tricky.


Instructions suggest CA (cyanoacrylate glue - Super Glue, basically) for this step. I use CA sometimes, but avoid it when I can. And in this case, I think laminating them with wood glue might make for a stronger fin. Not that it's critical - they're not likely to brake. But the wood glue, if properly applied, should soak in and make the fins one solid piece.


I spread the glue on the spars of the core, evenly and thin, then press the skins on. After holding them tight for a minute or so, I press them between waxed paper and heavy, flat books. Only one skin at a time - you want to make sure they don't slide around when you're placing them under the press! After 20-30 minutes of dry time, I flip them over and do the other skin. Then I leave them under the books for AT LEAST a day for them to dry thoroughly. Any residual moisture can still cause the fins to warp after you take them out from under the heavy weight.


The edges may not all line up perfectly when you do this - ideally, the outer skin will be slightly larger. You'll then sand everything even. Just make sure the root edges are even - that would be the hard part to fix.

Don't throw out the sheets the fins are cut from - lots of good scrap balsa there for other projects!


I really like these fins - they're solid!


I post a lot of things on Instagram these days. Follow me here.


Like my Facebook page for blog updates and extra stuff.

Have a question you'd like to see addressed on this blog? Email me at iamtherocketn00b@gmail.com.

Wednesday, August 18, 2021

Liberty Bell 7 - Mercury Redstone - Finally Finished!


 After a long long time and one smashed capsule tower, I finished the Estes Mercury Redstone build. It was pretty frustrating at times, and I struggled, but I did it. If you don't look too close, it's not that bad!

I know where all the flaws are, and there are many. That capsule will probably pop off after the first landing. But for now, I like what I've got. And I have a few more of these kits, plus some extra capsules, so I can try again.

I think you need to build the hard rockets, so you can get better. I used to be one of those rocketeers who held on to those "special" kits because I didn't think my building skills were up to the task yet, and I wanted to "do it right on this one." But if you do that, you'll never build that Saturn, or Redstone, or whatever special "master-level" kit you're holding on to.

Do your best, and it'll probably turn out better than you think. Then the next one won't seem so daunting.

Follow me on Twitter.

Like my Facebook page for blog updates and extra stuff.

Have a question you'd like to see addressed on this blog? Email me at iamtherocketn00b@gmail.com.