Thursday, October 23, 2014

Quick Update on Rocket Stuff

I've been working on the most recent post in the Skill Level 1 building tutorial series, Building the Big Bertha, but it's taken me longer than I'd thought. For one, needing to finish something makes me procrastinate. But mostly, I've realized I need to take some pictures for this post.

I'll just give you a quick update as to what's to come later.

First, I am working on several projects rather furiously at the moment. I'm nearly finished building my first cluster rocket - that's a rocket that uses more than one motor at a time, making tons of smoke and noise! It's also my first non-Estes kit, by Quest Aerospace. It's called the Magnum Sport Loader, and will use two motors at once, and carry a payload of two eggs!

Motor mount for the two-motor cluster rocket
Magnum Sport Loader, by Quest Aerospace


Magnum Sport Loader ready for priming and painting


Second, I've started my first scratchbuild - that's a rocket you design and build completely yourself, without a kit or instructions. It's a two-stager I'm hoping to launch next week.

Janus I, a two-stage rocket, and will be my first scratchbuild from my own design


Along with this scratchbuild, I've come up with something really exciting. I have come up with a method of creating perfectly symmetrical trailing edge tapers for airfoiled fins - something I think lots of rocketeers have trouble with - which are consistently the same from fin to fin. This means you get a better look and better aerodynamic performance from your fins, and don't have to make a ton of extras and eyeball which are the best ones. I'll show you how I do that later - and make a video.

I've also been working on what I'll call a semi-scratchbuild: the Ceres B booster which will carry a camera payload - that's right, this rocket will carry a tiny video camera which will shoot POV launch videos! I got the plans for this rocket booster/payload combination from a book I've mentioned before - Make: Rockets: Down-to-Earth Rocket Science by Mike Westerfield.

Motor mount for the Ceres B booster,
made from bulk parts. This mount is
for a D or E class motor, and will fly high!

Rocksim file of the Ceres B booster with the ICU2 mini video camera payload bay (the fat section up top)


The camera is taking forever to get here - I just checked the Amazon tracking on it, and it's currently in Shenzhen, China. So, I'm putting that rocket on hold for now.

I bought a TON of stuff from JonRocket.com - and as a thank you, they sent me a free parachute!

Now I have to figure out what I'm going to do with all these bulk tubes and nose cones!

Tuesday, October 14, 2014

Building the Big Bertha - Part 6 (For N00bs)

[Click here for Part 1]

We're getting closer to finishing our Skill Level 1 rocket!

Once the fins are on, attach the launch lug. That's the short tube that looks like a piece of drinking straw.


First, I like to scuff it up a bit, so the glue holds better. I do this on one side with rougher grit sandpaper. Then I do a double glue joint, putting a bit of glue onto the roughened surface of the launch lug and attaching it to the rocket for just a moment, as perfectly straight as I can along the launch lug line we've already marked. I remove it, and allow the glue to dry a little, then apply more glue and attach it to the rocket.


Scuff one side of the launch lug
    
Apply a thin layer of glue the entire length of the launch lug

Place it on the rocket where you have marked the launch
lug line, getting some of the glue on the rocket

Allow the glue to dry for several minutes. These reverse-
action tweezers aren't necessary, but they are a nice little tool!

Add a bit more glue and attach the launch
lug to the rocket - make sure it's straight!

You must make sure it is straight - the launch lug will slide down over a metal rod called the launch rod (when we actually take the rocket out and launch it). The rod keeps the rocket flying straight for the three feet or so it takes to gain enough speed for the fins to keep it stable in flight. If the launch lug is askew at all, the rocket can grab hold of the rod, and either not take off, or fly in a weird direction, or even try to take the rod with it! Site down the length of the body tube to make sure the launch lug is straight and true. You can even (carefully) slide a launch rod into the lug and verify that it follows the line you marked on the tube - then you'll know it's straight. Just (carefully) remove the rod so it doesn't weigh down on the glue and push the lug out of alignment as it dries.

Site down the length of the rocket to verify the launch lug alignment. Be sure to adjust it
while the glue is still pliable if it's crooked. Work fast - a double glue joint sets quickly!

Let the glue on the launch lug dry before moving on.

The fins are on, so let's reinforce the joints. We're going to make fillets. A fillet is a rounded joint in a corner, often found when two pieces are welded together at a right angle. In model rocketry, this makes the joint where the fin connects to the rocket stronger, and it also reduces interference drag, making the rocket more aerodynamic.


For our rocket, we'll use more wood glue.

The simplest way to do this is to apply a bead of glue at the base of the fin at the leading edge, then take your finger and run it along the base of the fin, dragging the glue with it. You should get smooth, even line of glue connecting the fin to the body all the way down the root of the fin.

Instead of your finger, you could also use a craft stick (popsicle stick) or coffee stir stick, or even a narrow dowel rod.

I always get extra glue on the fins if I do it the simple way, which either I can't sand off, or don't have the patience to. So I mask off my fins with a little low-tack masking tape. I've been told by some real rocket craftsmen that this isn't necessary with glue fillets, but I find it makes mine a lot neater, so I always do it.

I start by masking two fillets - two joints between the fins and the body - at a time. You'll do two fillets in one go on each side of the rocket, and by side, here I mean the space between the fins. So, if you have a four-fin rocket, like the Big Bertha, you'll have four sides. Three fins, three sides. Etc. Each side will have two fillets each, one for each fin.

Here, let me just show you...


This is what I'm talking about. I've got a tiny bit of tape on the body tube at the leading edge of the fin, then one piece of tape running the length of each fin, and tape on the tube itself, with a little gap between the tape lines where the glue fillet will go. If you're building a rocket where the fins are not flush with the base of the body tube, I'd put a piece of tape there as well.

You'll want to lay the rocket on its side with the joints you're working on facing upwards, so you can work on the fillets, and so they'll dry evenly. Here's one of the many little things I love about rocketry - coming up with a creative solution to problems. There are big problems and little problems in building rockets, and they all require creative solutions.

Here's a few ways you can do this.

You could lay the rocket on its side, with the tube supported by a thick book.


Could be just fine. But you might not want to put any lateral stress on those fins before you reinforce the glue joint. And if you're building a three-finned rocket, this won't work.

The joints aren't facing upwards!
 You could lay a dowel rod on a table, place something heavy on it, and slide the rocket body over it.


You could place the rocket down on a table (or in this picture, a thick book) with the fins hanging over it, and lay a heavy blanket over the body of the rocket. This will hold the rocket down, but won't squash the body.


In my case, the problem is solved by the Guillotine Fin Jig. The long metal arms are for holding the fins when you attach them to the rocket. But once you're done, you can slide the rocket through the jig the other way to hold it gently but firmly in the horizontal position for working on it.


Whatever solution you come up with for this little problem, just make sure the rocket is secure, that it won't fall or get crushed, and that it can remain undisturbed in a horizontal position while you work and while the glue dries.

OK, enough of that digression - back to fillets!


Drop a healthy bit of glue in the gap between the tape lines. If you're building a small rocket, a bead may be enough. The Big Bertha is pretty big, and I find if I don't put enough glue, I can't get the fillet to run the whole length of the fins, so I put a bigger blob. Don't put too much, though. You are going to pull most of it off, and the more glue you use, the more of a chance you'll get a mess.


First, notice that I don't put the bead right at the fore of the fin.  With a craft stick or coffee stir stick (depends on the size of the rocket, and therefore, the radius of the fillet I'm making - bigger rocket, fatter stick), I push a little of the glue forward to the leading edge, then run the glue back down the length of the fin, smoothing it as I go. Do this quickly, so it spreads evenly, and if there are any bubbles when you're done, smooth them over with the stick.


Once the fillet is smooth and covers the entire seam between the fin and body tube, remove the tape. Don't wait long to do this - fresh glue will smooth out and make a nice smooth seam, but once the glue has started to set, it will leave a sharp ridge.

Remove all the tape, from the fins and also the little bits from the body tube.


When you remove the tape, you should have smooth, even fillets.


Let these set and dry a bit before moving on. I can't tell you how long - 20-30 minutes, maybe? I dunno. Go have a snack or something. When the glue looks dryish on the surface and the color has changed from off white to more yellowish, you're fine to move on. Turn the rocket to the next side and do those fillets. Repeat until you're all done.

Oh, and don't forget to put a fillet on each side of the launch lug! The launch lug takes some stress from the launch rod, so you want it to be secure!


We're nearly done building our first Skill Level 1 rocket! Next up, we'll prime and paint this sucker, then we're almost ready to fly!

Click here for Part 7

Friday, October 10, 2014

Building the Big Bertha - Part 5 (For N00bs)

[Click here for Part 1]

In Part 4, the first thing we did was to reinforce the ends of the body tube with a bit of thin CA - cyanoacrylate, or super glue. Turns out, this is a really good idea.

A couple days ago, I took a few rockets out to try out my new homemade launch controller.


I took my newly-completed Big Bertha with me. Since it was a little windy, and I didn't want to lose my beautiful, new rocket to a big gust of wind, I put in the weakest motor I had - an A8-3 (We'll talk about motors later, but I'll just say, the A is the least powerful of the standard sized motors). This was a mistake, because it turns out this motor is far too weak for a rocket this heavy (always read the instructions!).

The controller works great. But the rocket lifted off the launch rod, went about 50 feet maximum into the air, then the motor ceased its burn and the rocket took a nose dive straight at the Earth. The ejection charge blew the nose cone off about 6 feet from the ground. The parachute didn't even open, and the rocket body embedded itself into the ground.

The parachute is still folded...

This could have been the end of the Big Bertha. But I pulled it out of the ground. Smoke still oozed out of the top of the tube. Apart from a bit of mud, grass and clover leaves, there was no damage!


So that Rocket Pro Tip was well worth it!

OK, back to our build. Now it's time to add the fins to the rocket body.

The first thing we need to do is determine where the fins will go, and mark the tube, so that we get them on straight. Kits come with a fin marking guide for this purpose.


You'll cut this out and wrap it around the body tube, somewhere near the base. Make sure the lines on the ends line up perfectly - that's how you know you have the fin marking guide on straight.

You can see here that my fin marking guide has a bit
of a gap in it. Some Estes kits are a bit sloppy on a few
details. But the fin lines did line up perfectly.
The lines marked FL are fin lines - put a pencil (NEVER a marker or pen) mark on the body tube where they indicate. The LL line is for the launch lug - mark this as well. In the above photo, I had it off-center a bit while manipulating the camera. Often, the launch lug and the engine hook are lined up.

Next, what you'll need to do is draw a perfectly straight line up the body tube to show exactly where to place the fins. Well, how do you do that?

The traditional way is to place the body tube in a door jamb and use that as a straight rule to mark a line up the tube. People have been doing that since the birth of model rocketry in the 1960's, and it works. Many kits will explicitly include that in the instructions. If that's all you've got, it's fine. But it has drawbacks.

Some door jambs are not as straight as they should be - especially in an older house that has settled, or been repainted many times. And they may have chips in them. And you'll get pencil lines on your door jambs.

Using a door jamb to mark a fin line -
notice the nick in the jamb?
 There's a better option.

You can make yourself a really cool, cheap tool, with aluminum angle. This is a piece of aluminum, sold at hardware stores, and it's used for... I dunno. Construction or something. Doors or windows. I have no idea. I only know it's used for rockets.

It comes in 3-foot lengths, and it costs less than two bucks. Get yourself a piece of 1/2 inch aluminum angle, the kind with equal-length sides, and cut off an 8- to 12-inch piece with a hack saw. Here's mine:

I even put 1-inch marks on the side with a Sharpie so I could use it as a crude measuring tool. I wasn't sure that would come in handy, but it has. Not as precise as a ruler, but it's nice to have some times.

See how the angle sits exactly along the tube?

Line the angle (or the door jamb, or the Estes Tube Marking Guide) up with the fin marks you made, and draw a line up the body tube, for several inches. Then do the launch lug line. I like to mark the launch lug line with an LL so I don't accidentally glue a fin to the wrong place.

The yellow thing is an Estes Tube Marking Guide part.
See? Perfect lines!


Now it's time to glue on the fins. This gave me a real panic the first time I did it. I knew I would have to do this freehand, and I was pretty sure I would screw it up.

There are options for assuring that you get perfectly straight fins. But if this is your first rocket, try it freehand. It's not as hard as you think - you'll just have to hold the fins in place until the glue sets.

For low power rockets, most people use either wood glue - sometimes called "yellow glue," because it's yellowish - or "white glue" like Elmer's Glue All, so called because it's white. Some people use epoxy, but that's more for higher powered rockets, so for your first Skill Level 1 kit, just get some yellow or white glue. Do not use "school glue" or anything washable - it just won't hold as well.

Wood glue, white glue. I started with the Elmer's wood glue,
but I've really taken a liking to this Titebond stuff.

You can make the glue set better and in less time by creating a double glue joint. This works really well with wood glue, which is about all I use, because it creates a stronger bond - stronger than the material it's gluing, so the rocket itself will break before the glue does.

First thing to do is to put a small bit of glue on the root edge of the fin. Just dab a bit on the root edge, then spread it up the edge with a finger, so there's a thin layer of glue all along the edge. Then locate the place on the rocket where the base of the fin will sit - it's often, but not always, lined up with the base of the body tube (your kit's instructions will tell you where to put the fins - you may need to mark a spot on the body tube where they'll go). Put the fin exactly where you'll glue it down, pressing the glue to the body tube. Then remove the fin.

Yep. Remove it. We're going to let the glue on the fin edge and the body tube dry a bit. Then we'll re-glue it, and the "double glue joint" will set a lot faster, and be a lot stronger. Set the fin somewhere where the glued edge won't touch anything, and let the glue dry for a few minutes.

When I built my first rocket, the idea of getting the fins on straight was the part that made me hesitate. But I did pretty well with it. I did have to keep my hands on the rocket, and keep checking that I wasn't moving the fins, but I'm happy with the rocket.

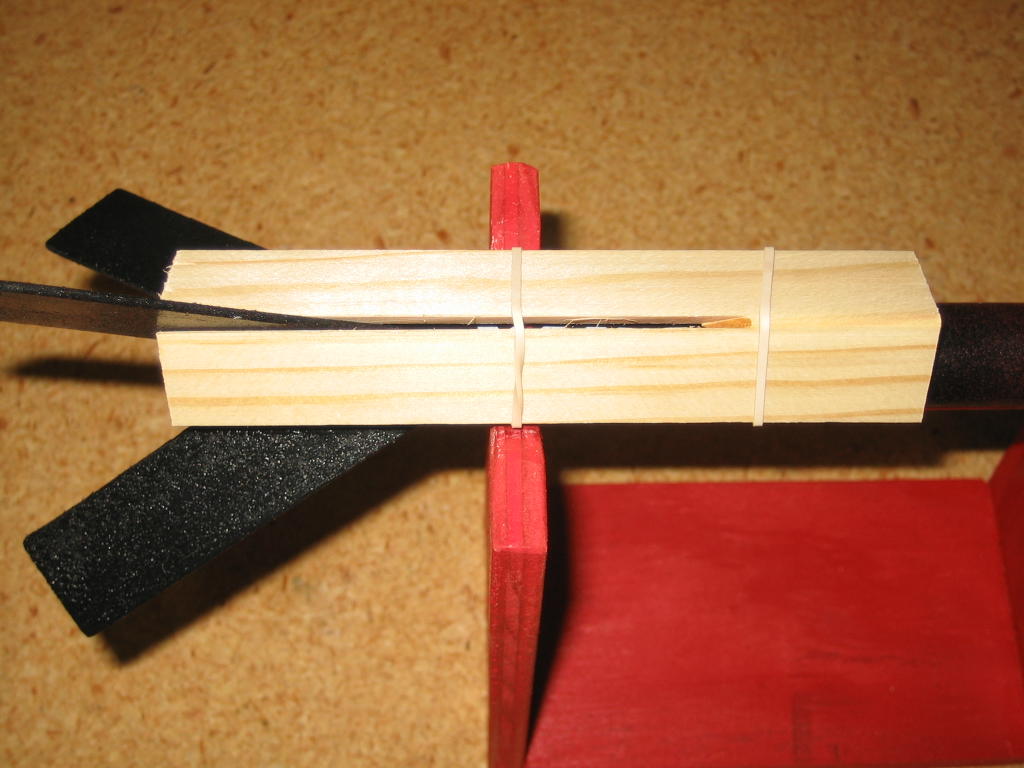
But there are tools you can use. If you read Harry Stine's Handbook of Model Rocketry, you will find instructions for making a very simple fin jig, called a Kuhn fin jig. This is just a piece of wooden angle - used for doors or something - with a slot cut right in the center.

Works great - if you have the power tools to make it, and know how to get the slot cut exactly perpendicular to the angle, and get it the right thickness for your fins - none of which do I have or know how to do.

The Estes Tube Marking Guide has a Kuhn-style fin jig at the end, which is helpful - sometimes. I've used mine on a few rockets, but I discovered quickly that if the fins are too thick, they'll barely fit, and if you're building a smaller rocket with more than three fins, it won't work at all...

Building the Estes Mini Honest John. With the Estes Tube Marking Guide
fin jig, I can get opposite fins on, but not the
two side fins. Those, I had to do by hand.
Still, it has helped me get my fins on straight on some of my favorite rockets.

I recently invested in the coolest tool in my toolbox - the Guillotine Fin Jig, created by a guy named Ted Macklin, and sold by Apogee Components. Now, if you're just getting into rockets, and not sure how involved you're going to be, you might want to hold off on a lot of special tools. The Guillotine Fin Jig is not cheap - it's about $90. But it is so ingenious. It holds your rocket in place and holds your fins perfectly straight. So, if you're building your first rocket or so, do it by hand. But if you've decided that you really want to make more, better rockets, getting a fin jig like the Guillotine is a really nice investment.

It's also great for carrying stuff from one room to the other, if you tighten down all the nuts, because the body of it is basically a wooden box.

Back to gluing on fins! Once your glue has set for a few minutes, apply another thin layer of glue to the fin root edge, and carefully line the fin up with the fin line you marked on the body tube, and hold it - or jig it - in place. Let it set for a few minutes at least before you do anything. I leave mine in the fin jig for at least 20 minutes or so and get a snack or work on some other rocketry project.


There may be small gaps due to imperfections in the tube, or imperfect
sanding - this is fine. Press the fin to the tube tightly for a moment and
let the double glue joint do its work. We'll fill in any minor gaps later.
Perfectly aligned fin. This is why I love good tools. You need skill to make a nice
rocket, but a good tool can help you make a better rocket, with less of a struggle.
Repeat the process for all your fins.


Now the fins are on, and your rocket is starting to actually look like a friggin' rocket!

Next time, we'll apply glue fillets to the fins to reinforce them (and make them more aerodynamic), attach the launch lug, and maybe even prime this sucker and start painting! Stay tuned...

[Click here for Part 6]

Tuesday, October 7, 2014

Building the Big Bertha - Part 4 (For N00bs)

[Click here for Part 1]

Once you're happy with the smooth texture of your fins, it's time to set them aside for now, and focus on the body tube, with a couple of Rocket Pro Tips.

I got some of these tips from various places online, including Chris Michielssen's Model Rocket Building blog.

First thing I always do, even though it is not written in the instructions, is to reinforce the ends of the body tube. To do this, I use cyanoacrylate - commonly called CA. This is the same stuff as Super Glue, but you can find specially made bottles at hobby shops which come in different viscosities.  This stuff is useful for a lot of rocketry applications (though not generally recommended for gluing on fins or motor mounts).

For this, you want thin CA, which is pretty watery. This stuff bonds instantly to skin, as I learned when I glued a bit of paper towel to my finger, so you'll need to be careful. With thin CA, you should also wear eye protection.

Protective eye gear, thin CA (pink bottle) and CA un-bonder,
in case you glue your fingers together

Open the bottle of CA and run a very thin bead of the glue around the inside of very ends of the tube. Using a bit of paper towel, wipe off any excess - though don't use your fingers. Roll up a bit of it into a kind of wand or baton, hold it from one end, and run the other end lightly around the inside of the tube. Throw the paper towel away immediately, so you don't accidentally grab it by the wet part later and end up with stuck fingers.

Thin CA will wick into the paper fibers, and when it dries, the ends of the tube will be stronger and harder - good if your rocket has a hard landing.


It also makes it less likely the end of the tube will wear out from having the nose cone inserted and removed launch after launch.

Now, these low power rockets are all made with tubes of rolled paper - cardboard, essentially, a little like what you find at the center of a roll of paper towels or toilet paper, but better constructed, a bit thicker, and usually with some kind of waxy, smooth coating on them.

But they do all have that spiral groove winding their way from one end to another. That groove will show up through the paint job, so when people look closely at your rocket, they can tell. "Oh, yeah, looks like a paper towel tube." But you can fix that, and hide that groove, so that people may not be able to tell what it's made of.

Before I go any further, let me say that you can totally skip this next step if you're not into it. A lot of people build tons of rockets and don't bother. I didn't even know it was an option when I built my first rocket, Der Red Max, and I was really happy with the way that turned out - though now I can see the spiral.

A visible tube spiral on Der Red Max. Spirals are sometimes hard to see on a bare
body tube, but they're really visible once you prime and paint the rocket.

 But a lot of people prefer it, and I try to do it with every rocket I make.

There are a few options for filling a tube spiral (technically, it's a helix), but by far the most common solution is to use more of the carpenter's wood filler - CWF - we used to fill the wood grain in the fins. This doesn't take nearly as much time as the fins did, and if you get it right, the results are rewarding.

I admit, I've had trouble getting this right, and it's only with this latest build, the Big Bertha, that I finally did it to my satisfaction. More about that in a minute. The other option, which I've read about but not tried yet, is to skip the filling, and when you go to prime the rocket for painting, use automotive filler primer instead of mere sandable primer. Filler primer is used to fill in deep scratches in car paint jobs, so it actually has some structure, and you can sand it smooth, filling in the seam as you go through the priming process.


When I heard about this, it sounded much easier, but I'm stubborn, and wanted to learn the CWF technique, so I kept at it.

You'll need some CWF - thinned, but perhaps not as much as you used to paint onto the fins - and a razor blade. You'll also need something to apply the CWF to the spiral seams. Chris Michielssen of the Model Rocket Building blog uses the tip of a used (dulled) hobby knife to apply CWF right to the seams, and he's a real pro at getting rockets to look great. But I've tried this, and I personally don't have a lot of success with it. So I use a fine tipped artist's paintbrush. You'll want a fresh razor blade. You might also want a freshly-sharpened pencil.

There are actually two seams. One of them is easier to see than the other, especially on white tubes (they're usually white or brown, and they're a little different, but I don't know enough to tell you what the technical difference is). Often, that one is actually filled in - the seam is on the inside, and you're seeing the filled outside of it, so it looks darker. Run your thumbnail around the tube until you feel the other seam - it may be invisible. That's the one you're going to fill, because that is the one you'll see when you paint the rocket.

Run the tip of the pencil down the whole length of the seam, from the top of the tube to the bottom. Now you can clearly see the seam, and you'll be able to get CWF exactly where you need it.

Next, apply the CWF to the seam, going about an inch or so at a time at most. Use Chris Michielssen's knife blade technique if that works for you, or paint it on. I try to tap it into the seam with the tip of the paint brush, then brush over that, so I get CWF all the way into the seam.


Next, grab your razor blade, and scrape off all the excess. You're going to hold the razor so it is lined up with the body tube, perfectly straight, and so the blade is perpendicular to the surface of the tube. Be careful not to cut into the tube - you're just using this blade as a super fine putty knife to push the putty into the seam, and scrape off all the excess, so you'll have less sanding to do later.

Don't hold it at an angle like this - this was just me trying to use one
hand to hold the blade, and the other to take a picture.

 Wipe the edge of the blade off often, on the edge of the container of CWF. Go inch by inch, all the length of the tube. When you're done, you should have a fully-filled spiral, with not much excess to sand off.


Once the CWF on the tube is dry, you're going to sand it off. Now, this is supposed to be really easy, but I admit for the first few rockets I built, every time I tried sanding the CWF down to the surface, I ended up scuffing the waxy coating on the tube and ended up raising all of these hairy paper fibers from the tube. I could not for the life of me stop doing this, and it ended up making my rockets have some weird fuzzies on them.

Paper fuzzy bits poking through the finish of my Crossfire ISX. This
was driving me absolutely crazy for my first few builds!
When I asked about this on The Rocketry Forum, I got a lot of responses, ranging from "You need to sand in little circles" (I did) to "Did you use a sanding block?" (sometimes yes, sometimes no, always with the same result) to "I don't bother to do that on tiny paper rockets" or even "Why bother? Nobody's going to notice when it's rotting in a tree!"

What nobody ever said was "Yeah, I used to have that same problem myself. Here's how I solved it..."

I tried fine grit sanding paper, rougher grit sanding paper, wet sanding (bad idea with no paint on it), dry sanding, etc. So, I was beginning to think that this whole CWF spiral filling thing was either beyond me, or that maybe it was some kind of rocket urban legend, and that the secret was something the real craftsmen weren't sharing with the rest of us. It was really frustrating me, and I felt like it was holding me back, because regardless of the size of the rocket or the fact that it might end up in a tree or a pond, I wanted to craft a nice rocket. So I kept experimenting.

Then I cracked it.

I now use a sanding sponge. It's like sandpaper, but in sponge form, and it comes in various grits. The finest I could find was 320. This is why it is important - for me - to use the razor blade method and get as much of the excess CWF off the rocket body before I sand, because I want to sand as little as possible. Something about the sponge being softer and conforming to the body of the rocket makes it less likely that I raise those nasty paper fibers, and I end up with an acceptable surface for painting later.

My sanding sponge, just before sanding off the CWF. You can rinse these
out, and they last a lot longer than a piece of sandpaper.


Chris Michielssen - whom I've mentioned on this blog numerous times, and I recommend you check his blog out if you want to see some expert builds - sands CWF off seams by going parallel to the body tube, thereby going across the CWF. I have to be really careful, so I lightly sand with a corner of the sponge in tiny circles, trying to touch only the CWF. I go slowly, and stop if it looks like I'm going too far.

You might just try using sandpaper - I've seen some people using grit as coarse as 150 or even 100. Maybe it's just me.

Anyway, when you're done, there should be no raised bits of CWF, and when you prime your rocket, those spiral seams will be invisible.

Now, I had said in Part 3 that we'd put the fins on in this post, but this body tube prep post has gotten longer than I'd anticipated, so I'll save that for Part 5. We'll figure out where the fins go, attach them to the rocket, and I'll show you a cool, very useful tool that you can make yourself for less than two bucks.

Click here for Part 5