
Here's the beginning of my latest build project, the Big Dog, from Quest Aerospace. This is a pretty straightforward rocket build, and if you're new to rockets, you'll see that most of what you've learned about putting together small Skill Level 1 rocket kits is exactly the same with this rocket. So, it's probably a good transitional rocket to something bigger.

I find the name "Big Dog" pretty cheesy, but I really like the look of this rocket. It's kind of like a bigger, fatter version of the Estes Cosmic Explorer (not really - that's the Centuri Centurion, which you can now by in reproduction through Semroc), possibly my favorite rocket in my fleet so far. It's got the advantage of having a 29mm motor mount, in which I can use my Aerotech composite motor reloadable hardware, but it's light enough I can still fly it on the larger Estes black powder motors.
Let's look at the parts:

I love those Quest nose cones. This is the same cone as on the Quadrunner - an ogive cone with a rounded tip, with a long cylindrical section before it joins the rocket at the shoulder. And those are some big, swept-back fins.
There's a launch lug which I won't use - it's too small for a G-powered motor. And I used it on the Cosmic Explorer E-motor upgrade, which I lost in January. I just got a launch rail, so I'm going to use the mini buttons I got from rail-buttons.com.

There's a motor adapter kit I probably won't get much use from, as it's only big enough to hold a D-sized motor.
This rocket has no motor hook - which you wouldn't use with a larger motor. But it has no motor retention system at all! You could tape the motor into the rocket, but after getting some advice from folks over on The Rocketry Forum, I got an Estes screw-on motor retainer.

Part of this will be glued to the back of the motor tube. Then I'll be able to slide the motor into the motor mount and screw on the cap - an easy and reliable method of keeping everything in place.
There are some self-stick decals. I really like waterslide decals better, but you can't have everything.

Let's put together the motor mount.

This is assembled the same way as the motor mount on your standard beginner's model rocket kit, with two important differences.
The first, of course, is that we won't be installing a motor hook. Instead, we'll use epoxy to glue the screw-on motor retainer to the aft end of the motor mount.
The second is that we will not be installing a thrust ring.
A lot of these kits do come with a thrust ring - or engine block, as they're called in Estes kits. The Quest kits have them, as do the Estes Pro Series II mid power rockets. The purpose is to keep the motor from flying loose up through the motor mount and blowing out the top of the rocket. Basically, the whole rocket is carried by the thrust ring.
 |
| The kit instructions include installing this thrust ring in the forward end of the motor tube. I won't be using it for this rocket, so I'll save it in case I need one for some other project. |
But I won't be installing it on this rocket for two reasons. The first is that it doesn't need one. Composite motors - the reusable hardware as well as single-use composite motors - have a thrust ring built into them, on the back.
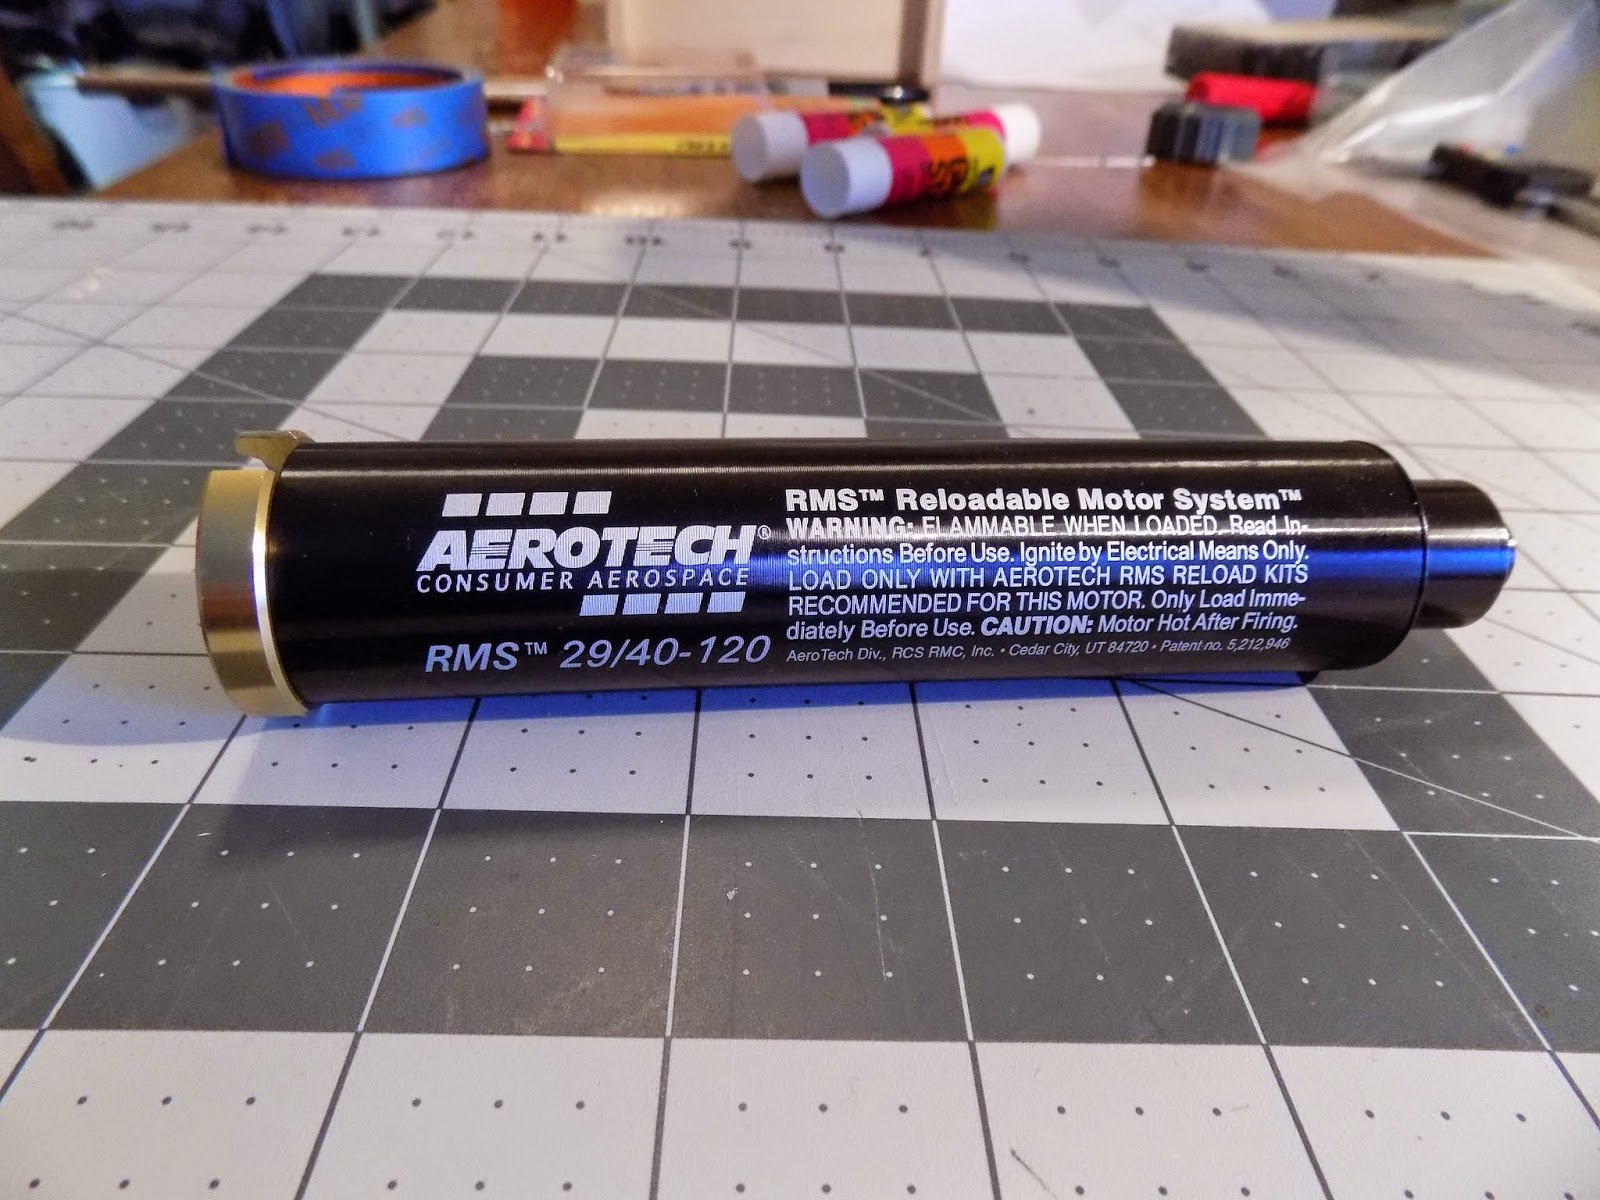 |
| An AeroTech 29mm reloadable motor casing. The brass ring on the left - the aft closure - is also a thrust ring. |
This ring keeps the motor from sliding all the way through the motor tube and keeps it from falling out the back, because once you screw the retainer on, the motor is held in place.
 |
| Sliding the motor into place |
 |
| The thrust ring prevents the motor going any further. |
 |
| The screw-on retainer prevents the motor falling out the rear of the motor mount. |
If you wanted to use a 29mm black powder motor, you would wrap a narrow ring of tape - say, pinstriping tape - around the very aft end of the motor, creating an aft thrust ring.
The second reason not to install the thrust ring is that composite motors and motor hardware come in different lengths. If you were to install the thrust ring, you could only use a motor of a specific length. If you got a motor that was too long, it would stick out the back of the rocket, and you couldn't use it.
The only reason I know of to install that ring is if you were going to use only black powder motors of a specific length in the rocket, and didn't mind limiting your choice of motor to those alone.
Now, don't throw unused parts away. I might find a need for this thrust ring some time in the future. I've collected two so far, so they'll just go in my spare parts box in case I need one some time.
The shock cord on this rocket is mounted by tying a slip knot of Kevlar around the motor tube, then sliding the forward centering ring over the lead of the Kevlar line. I put both centering rings on, pushed the loop of Kevlar tight against the forward centering ring, then made a fillet of wood glue around the aft of both rings, making sure to secure all of the Kevlar loop against the forward ring so that it wouldn't move. Once those fillets were dry, I made fillets on the other side of the rings.
 |
| This shock cord mount isn't going anywhere. If I wanted it to be even stronger, I could have used epoxy here instead of wood glue. But a fillet holding the shock cord isn't even called for in the kit instructions, and I'm fairly sure this will hold. |
The plastic retainer is smooth, as is the paper motor tube. Epoxy works best when it can get a grip on a surface to create a mechanical bond, so you have to rough up the inside surface of the retainer with some coarse sandpaper. For good measure, I also roughed up the end of the motor tube in the same manner - just enough so that it wasn't smooth.


Epoxy of any kind can be irritating to the skin, and too much exposure over time can cause you to develop an allergy to the stuff, so when using any epoxy, the best practice is to wear nitrile gloves. And before it's cured, epoxy is alcohol soluble, so have some rubbing alcohol and paper towels handy. If you get any epoxy where you don't want it - on the motor retainer threads or edges of centering rings, for example - moisten a paper towel with the alcohol and wipe off the excess epoxy. The stuff is really viscous and tricky to handle, so it's important to have paper towels and alcohol right at hand. It's easy to get some epoxy where it shouldn't be.
Epoxy comes in two parts - a resin and a hardener - which must be mixed together. With J.B. Weld, the steel epoxy resin is black, and the hardener is light gray. You mix equal amounts of these together until you get a consistent dark gray color, and you're ready to apply it. A thin ring of it around the aft end of the motor tube, and press the retainer down until it's straight and all the way on. If you get any epoxy inside the motor tube, wipe it out with a little alcohol, so you don't have trouble inserting a motor later.


The shock cord comes in two parts. The Kevlar line is looped around the motor mount, but then you tie the ends of it to an elastic cord.
I don't know what kind of knot I used to tie the ends together. It seemed pretty secure, but if it ever came undone, I wouldn't be able to get my hand inside the airframe to reattach it. Often, you want to secure a knot - whether it is of a shock cord to a nose cone, or two different shock cord materials together - with a dab of glue. Wood glue is often used. But since I had some J.B. Weld left after attaching the screw retainer, I used a gloved hand to massage some of it into the knot. Because it's a steel-based epoxy, it will be both heat-resistant and very strong.

 |
| For good measure, I let the motor mount cure sitting up on its forward end, so that the screw retainer would not move. It's just sitting on its side here for the picture. |
Next, I'll mark fin lines on the body tube and fill in the tube spirals so we get a nice smooth finish on the final paint job. I had to fix a minor problem with the kit, as I'll show you in the next post.
Click here for Part 2.
Like my Facebook page for blog updates.
No comments:
Post a Comment