Yesterday on The Rocketry Forum, on the subject of the Quest Q2G2 model rocket igniter, someone asked "Why is it so hard to get these things now... is this an Aerotech thing or what ??"
The Q2G2, seen above in its current form (they used to be blue), are a popular igniter for model rocketry, and have some high power uses as well. They are particularly useful to rocketeers who like to launch clusters - rockets with two or more motors firing in parallel.
[Edit: according to one of the commenters, Q2G2 always came in blue and red.
I have seen pictures of blue ones, but only ever had red ones. Quest in
recent years changed how they are made, to conform to new AFTE
regulations. While still great, they are slightly slower to fire
than they used to be. I had assumed there was a change in color to
signify the different formula. Apparently, I was mistaken about this.]
Preparing a 3-motor cluster with Quest Q2G2 igniters
Because they are low-current igniters, and because they have a pyrogen tip, they are very reliable for igniting multiple motors quickly and simultaneously - very important in clusters. You need all motors to ignite at the same time or the rocket may leave the launch pad with unfired motors, which will result in an underpowered flight, or a flight which may veer off in one direction. The Q2G2 is a much better igniter for clusters than the Estes igniter, especially now that the Estes igniters no longer have a black pyrogen tip.
High power rocketeers sometimes like to use the Q2G2 to ignite electronically-controlled ejection charges, in a process known as dual deployment. Rather than using a motor with an ejection charge, which is the standard for model rocketry, in dual deployment, the motor has no ejection charge. Instead, the charges are installed in the rocket by the flyer, and are controlled by an altimeter on board. At apogee, the altimeter sends an electric current to fire an igniter or e-match, which sets off the first charge. This usually deploys a small drogue parachute. It stabilizes the rocket's descent, but doesn't slow it down too much.
Then, at a lower altitude, the altimeter causes a second charge to fire, deploying a larger, main parachute. The purpose of this is to keep the rocket from drifting too far to recover it, especially if it's going to fly to a very high altitude. The Q2G2 makes an excellent and reliable substitute for an e-match, which is why it's popular for dual deployment.
The Q2G2 comes bundled with Quest motors, or can be purchased alone.
But for the last couple of years, Quest igniters and Quest motors have been hard to come by. For a while, rumors circulated that perhaps they were going away.
One advantage of being onThe Rocketry Show podcast is that I've made contacts with some interesting people who can answer questions. A while back, we interviewed Charles Savoie of AeroTech, manufacturer of mid power kits and mid and high power composite rocket motors. AeroTech now owns Quest Aerospace. He assured us that, no, the Q2G2 and Quest motors would not disappear. In fact, to make things easier and more readily available, manufacture would be relocated to the United States from China.
But since the question popped up on TRF, and since I've been looking for both Quest motors and igniters for myself for a while, I sent him an email to ask if he could shed some light on the situation.
He replied, "The Q2G2's are still being resolved as we deal with some supply chain issues with China. They had a huge explosion last year that has seemed to have an affect on hazardous materials and how they ship and store them. We are working on a solution now but nothing for sure."
"Are you still planning on moving manufacture of the Quest stuff to the US?" I asked.
"Yes," he replied, "we currently have the new Quest motors in the certification process. Once we get the design settled we will begin production."
This is good news. Although the Q2G2 igniters seem to be in limbo at the moment, with new motors will come new igniters. This kind of transition takes a lot of logistics and planning, so the issue may not be resolved right away. But our patience may be rewarded with wider motor selection for low power rockets, and more readily available igniters for those cluster rockets some of us love.
Part 1 of the Charles Savoie interview on The Rocketry Show can be heard here.
I haven't posted anything on this blog in about two weeks. Apologies to my regular readers, particularly if you've been waiting for the most recent installment of the Rocket Camp series of posts. I write this blog when I have the time, and some posts - particularly the Rocket Camp ones - take a while to finish, as I don't want to leave anything out. I just finished a 7-day work week, so writing anything of substance had to wait.
But I thought I'd get the ball rolling again with a Current Projects post, an idea I had for a regular feature on the blog, which I haven't revisited since last December.
One reason I haven't been writing much lately is that I've been trying to finish a few rocket projects. The most recent I've finished is the Estes Leviathan, a hulking beast of a model rocket on which I started construction nearly a year ago.
Estes stopped making the Leviathan recently, and it's a real shame that they did. It's a very popular kit. The rocket is a big, beautiful, four-finned rocket, part of their Pro Series II lineup. It's three inches in diameter and over 41 inches tall, and has a 29mm diameter motor mount. It's designed to be a mid power rocket (mid power is generally considered to be any rocket which uses E-G impulse motors), but with its strong construction and 29mm mount, it can be flown on motors up to H impulse.
H is where high power rocketry ("HPR") begins, and the Leviathan is a popular rocket for Level 1 HPR certification flights. Because it was relatively inexpensive (especially when Estes was liquidating them at about $22 per kit) and simple to build and fly, it's ideal for certification, because if the flight failed, it didn't cost so much, and could easily be replaced on a lower budget. A lot of dedicated HPR rockets cost much more, so a failure could hurt the wallet a lot more.
Though when I started building the Leviathan, I figured I'd just use it on F and G motors, I've decided to use it for my L1 cert flight, which I plan to do in September.
Because this blog is mainly aimed at beginners - rocket n00bs - we haven't talked about HPR much. And there's lots of exciting stuff to do in LPR and MPR (low power and mid power rocketry, respectively), and a lot of beginner stuff I haven't touched on yet. But the basics of getting a Level 1 certification are pretty simple.
First of all, you do need a certification to fly HPR. You can build all the HPR rockets you want to, but in order to purchase the motors you'll need to fly them, you must be certified.
High Power Rocketry has three levels of certification. Level 1 allows you to fly rockets with H or I impulse motors (or clusters of lower power motors which exceed the propellant weight or combined total impulse allowed in model rocketry - more on this at another time). With a Level 2, you can fly J, K, or L motors. And at Level 3, the top level of HPR, you can fly M motors and above.
Since each letter essentially doubles the total impulse - the total power a motor can impart to the rocket - you can see how quickly the rockets flown by high power rocketeers can get bigger and louder, can fly higher, and certainly get much, much more expensive! And restrictive - there aren't many places in the country where you can fly an N, O, or P motor. But if you get to witness a flight like that, it's really impressive. Motors that powerful are - well, they're very much like "real" rockets (actually, even an Estes Alpha is a real rocket, but you know what I mean).
While Level 2 and 3 certifications are more complicated, including written tests - and redundant recovery system deployment required for L3 - a Level 1 certification flight can be very, very simple. Some people go for more complexity on their certification flight, using electronically-controlled recovery deployment, but an L1 flight can be as simple as a model rocket flight, just with a bigger rocket.
What's required is that you be a member of one of two rocketry associations - the National Association of Rocketry or Tripoli Rocketry Association. You must build the rocket yourself. It can be either a kit or scratch built. You have to fill out some basic paperwork (though there's no written exam). You must then fly the rocket with qualified witnesses, usually at a club-sponsored event. The rocket has to fly on either an H or I motor, must have a stable flight, and must be successfully recovered undamaged, and with the motor still in the rocket (in other words, the motor has not accidentally been ejected during flight). Undamaged in this context means that the rocket must be judged by the witnesses to be immediately flightworthy again without making any repairs. So, while a little chip in the paint job (which will probably happen to any rocket) is OK, losing a fin is not!
* * *
But, I'm getting off track. This isn't meant to be a primer on HPR - it's a Current Projects post.
It took me nearly a year to finish the Leviathan. That's much longer than you need - this is essentially a larger model rocket with pretty simple construction. But I had to make some decisions on how I was going to build it, and I wanted to make it look as nice as I could. For me, that takes a little extra work, and I didn't have the time to do it all at once.
One thing I had to decide - would I attempt to streamline the fins? On most of my smaller model rockets, I sand the balsa fins into airfoil shapes. I enjoy doing it, I'm getting pretty good at it, and I really like the way it makes a rocket look. And it may help increase your altitude significantly.
The Leviathan has fins made of birch plywood - much tougher than the balsa fins of a basic model rocket. I don't have any power tools for shaping, cutting or sanding. My only tool for that is my Great Planes hand sander.
Well, it takes a little longer, but it's no more difficult to streamline plywood fins with a sanding block than it is with balsa. I did about a fin a day, and it came out great.
The finished rocket is flat black with two thin silver bands. Instead of a launch lug, I installed two rail buttons for use with a launch rail - which is fast replacing launch rods on high power launch pads.
I'm pretty pleased with how the Leviathan turned out, and I can't wait to fly it.
Also nearly finished is the Estes Nike Smoke, another large Pro Series II rocket. This is a sport scale model of a NASA sounding rocket from the 1960s, and it's another impressive kit.
The Nike Smoke was flown during the 1960s, and was used to test wind shear.
It has also taken me a year to complete. I worked on a lot of rockets at once - probably too many - so it took me a little longer.
Painting the Nike Smoke has given me major problems. My first three attempts at a white undercoat came out terribly - horrible, sharp bumps all over the rocket!
After my first attempt at painting the Nike Smoke
The results of my third attempt...
Finally, two days ago, I managed to get a nice, smooth gloss white coat on.
In a day or two, I'll move on to the orange and yellow fins, followed by the United States decals, and finally a flat clear top coat (scale models are often painted with a flat top coat - real launch vehicles are rarely shiny like a nice sport model rocket, and flat colors make a model look larger).
Also nearing completion, though lagging behind, is a third Pro Series II kit, the Ventris.
This is a nice tall rocket with a larger payload section. The build has come along slowly but well, and I can't wait to finish it and fly, hopefully in September. I have a launch this weekend, but at a smaller field, and I'm not going to fly the Leviathan until my Level 1 attempt. I hope to show up at the field with all three of these, because they're pretty impressive-looking.
I also finished and flew the Copperhead a while back. The Copperhead is a rocket I designed and built for a friend, and I liked it so much I built my own. I decided to add a booster, transforming it into a two-stage rocket.
I've flown it three times - once with the booster, and twice as a single-stage rocket. I've already broken a fin off both the booster and the sustainer. I glued them back on, so the rocket can fly again. It's not as pretty as it was when I finished it, but they never are after your first flight.
* * *
Back in April, I flew a number of new things, including a rocket from the book Make: Rockets: Down-to-Earth Rocket Science, by Mike Westerfield. This rocket is called Ceres B, and has a hidden camera payload.
The Ceres B has a 24mm motor mount. The original design, from the book, is meant to be flown on E9 black powder motors. But with a composite, you can fly much higher, and use motors up to G impulse.
I had ordered some composites for that launch by AeroTech, but they didn't arrive in time. Well, they're here now! In fact, a few days ago, I took inventory of all the motors I have.
My supply of C6 motors is dwindling. I have no idea where I got all the B6-4 motors. The G40-7 composite motors at the bottom will be used in my Pro Series II rockets. I've heard that these are impressive motors to watch - a decent 2.5-second burn time with a thick plume of white smoke. I'm excited to try these guys out! The Cesaroni H133 is the motor I purchased for my Level 1 HPR attempt.
Finally, I got a hat.
My official rocket hat
Anyone who's serious about rocketry seems to have a hat. Now I have a hat. This is a big step.
Joking aside, if you spend lots of time in the sun launching rockets, you should consider getting a sun hat. Sun screen is a must, but you will probably need extra protection. If you join a club, you'll see lots of people wearing sun hats, and it's experience (and possibly a dermatologist) which has taught them that they need these.
Back to instructional posts soon.
I'll do full build posts of the Leviathan, Nike Smoke, and Ventris, when all of them are finished - and probably after they've flown. In the mean time, I am uploading photos of the build on The Rocketry Forum. You can find the Leviathan thread here, the Nike Smoke thread here, and the Ventris here.
From the "Estes Mercury Redstone Model Rocket" Facebook page
The Estes Mercury Redstone now has its own fan appreciation page on Facebook. It's not an official Estes-run page, but one created by an admirer of the rocket.
The Mercury Redstone kit is a recent re-release from Estes, and is part of what seems to be their return to a line of sport scale or semi-scale models of historic NASA rockets. The Mercury Redstone has been out for maybe a year now, and has been recently been joined by the Little Joe II (a Project Apollo test vehicle, used to test the Apollo Command Module's Launch Escape System), the gigantic Saturn V, and a low power version of the Nike Smoke sounding rocket (there has been a Pro Series II mid power version for some time). Soon, a Nike Apache kit will be released.
Also recently added to the Estes catalog is the Estes Shuttle, which, while not actually a scale model, is at least somewhat inspired by the Space Shuttle.
Most of the rockets are more challenging to build than your basic Skill Level 1 "three-fins-and-a-nose-cone" sport model rocket, and they have some nice detail. They're also on the larger end of the spectrum of low power rockets, and, when well built, look nice on the shelf.
Fans of Chris Michielssen's Model Rocket Building blog will remember his detailed build series of the Mercury Redstone. It's a good reference for some of the trickier aspects of the build (the capsule and escape tower in particular).
I love that there's a Facebook page just for this rocket. It's pretty new (looks like it was begun on June 28), and could use some more pictures. If you have some, you should add them.
Building model rockets with a group of young kids who have no experience doing it is one of the more challenging aspects of teaching rocketry. Building a simple Skill Level 1 rocket isn't hard, but there are steps which must be followed in order. There are small parts which must not be lost, or the rocket won't work properly. Time must be allotted for glue to dry before moving from one step to another, and some kids get impatient and try to rush. There are fragile parts which may break if there is horseplay. And kids without a lot of craft-building experience tend to use far too much glue.
Building a model rocket isn't hard, but kids building one for the first time require a little guidance.
Although this blog is largely aimed at people just getting into rocketry, a lot of my readers are experienced rocketeers. Some people reading this will have a lot of experience both building rockets and teaching rocketry to kids. More may have lots of experience building and flying, but haven't actually taught rocketry at a school or camp or scout troop before. Some readers may have no experience at all building rockets, but wish to incorporate model rocketry into a school curriculum, and need some guidance. With the next few posts, I hope to address readers of all levels.
* * *
In earlier posts in this series, I have mentioned the fact that, due to the amount of time I had with my rocket camp kids, I didn't always go by the advice of others in online rocketry forums to "keep it simple." I managed to teach some advanced stuff to these kids.
But when it comes to building rockets with young newbiesyou definitely do want to keep it simple! Many experienced rocketeers will do their own thing, altering the rocket from the strictures of the instructions. They may add a payload section which doesn't come with the kit, so the rocket can be flown with an altimeter. They may do a "kit bash," using the parts of one kit to make a different rocket from the one pictured on the package. They may clip the thumb tab off the end of a motor hook/engine hook, either because it looks better, or because the hook is too long and the rocket won't stand on its fins with a thumb tab. Or, they may leave out the hook and the thrust ring/engine block so that a wide variety of motors may be used. I myself will often at least use a larger sized motor mount, so I can fly a C motor rocket on a D or E motor if I want to. They might even decide not to use a launch lug, but instead replace it with micro rail buttons, so the rocket can be flown off a more sturdy launch rail, such as the MakerBeam.
When building with kids for the first time, however, it's best to "build stock." In other words, stick to the instructions and don't change too many things. This may seem obvious to most people, but I'd bet a lot of rocketeers get to a point where they don't look too closely at the instructions for a basic rocket build, because they know how a basic build goes, and they tend to enhance or upgrade most of their low power model rockets.
A lot of us will take certain steps to hide the spiral groove in the paper body tube and fill in the rough wood grain on balsa fins - with materials like Elmer's Carpenter's Wood Filler or sanding sealer, or by adding paper skins to the fins to strengthen them and make them smooth.
This can certainly make a rocket look much nicer, and may help the rocket fly much higher, since a smooth rocket has less aerodynamic drag than a rough rocket. But these steps can be messy. Carpenter's Wood Filler (CWF) creates a lot of dust when sanded smooth. Sanding sealer puts out strong fumes and must be used in a well-ventilated area. Papering fins is tricky to a beginner with underdeveloped manual dexterity. And all of these techniques are at least somewhat time-consuming. A lot of kids will get bored, and ask "Do we have to do this?" Bored kids may act up and disrupt the class, or, at the very least, decide that rocketry isn't for them, and give it up once the camp or class is over.
A beginner's rocket doesn't have to be beautiful. It must be functional and safe. For most classroom applications, you should skip the extra steps of filling in wood grain and spiral grooves, and just build the rocket as depicted in the instructions.
An exception to this would be if you are working with older students, in, as I mentioned in the previous post, an art class or as a project in a shop class, where the point is to make something that looks nice. Or, if you have kids who are really interested in the finer points of craftsmanship and model building. In that case, you could surely consider showing them some tips for making finer-looking rockets.
* * *
As I mentioned in the post about kit selection, you will hopefully have built one of the kits you'll be using before class begins. If you are totally unfamiliar with model rocket building - perhaps you are a teacher who wants to incorporate rocketry into your curriculum, but not an obsessive rocket hobbyist like the rest of us - this is especially important. Not only will you go into the class knowing how the rocket is to be constructed from start to finish, but you'll know what tools and materials you'll need for each step. Let's start there.
Tools
Here are the basics you will most likely need for any rocket kit.
Hobby knives with #11 blades
These are often called "X-Acto" knives, but X-Acto is just a brand name. It's like the Kleenex of the hobby knife world. With a Skill Level 1 kit, or even an easy-to-assemble "E2X" kit, there is at least some bit of cutting you'll have to do. This might be nothing more than cutting a tiny slit into the motor tube to install a motor retention hook, or "engine hook."
Do you give each kid a hobby knife and let them do their own cutting? This is a tricky judgment call, and I can't really answer that question. Hobby knives are razor sharp, and fragile. Not only can they slice very easily, but if you apply too much pressure to them when cutting, the tip can break off - that can end up flying back into an eye.
Last year, we had a bunch of hobby knives and smaller groups, and the kids seemed pretty competent. Kids of this age group have been building rockets for decades, and the camp had used hobby knives in the past, so while I let kids make their own cuts, I gave them some basic rules on knife safety and made it clear that this is not a toy. I told them I would do the cutting for them if they wanted me to, and I kept a sharp eye on all the kids while they were doing it. It made me very nervous, but everything went well, and once the cutting was done, I made sure to collect all the knives.
Between last year and this year, at least one box of the camp's supplies had been lost somewhere. We had no hobby knives, so I bought one. Only a single cut was necessary per rocket. And I had a lot more kids this year. The larger group dynamic meant that the kids were rowdier and didn't listen as well. Rather than pass around the knife, I erred on the side of caution, and went around and made the cut myself. When in doubt, you do the cutting.
Rulers
Most model rocketeers prefer a metal ruler with a cork back. A metal straightedge is necessary when used as a guide for cutting things like fins with a hobby knife, and the cork prevents the ruler from slipping.
But most beginner's kits come with fins which are already cut out. You merely need to remove them from the balsa sheet in which they come. There are some small tabs holding the fins in place, but those can either be cut without using a ruler, or the fins may simply be snapped out (there may be some minor fin damage, but if you're careful, it should be fine).
Still, you do need to make a few measurements, so a handful of plastic or wooden rulers will do fine, if that's what's available to you.
Pencils
The kids will have to make some marks on the body of the rockets. Always use pencils - never pens or markers. Pencil marks are erasable if kids make mistakes (they will), and pen or marker ink can bleed through a paint job.
Sandpaper
Even if you're not trying to build beautiful models with a fine finish, some sanding will probably be necessary. Get a few sheets of sandpaper and cut them into small squares to pass around. Don't get anything too coarse - an inexperienced kid can really sand things out of shape with 150 grit sandpaper! Anything between 220 grit and 400 grit will serve you just fine. Sanding blocks cut from 1X4 wood are nice to have, but probably not necessary for a rocket camp build. I requested sanding blocks for my camp, but they never materialized. In the end, it wouldn't have made a difference to how the rockets turned out.
Aluminum angle
This is an optional tool, but I highly recommend it. When building rockets, with a few exceptions, kids will have to mark straight lines all the way up the body tubes to mark where fins and launch lugs go. It's hard to draw a straight vertical line on a curved object like that.
For decades, model rocketeers have used either the lip of a drawer or a door jamb to do this task, and it works just fine.
A door jamb is an acceptable way to mark
lines up a body tube - in a jam.
But you probably won't have a dresser drawer in your classroom, and a lot of schools have metal door jambs with round corners. Wooden door jambs often have nicks in them, so it's hard to get a good line. Plus, the school or camp where you're working may not want pencil marks all over their doors.
Many rocket builders today use aluminum angle, available at hardware stores in 3-foot lengths, to accomplish this task.
Simply place the angle open end down on the body tube, and it forms a perfect straightedge all the way up the tube.
Aluminum angle makes the perfect straightedge for drawing lines straight up the body tube.
Aluminum angle is pretty cheap. You can get one or two 3-foot lengths, cut them into shorter pieces with a hacksaw, sand off any rough edges with coarse sandpaper, and then pass them around the class when it's time to mark up the tubes. 1/2-inch wide aluminum angle, as seen in the above photos, is the perfect size for small, classroom rocket building projects.
Craft Dowels or Craft Sticks
This is another optional tool, but you might find it nice to have on hand. Kids will have to apply glue to the insides of the rocket body tubes. Usually, using fingers will work, but kids with small hands might find it difficult to get glue into the right place. A dab of glue on a dowel or craft "Popsicle" stick will do the trick. I applying glue inside a round tube easier with a round dowel than with a flat craft stick, but either will work.
Cardboard Boxes
This is one that's so simple, I can't believe I didn't think of it before I started.
Rocket kits have a lot of small parts, and some of them tend to get lost in a classroom full of kids. There's always at least one kid who loses a nose cone and several who lose launch lugs. Launch lugs are tiny, and until launch day, kids don't see how important it is not to lose them. Unless you want to go to the trouble of building a launch tower - which you probably don't - you need the launch lugs.
A launch tower is used to launch rockets with no launch lugs. They're mainly used in competition
rocketry, where you want to reduce aerodynamic drag as much as possible. Image from nar.org.
The first couple of times I did the camp, when the day was finished, I had each rocketeer make a little pile of his or her parts on the tables at the side of the classroom. "Put your stuff where you know you'll find it tomorrow," I said. This really didn't work. It finally dawned on me that I needed some kind of storage for half-built rockets.
The simple solution is to have a shoe box for each kid to put his or her stuff in at the end of each day. As seen in the photo above, by cutting a V-shaped notch in opposite ends of each box, you have also made the storage box double as a rocket cradle, perfect for holding the rocket horizontal while allowing glue to dry on fin fillets or while doing other work on the rocket.
Scissors
You're probably going to need scissors for a lot of things, especially cutting out tube marking guides (these are used to mark where the fins go on the rocket, and are included in the instruction sheets in just about every rocket kit) and probably for cutting out shock cord mounts (especially if you use Estes rockets). That's not to mention the dozens of other used you'll find for scissors in the classroom.
Materials
Adhesives
For most rocket-building tasks, you will need either white glue or yellow glue, more commonly known as wood glue or carpenter's glue.
Wood glue, sometimes called "yellow glue," and is technically called aliphatic resin, on the left;
white glue, or polyvinyl acetate, on the right. Either one will work well for model rocketry.
Either will work well for kids building rockets. Don't ask "which one is better?" because that opens a whole can of worms. "What's the best glue?" is a question which sparks heated debate in online rocketry forums. Either one should be plenty strong for a Skill Level 1 model rocket.
I went with wood glue, because I know the bond it creates is stronger than both the paper body tube and the balsa fins we'd be gluing together, and it's what I use at home. You can also find multi-packs of small bottles of white glue in a lot of craft stores.
What you don't want to use, however is "school glue," or anything labeled as "washable." White glue and wood glue can be cleaned up with water if they're not totally dry, but washable glues can be removed with water even when dry. The bond isn't as strong, and you don't want your rockets falling apart if it starts to rain on launch day!
Plastic Cement
Some model rockets - including the Apogee Avion, which I built with my kids this year - require some use of plastic cement, either to assemble a two-part nose cone, or to attach plastic parts to the paper body tube. A common plastic cement is Testor's, and it comes in a red tube. Beware - this stuff is toxic. There is a "non-toxic" variety, but it's not as strong. In my camp, I assembled all the nose cones myself before class. I didn't want any kids getting plastic cement on their fingers or in their mouths.
Stay Away from CA!
Thin and thick varieties of cyanoacrylate - commonly called CA - found in hobby shops and online
Inevitably, you'll have some kids asking "Why can't we just use Superglue?" Adhesives marketed as Superglue or Krazy Glue are in fact cyanoacrylate, which hobbyists abbreviate CA. It's sold at hobby stores in thin, medium and thick viscosities for model builders, and in medium thick or gel form, as found in hardware stores, for household use. It does bond very quickly, but there are some good reasons to steer clear of CA.
First, CA is brittle, and it gets even more brittle with age. A hard landing can easily knock a fin off a rocket if it's glued on with CA.
But, more importantly, CA is too dangerous to use with kids. CA is a monomer with small molecules capable of attaching themselves to each other. When it cures, it polymerizes - the molecules bond firmly together to form long chains. CA's bonding power is activated by moisture, such as the moisture in the air. But the moisture of human skin makes CA bond instantly. You can quite literally glue your fingers together, or glue them to a rocket part!
Not to mention, when CA cures, it has what's known as an ectothermic reaction, meaning it generates heat. The faster CA cures, the hotter it gets. When you get CA on your skin, it can get hot enough to cause a bad burn, especially in large quantities.
When my kids asked me why we couldn't use Superglue, I was prepared. I showed them this picture.
This happened when I accidentally got thin CA on myself and glued my finger to the bottle. Luckily, I had some CA de-bonder on hand, and was able to work my finger loose - but I did get a bad burn.
Un-Cure, a CA de-bonder, available in hobby shops and online
Don't mess with CA when building with young kids. Instead, teach them to be a little patient and wait for the wood glue or white glue to dry.
There is a possible exception to this, however, if: a) you are building with older kids, and b) you either need to build quickly or you are doing an altitude competition and need the rockets to be ultra-light, and c) you don't mind if the rockets only last a few flights, then you might consider using CA for construction.
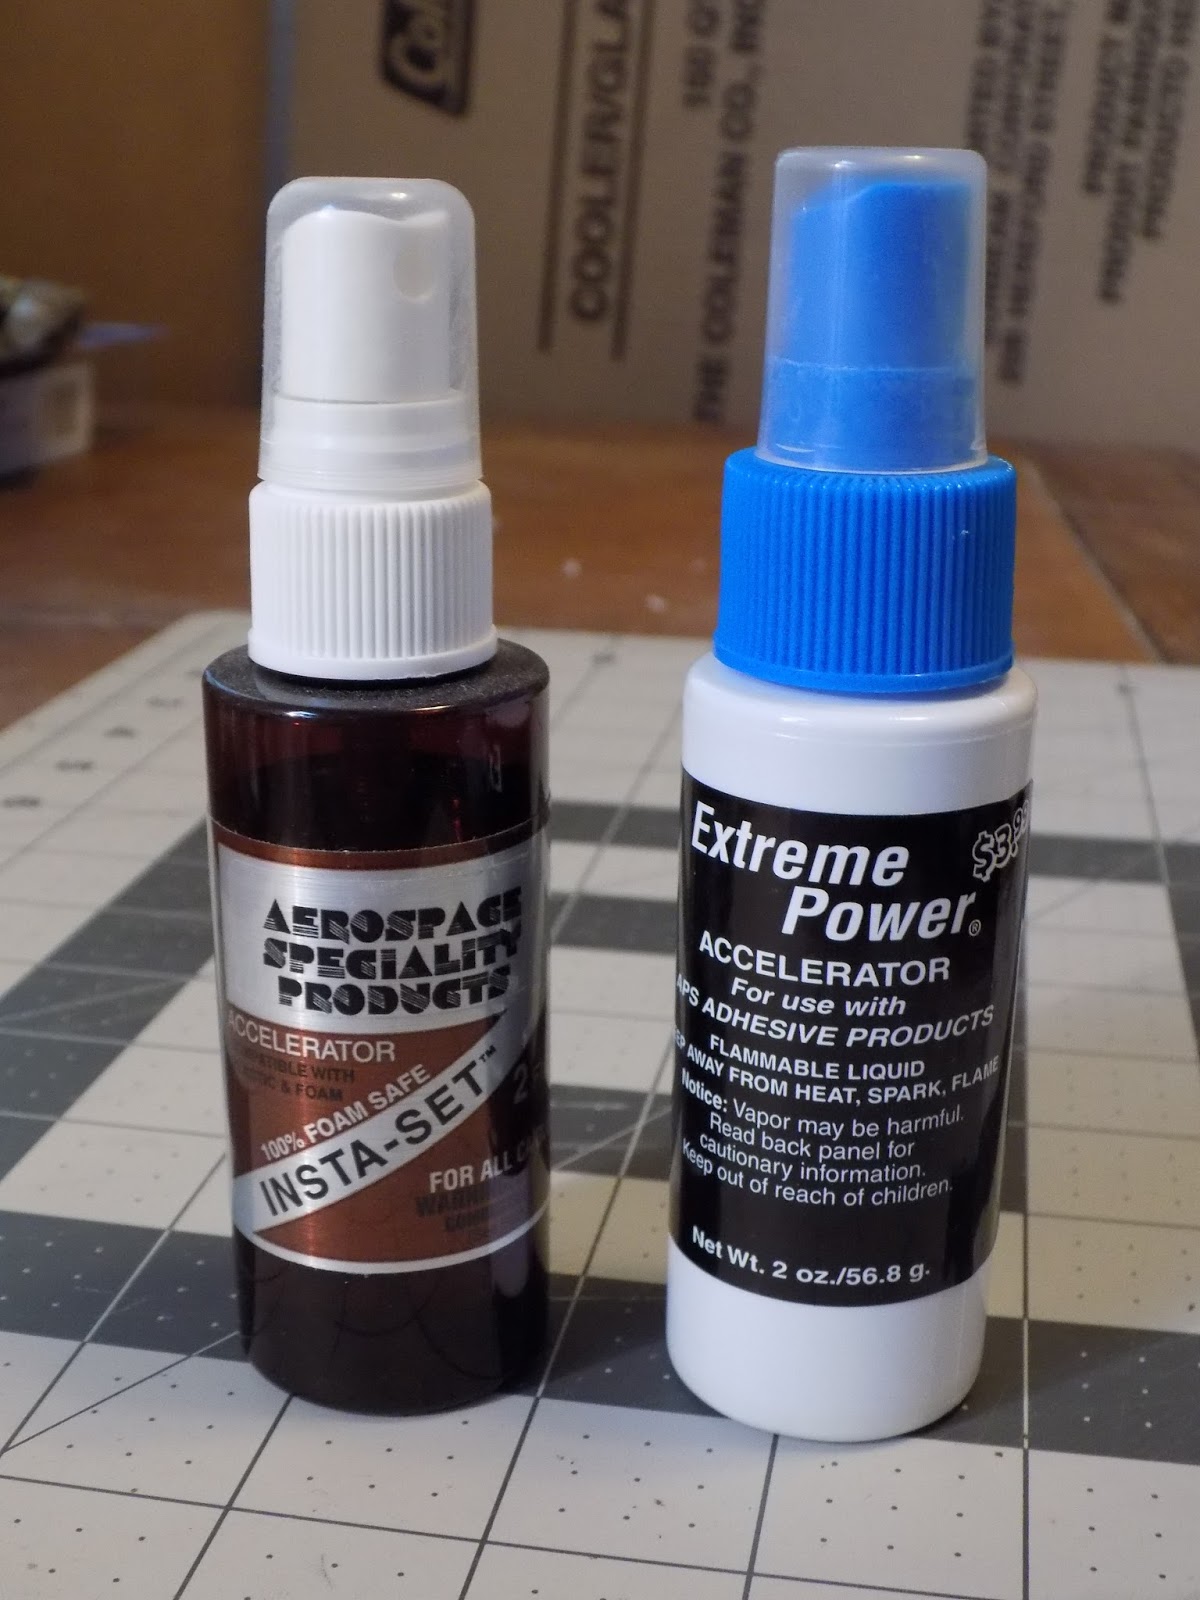
If you do, make sure you use protection. Builders should wear nitrile exam gloves. If CA gets onto the gloves, they will stick, but that's better than getting CA on the fingers. Don't use the super-thin CA - it goes everywhere, and is not good for attaching fins to rockets. It also cures lightning-fast, meaning if you do get it on your skin, it can get very hot. Furthermore, thin CA can splash back, and if it gets in someone's eye you will have a medical emergency on your hands. Use a medium or thick CA, or perhaps a gel Superglue. Since medium and thick CAs cure more slowly, you might want to have a CA accelerator - often called "kicker" - on hand. It cures the CA instantly. Once CA is cured, it's safe to touch.
Two brands of CA accelerator, found in hobby shops and online
Make sure you have some CA de-bonder or acetone on hand in case someone glues their fingers together. And as you would with kids using hobby knives, keep a close eye on everyone to make sure someone isn't absentmindedly making a dangerous mistake.
Tape
You may be painting the rockets with your kids, or you may not. Either way, you'll probably find you need some tape. Regular Scotch tape will work well. We got some really cheap blue painter's tape. It's not great - I would never use it for my own builds. But for rocket camp, it's fine.
Waxed Paper
Kids can be messy, especially when working with glue for the first time. Lay a sheet of waxed paper at each kid's work space, and it will help prevent the need for major cleanup at the end of class - which will probably fall to you.
Alternately, dollar store cutting mats, which often come in 3-packs, and which are meant for the kitchen, are good work station tools. If you do have to have the kids do any cutting with a hobby knife, they will also protect the tables or desks from damage.
Paper Towels
You will have glue everywhere, and probably some sanding dust as well. There will be a lot of kids with a lot of gluey fingers. Make sure you have something to clean up with. A damp sponge might also be a good idea.
Paint
We'll actually discuss paint in a later post. Whether you use spray paint or opt for brushes - or even markers or colored tape - will depend on your setup.
* * *
In the next Rocket Camp post, we'll actually discuss construction of the rockets themselves.