[
Click here for Part 1]
Let's prime and paint this sucker!
You're going to need two kinds of primer - gray and white. It must be
sandable
primer, because you're probably going to need to sand the surface smooth
once you've primed it. And both should be of the same brand and type. Lately, I
usually use Rust-Oleum 2X flat gray and flat white primers.
You'll need some fine grit sandpaper - probably at least 400 grit.
And of course, you'll need color spray paint - whatever colors you intend to
use. If you're going to paint your rocket with the color scheme prescribed by
the kit, that's obviously what you get. But sometimes I like to paint mine
differently.
Whatever you do, make sure all the colors are the same brand and type, and
for good measure, I make sure they're the same brand and type as my primers -
so I get Rust-Oleum 2X, either gloss, satin or flat, depending on what I want
the rocket to look like (most models use gloss, because it's shiny. But for
scale models, a lot of people use flat colors. Real NASA rockets are flat in
color - otherwise they'd have a glare coming off them in the sky. Flat colors
also tend to make the rocket look bigger).
Don't mix things like enamel and lacquer. I've not had experience with this,
but I've heard that things like enamel, lacquer and acrylic can cause each
other to melt or dissolve. I don't know much about the hows and whys of this,
but stick with the same kind of paint, and you'll be fine.
You'll need something to hold the rocket while you paint. The easiest, cheapest solution for this is called a paper wand. You just take a section of newspaper, roll it up, and stick it into the top of the rocket body tube. When you relax your hand a bit, the paper unrolls slightly, filling the tube, and it will stay put. For your first rocket, this is a great solution.
 |
Roll up a section of newspaper to make a "paper wand"
and stick it into the body tube. |
I've obviously gotten obsessed with rocket building, so I made myself a little painting rig. Or is it a jig? I don't know...
 |
The Big Bertha on the painting rig, ready for priming. This is really easy to build, and
keeps the rocket upright for painting - you can also rotate the rocket for easy application. |
Either way, it was really easy to build, and I'll give you instructions in a later post.
Start with the gray primer.
Some people say you should begin with a very light mist coat over the whole rocket, let it dry about 20 minutes, then repeat, adding light coats until the whole rocket is primed and completely covered. This is definitely how you paint topcoats (the colors you'll use on the final finish). Other people, however - including Tim Van Milligan of Apogee Components, in his video
Rocket Building 101, which you get free on DVD with your first purchase over $50 - just use one heavy coat. Van Milligan goes so far as to get paint drips - something you wouldn't want with a final coat of paint, but he's fine with it in primer coats.
In my experience, you're going to sand most of the primer off anyway, so I don't know that it matters. But if you want to be careful, go with multiple, light coats of primer. (I admit, I have gotten too impatient for that, and go for one or two medium coats.)
Here's a good practice for each coat of paint and primer:
- Start with the trailing edge of the fins
- Do the tips of the fins
- Do the leading edges of the fins
- Do the surfaces of the fins
- Do the body of the rocket
You're going to shake the can of primer or paint for at
least one minute, then hold the can 10-12 inches from the surface of the rocket, and keep the can moving. Move in one direction, and start spraying before the surface you're painting, and spray past it. In other words, if you're painting a tube, point the spray can in the direction of the rocket, but
below it, then press the button, and move the stream of paint all the way up to the top of the tube and beyond.
 |
You can see a bit of wood filler in the spirals under the primer here, but do make sure
you get full coverage - whether you use multiple light coats, or one or two heavy coats. |
Don't forget to prime the nose cone! Mask off the shoulder - the narrower part that fits into the rocket - and prime it as well. I insert a dowel rod into mine to hold it while I paint.
Wait a day.
Look at your rocket. You can see any imperfections in the surface once the primer is on. If you have any wood grain that wasn't filled on the fins, you'll see that. If there was any dust or debris on the rocket, the primer will sprout a little hair at that point (you can actually rub these fuzzies off with your thumb). You'll also see it if you didn't fill the spirals in the tubes - or if you had some spots where the filler didn't completely fill it.
 |
In the sunlight, you can really see the little "hairs" that grow from tiny particles of dust
on the surface. Remember Hair-In-A-Can? I think it kind of works like that. |
Not to worry. If you want those spirals filled, now is the time to do
it. Grab your carpenter's wood filler - CWF - and repeat the process of
filling the spirals, and using a razor blade like a putty knife to
remove the excess. You will probably only have to do this in a few
spots, if you filled it correctly the first time. Let all this dry
completely, several hours, then sand.
 |
| Just a few spots of tube spiral to patch |
If you don't need or want to fill any imperfections in the tube, skip right to the sanding.
Sand the whole rocket with a fine grit of sandpaper - say, 400 grit. Blow on it continuously to remove excess dust so you can see how well you're doing. Move in little circles as you sand.
Some people remove almost all the primer, so that you get a rocket that is mostly body tube showing through with a bit of primer here and there. I usually end up oversanding when I do that, and digging into the paper fibers, so I only sand until the whole thing is smooth, and then quit while I'm ahead.
Wipe the whole rocket with a soft, clean towel. You can blow off extra dust with canned air if you like - the kind you'd use for cleaning your computer. I have slightly -
slightly - dampened a paper towel and wiped the rocket off with it, then dried it quickly with another paper towel. I've heard that this can cause damage, though, and a better option is to wipe the rocket down with a bit of rubbing alcohol.
You can actually wet sand the nose cone with some fine grit wet/dry sandpaper. Run a small square of 400-600 grit wet/dry paper under water and then sand the nose cone in little circles - wiping off with a paper towel as you go. It will become very, very smooth!
Once the rocket is sanded and clean of dust, you will use the white primer. Repeat the process you used with the gray primer, but this time, definitely stick with light coats. At this point, you want to sand as little as possible. The gray primer is your chance to do most of the important surface preparation touch-ups, and while you can sand the white primer, you don't want to do too much if you don't have to. With white primer, you should consider yourself to be actually painting, so take care with that surface!
 |
| Super light first coat of white primer |
Once you've got
full coverage of the rocket - including the undersides of fins and the joints between fins and the body
and the launch lug and the body... wait a day.
And don't forget the nose cone.
A good finish takes time. You want the paint layers to dry and cure thoroughly. Two days is even better, but not strictly necessary.
Now, as for painting, I'll try to be brief, because you can paint your rocket any way you want. If you're only doing one color (maybe with decals), you're lucky - it will take much less time.
Quick tip - warm the can of paint in a bucket of warm water - it makes for a better paint job. Don't paint if it's too hot, or too cold, or too humid. The paint you're using should specify optimum conditions. And if you're doing more than one color, always,
always do the light color first. You can do black on top of yellow, but if you try to do yellow on top of black, it will never look right.
In any case, shake the can for at least a full minute, and cover the rocket lightly as before - trailing edges of fins, tips of fins, root edges, then the sides of the fins, then the whole body. You should still see white primer through your first coat, because it should be very light.
Let it dry several minutes - up to about 20 - and do a second coat. It usually takes me about three coats until I don't see the undercoat. Let the rocket dry completely - at least a day.
If you more colors to apply, you'll need to mask off every part of the rocket you want to remain the original color. For example, my Big Bertha was black with yellow stripes, so I painted the yellow first (though I only bothered to do the area that would have the stripes), then I covered that area to do the black. The edges you can do with tape. Painter's tape works great, if it's low tack (you don't want to peel off that lighter color), but I just discovered that regular scotch tape makes really crisp lines as well - but the original paint has to be really dry!
Do the edges where one color meets another first, with the tape. Then you can mask off the larger areas with... just about anything. Paper works well - though not newspaper. You'll leave prints from the newspaper on your rocket, just like Silly Putty! I use a plain brown masking paper.
Now before you do the top color, hit the edges of the tape with the original undercoat color - in my case, yellow - to seal the tape well and prevent that top color - black - from bleeding through. Let it dry several minutes, and then paint the rocket with the top color. After you've done a few coats and are happy with it, remove the masking tape. Don't let it dry too much, or the paint will chip, and those straight lines you got won't look so nice. But be careful not to let the tape or paper touch the wet paint you've just applied - so peel carefully!
 |
In these three pictures I'm masking off the stripes I wanted to add. Each black stripe
would require me to mask off the yellow stripe below or above it, as well as the center.
So, as I painted each black stripe, I was also creating a yellow stripe. For this, I worked
from the outside in toward the center. It still took forever.. |
Last thing I'll say about this: Each new color or mask you do requires a day of drying time. I was originally going to do seven yellow stripes - that would have required probably four or five days of drying for each pair of stripes, top and bottom!
I'm stubborn, and would have done it, so I guess I was lucky when I decided this looked too busy. So I cut the number of stripes down and it took maybe 2 or 3 days.
When the whole rocket is dry completely, you can apply decals if you want to. I won't go into that here, because I threw mine away for this rocket.
You should have a nice, smooth rocket by this time.
 |
| No wood grain visible! That's because we filled the fins with CWF. |
Whether you apply decals or not, you might finally paint the whole rocket with a clear, gloss coat - same brand and type as the paint you used before. It's not necessary, but it can help protect any decals you use, and it will hide the ridges from the masking tape you used to make multiple colors. Use it sparingly, though, and not in cold or humid weather - I made my Big Bertha kind of cloudy by doing this!
I thought we might finish the rocket this time, but this post was, again, longer than I'd thought it would be. We are nearly done. Next time, we will finish this rocket and talk about flying it!
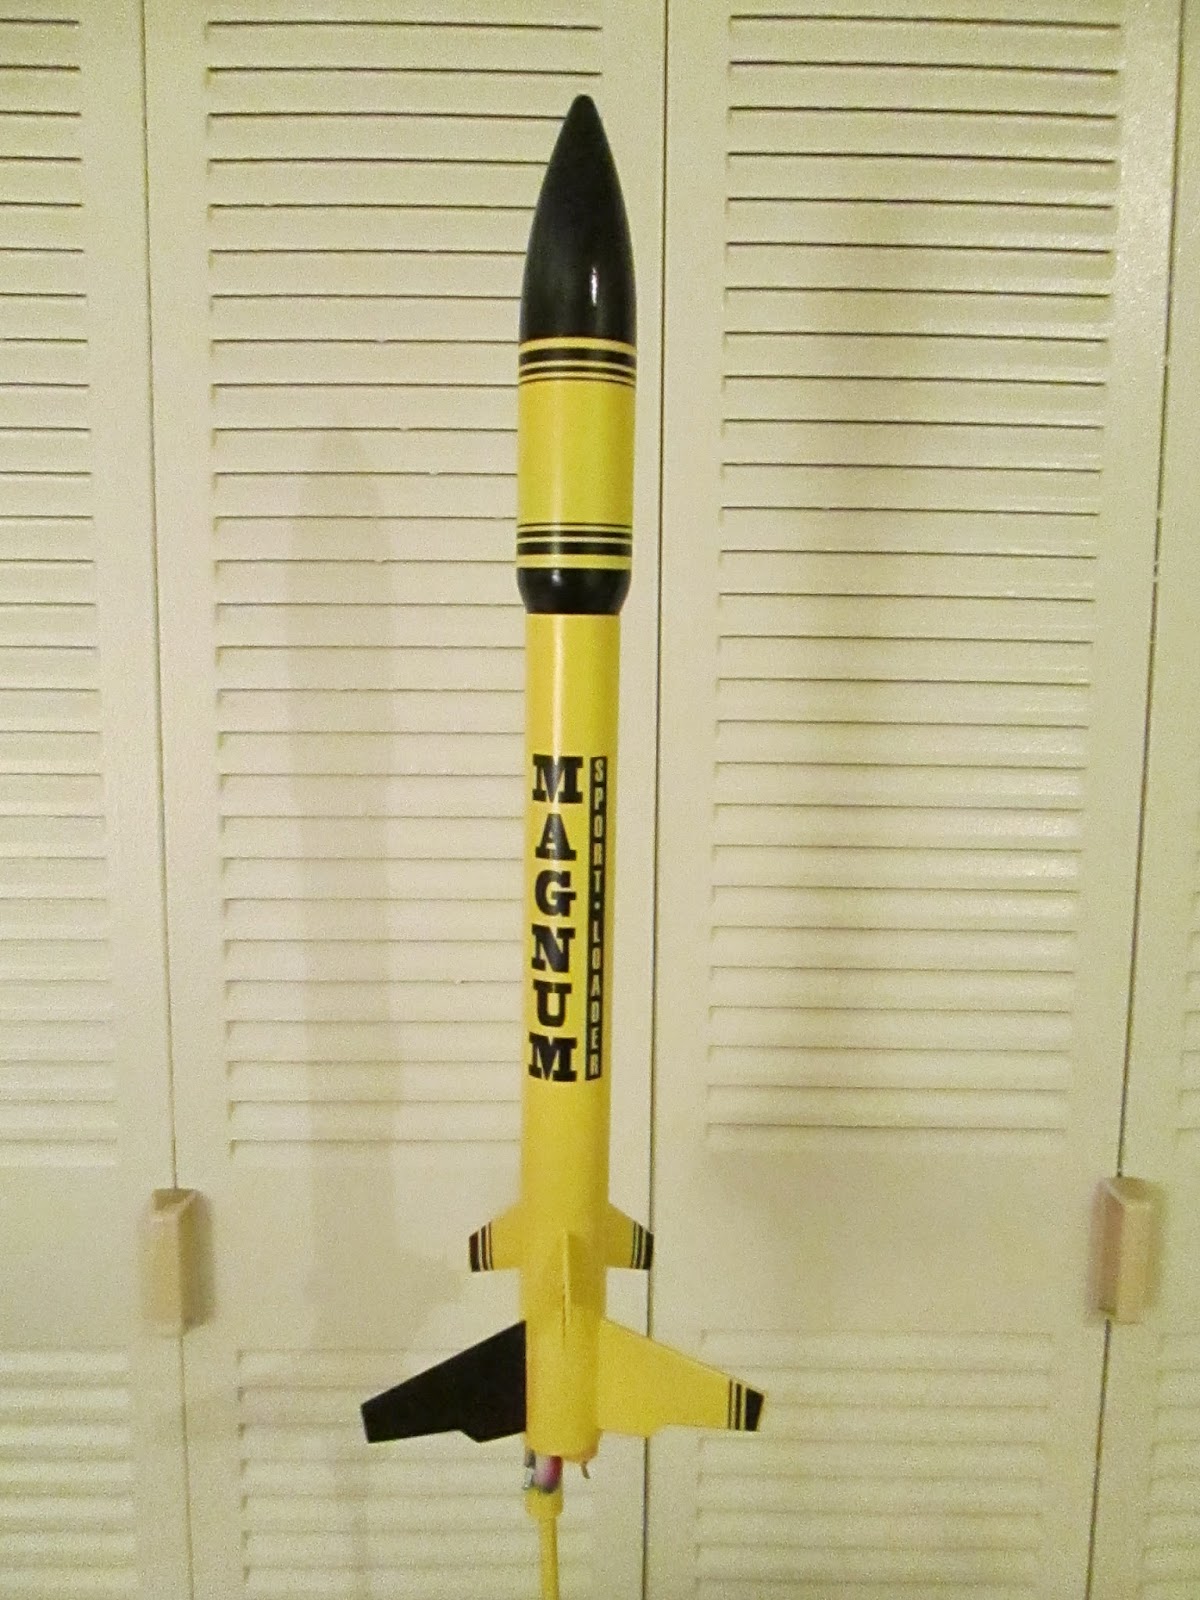
 |
| The finished product! |
|
[
Click here for Part 8 - The End!]