Tuesday, November 25, 2014

Bill Stine Himself on Quest Igniters

I think something incredible just happened.

If you're new to rockets, this might not mean anything to you, but stick with me. I'll explain.

So, Estes is not the only rocket company in the rocket biz. There are lots. One of them, Quest Aerospace (perhaps Estes' biggest rival in the low power rocket arena) is another. I have a few of their rockets, including the Magnum Sport Loader, a two-motor cluster rocket. Here's the video:


Quest has a line of motors and igniters. The igniters are called Q2G2, and they're sought after because they're very reliable - especially if you do cluster launches of low power, black powder motors (that's all I'm up to at this point). They require very low amperage to get them to fire, which means it takes less juice to get them to work quickly and properly - very important, since you want all your motors to ignite at the same time in a cluster rocket.

Problem is, Quest motors and starters have been out of stock for months - since long before I got involved in clusters. I kept hearing they'd be back in stock "in November," but, they're just not. Apogee Components has lately been saying "July 15."

I posted a thread on The Rocketry Forum to ask what the deal was. Were they ever coming back? Some insisted that, no, they are gone for good. Something to do with a recent merger between Quest and AeroTech (a company that specializes more in mid and high power rockets and motors). This Quest Q2G2 issue has been a hot topic in rocketry circles lately, and the thread has generated a lot of replies.

OK, that's Part One.

There's a guy named Bill Stine. He's basically been around hobby rocketry since the beginning, and he's the author - along with his father, the late G. Harry Stine (one of the founding members of model rocketry) - of The Handbook of Model Rocketry. If you're serious about pursuing rocketry as a hobby, and want to understand more about it, this book is required reading. I bought a copy for my Kindle and devoured it a few months back, and I turn back to it frequently. Seriously, get this book - it has a lot of information important to understanding rocketry basics. Point is, Bill Stine is one of the biggest names in hobby rocketry. He's like the Richard Leakey of model rockets.


Well, it appears as though Bill Stine himself responded to my thread.

Here's what he had to say:


Originally Posted by OldRocketeer"II"

OK, here's an official response from Quest:

First, NO, Q2G2 igniters are NOT gone forever and you will be able to purchase them again soon (both shorts and longs). The version that comes packed with the motors will not have any difference at all from the "originals" you guys love! But due to new pending BATF regulations, the ones sold as accessories are going to have a slightly different pyrogen on them - but you likely won't notice any difference.

And yes, we have been out of stock on A's, and then B's and then C6-5's. New production was completed in September and was expected to arrive via ocean freight then. Some regulations on shipping HazMat materials have recently changed in China - and we had to test new shipping cartons. Unexpected after unexpected delays just keep happening, and therefore I won't announce a "solid" arrival date now. but it will be soon...

We appreciate your patience and loyalty.

As to quality, the Quest China motors are very bit as reliable and safe as Estes BP motors (NAR MESS reports certainly support this). They are not made in a fireworks factory and the AQL process and testing is every bit as tough as it was in our own US factory years ago. In fact they are made from military grade BP - it just has a slightly slower burn rate than the US BP does. Most folks love our slightly slower burns, especially the C's. Teachers especially like the slower burn times because the kids get a bigger thrill out of slower boost that they can see...

The merger with AeroTech has been great, but of course there have been some "bumps". Running out of motors certainly was the biggest one...

We hope to have some new product announcements soon that I think the rocketry community will get a big buzz out of.

Bill Stine
Wow, I thought, Bill Stine saw my TRF thread? He REPLIED to my thread? THE Bill Stine?? For real?? Am I reading this right???

I went to his profile page. Looks like he's been on TRF for almost six years, and though I may simply not be understanding what I'm seeing on the website... it looks like my post on TRF is the only one he's ever responded to.

And if that's actually true... it kind of blows my mind.

Anyway, whether or not Bill Stine wrote this post himself, or it's someone quoting Bill, it's good to know Quest will eventually put out new starters, because I want to build bigger clusters, and I want them to launch correctly.

And I choose to believe Bill Stine thought my post worthy of comment. Because... wow...

Sunday, November 23, 2014

Estes Is Having A Black Friday Sale - Right Now!

Go to the Estes website right now and buy yourself some rockets. They're having a Black Friday sale which has already started, and you get free shipping on any purchase over $26.


I've already bought 6 rockets - including three of their "Pro Series II" line of rockets. These are their larger, mid power rockets (actually, they will fit motors for the lower end of the high power rocket spectrum, but since I am not certified to fly those yet - and you must be, to fly high power rockets - that's not something I'll get into too much here on the blog just yet). The Pro Series II rockets are huge - compared to the rockets I've built so far. Advanced rocketeers get into building rockets taller than your house, but for a n00b like me, these are impressive things.

You have to shop through the store - not everything is on sale. I really wanted a V-2 semiscale model, for example, but it's still full price. But on the rockets I did buy, I saved about 50-75% per rocket!

Here's what I got:

Pro Series II Leviathan

This big, fat rocket is over 41 inches tall and flies on 29mm motors - that's much bigger than we've discussed on the blog so far. I don't even have all the launch equipment I'll need for this yet, but winter is coming, so I'll have time to build and prep for spring. This and the other Pro Series rockets all cost $45, but I got them for $26.99 a piece!

Pro Series II Ventris

Even taller, Ventris is over 46 inches tall and sports a payload section. Should top 2000 feet with the right motors!

Pro Series II Partizon

At 56 inches, this rocket is nearly as tall as my mom. Should fly 1800 feet. I'm not crazy about this paint job, so I'll need to come up with something else, but I'm super excited about this guy.

Skill Level 1 Reflector

I've been trying to move up in the complexity and power of my rockets, so why would I get this little Skill Level 1 rocket?

For a few really good reasons. First, it's currently marked down from $23.99 to $4.59. For that price, I nearly bought several of them. I've wanted one of these for a while, and this is a price I can't say "no" to.

Also, there's that payload section. The picture makes it look like it's made of cheap gray plastic. It's actually two balsa pieces and a tube, and you can paint it whatever colors you want, and it'll look much better than the picture. But what's awesome is that you can put stuff in there. I found a project on Instructables on putting a camera payload into a rocket that uses this very rocket right here!

Estes Reflector modified to carry the guts of a
keychain video camera - from Instructables.com


This is different from the camera payload I'll be putting into Janus II - that one will be aimed at the ground. The one for Reflector is a sideways-aiming camera - and it uses an HD keychain cam which you take apart and fit to the payload bay.


I might have to get a few more of these...

Skill Level 1 Cosmic Explorer

If you read this blog, you may know I already have one of these. Well, I just ordered two more. Why?

There's the price - marked down to $4.49 from $21.99. This also turned out to be one of my favorite rockets to launch so far, and I kind of want to build it again. But I have plans to upgrade this one.

It's made from a BT-55 tube, which is about 1.33 inches in diameter. The motor mount is for an 18mm motor - your standard A-C. But a BT-50 tube will fit inside this, meaning I can build one of these to fly on a D or E motor (this is called "kit bashing" - you take an existing kit and modify it to suit your needs).

I love the way my Cosmic Explorer flies, but I'd like it to go higher. And an E9 motor apparently burns for three times as long as a C6 motor (the most powerful one my current Cosmic Explorer will take) - and seeing the smoke and flame come out the rocket is my favorite part of a launch. I'll put that build on the blog eventually - I'll need to make some adjustments and be careful about keeping the rocket stable, so that'll be a good blog topic.

Anyway, get thee to EstesRockets.com and buy thee rockets! Even if you're new to this, look around for stuff you might like to build and fly. I'm so stoked about all the rockets I got for much less money than I'd normally have spent! Whether you're a n00b or an experienced rocket builder, there's stuff there you'll like.

Thursday, November 20, 2014

Long Blog Posts Are Long

This post I've been working on, "Launching Your First Rocket (For N00bs)" is turning out so long... I'm considering turning it into a video - it isn't that hard to explain the process to somebody, but writing out all the details is taking forever. I hate to keep my blog audience of five people waiting, so that may be my solution.

Stay tuned...

Thursday, November 13, 2014

Building the Janus II - Part 1 - Parts!

Man, I am beat! Long day at work... It was my plan today to start a post for rocket n00bs on launching your first rocket, with some basic information on rocket motors - or engines, if you like to call them that (both seem acceptable, but a lot of people will tell you that "motors" is technically more correct).

But since I'm writing this blog partly for people just getting into rocketry, I want to make sure that the information I'm giving you is correct, and so I need to do a little fact-checking, and also take a few pictures, and after the work day I had today, that's not gonna happen tonight.

But I did want to show you what I'm up to. I'm building the second edition of my Janus series of scratch-built rockets - the Janus II.

Janus II - a larger, 3-finned version of the Janus I. With one D and one E motor, this should go more than twice as high.
If you've been reading this blog, you know that the Janus I prototype had to be retired after one flight, due to some damage - partly inflicted on the flying field (centering rings), and partly inflicted at home (two broken booster fins). It's now sitting on a shelf with my other rockets, and I'm keeping it on the shelf as a display model.

Janus I before glorious flight and tragic fin damage

I was never really keen on the paint scheme, anyway - I was in a rush to finish it by our scheduled launch date, and it flew really well - I was pretty proud to have designed and built this rocket, and even though I went for a bit more complicated with my first one - two stages, and I'd never even built a two-stage kit before - it worked exactly as I'd hoped.

But I've decided to raise my ambitions a little further. You may have read my mentions of a recent rocketry book, Make: Rockets: Down-to-Earth Rocket Science by Mike Westerfield. This book is great, but I think, for me, the biggest thing it did was to make me feel like I could actually build my own rockets, without necessarily needing a kit. I think if I hadn't read this book, I'd still be a long way from designing my own.

In the book, Westerfield shows how to build a camera payload to go on one of his series of boosters with the name Ceres. Here's an OpenRocket image of the Ceres B booster with what he calls the ICU2 camera payload bay:

I decided to build this payload bay and add it to the Janus II. It's a payload bay that will fit onto any BT-60 rocket. The BT-60 is a standard size paper tube (the name "BT-60" is actually an Estes thing, but a lot of rocketry suppliers now use the BT-whatever to describe their body tube sizes, because they're understood by everyone) about 1.64 inches in diameter. The Big Bertha has this size tube, so this payload could go on top of that rocket - thought it might be a bit heavy for the Bertha.


Anyway, it's a nice, fat tube for bigger low power rockets - though not the biggest, certainly.


I was building the Ceres B booster, but I had a mishap when I tried to install my own homemade ejection baffle - this is a device that blocks burning propellant from the rocket motor ejection charge, so that you don't need to use recovery wadding (if you're a rocket n00b and don't know what I'm talking about, we'll cover it in the "Launching Your First Rocket" post I promise is coming soon - or you can read this post of mine for now). Also, according to the OpenRocket simulation, this rocket may be a bit overstable. Meaning it can turn easily into the wind, which can be a problem! (I'll have some video up on my Youtube channel soon of this very thing happening to my Big Bertha on a breezy launch day.)

I could have fixed this problem by either shortening the length of the airframe, or making the fins smaller, or maybe even adding cool-looking smaller fins up closer to the front (front fins are not a good idea, unless you've got good sized rear fins first - we'll talk about all this stability stuff in an upcoming post). But I had another idea...

Since the Janus rockets are built from BT-60 tubes, I decided, "Hey! Wouldn't a cool idea be to put a payload on top of the next Janus rocket?" I like the idea of taking what I've done and taking it further, so this is what I've decided to attempt next.

Janus II - three fins per stage instead of four, larger motors, an airframe two inches longer than Janus I,
and with Mike Westerfield's ICU2 camera payload bay. Check out his book -
it really is what gave me the confidence to start designing my own rockets.

The camera will be pointed downward, and hopefully will see through the fins - perhaps even see the first stage fall away.

Anyway, I recently got a huge box of stuff from JonRocket.com - I love this website! You can find most components you need for low power rockets, and it's all really reasonable - and the more you buy, the cheaper shipping is (flat rate for anything up to $40; free shipping for over $40). I assembled all the parts I'll need for Janus II with Camera Payload Bay. Here they are:

Design sheets - these give a picture of the rocket design, plus a list
of all components you will use and their sizes, as well as templates for
cutting things like fins and centering rings - even a nose cone template, if
you want to make your own - and have the know-how. Both OpenRocket
and RockSim - sold by Apogee Components - let you print these.
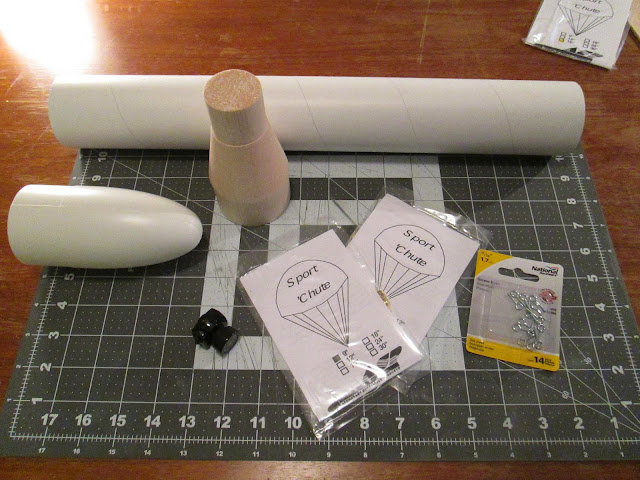
All the parts I will need to make the Janus II and the payload bay - plus some options
Here's a breakdown of the parts.

Payload Bay

BT-80 (2.6 inch diameter tube - we'll use a 3-inch length of this); balsa transition (used to connect a BT-60 and BT-80 tube - they come in many different sizes, but that's what we'll use in this case); 2.6-inch diameter rounded nose cone (from Estes); parachutes (this rocket will have two - one for the rocket body, and one for the payload, which will descend on its own chute - but I haven't decided what size I need just yet. I have several.); tiny video camera; screw eyes (for attaching the balsa transition to the parachute - not sure these are the right size. I'll have to do some reading)


This transition will be at the bottom or aft of the payload section, and is what will hold the
camera. It will be split in half, and a small area for the camera will be hollowed out with a
Dremel tool near the outside wall, with a hole for the lens to see through. This will be
pointed downward, toward the ground, and if I can get it to the right
angle, hopefully you'll see the fins in the video.
So tiny video camera!
The Rocket Itself

BT-60 for both the booster and sustainer (main rocket) body; BT-50 (perfect for a 24mm "D" or "E" motor tube. This will be cut to length - you can buy them ready cut, but this is cheaper, and you can make a whole rocket from one tube); 4 centering rings (two for each section of the rocket - you can cut your own, but I bought these at JonRocket.com - I'm not good at cutting my own - circles are tough!); thrust ring (also used as a centering ring for a BT-50 rocket with a BT-20 motor mount - that's for a standard A-C sized motor you see in most low power rockets); tube coupler (for joining the stages together); Kevlar shock cord (I might need to attach some elastic to one end to prevent the body tube ripping from the ejection - more on this when I post about building this rocket); 3/16 inch launch lugs (this rocket needs a bigger launch rod than your standard Skill Level 1 kit like the Big Bertha); parachute; 3/32 inch basswood (for fins - the Janus I had 1/8 inch fins. I wanted to make these a little thinner to reduce weight and to take less time sanding - because I will airfoil these, and I'll show you how); 1/8 inch basswood (we need to make a half-inch "standoff" for the launch lugs - because the payload bay is fatter than the body of the rocket)

So, that's it for now. I started building this rocket last night, and I have to say, construction goes pretty quickly on these once you have some rocket building experience. The part that takes the longest is the design phase - because you do need to put some thought in to it.

Now, for you rocket n00bs out there reading this - the idea of designing and building your own might seem daunting, I know. Two months ago, I never would have thought I could do this. But I intend to help walk you through the process of designing and building your first scratch build - something simple, that, as long as you feel comfortable putting together a few kits, you can do.

For now, though, I just wanted to show you one of my latest projects. I can't wait to show you the video.

Sunday, November 9, 2014

So Much Rocket Stuff Coming Up...

Rocketry is so fascinating, and I've got so many ideas for this blog, I kind of don't know where to start. I'm working on three new rockets right now - two kits and one scratch-built - and I barely got any of that done today.

Yesterday, I spread all my rocket stuff on the dining room table to take a picture for this blog - and it was a mess! I have a ton of stuff, and just ordered more stuff from JonRocket.com, and a new midpower rocket - the Quest Aerospace Big Dog - from Amazon.


This rocket is over 32 inches tall, and apart from the cheesy name, I really like the looks of it. It will by my third Quest kit - the first being the Magnum Sport Loader, and the second, which I'm just about to start building, being the Quad Runner - a four-motor cluster that I'm really excited about!

The Magnum Sport Loader was my first cluster - that's a rocket which uses more than one motor side by side, and they are so cool! Here's the video:


Check out the flame on that thing!! That's only two motors. The Quad Runner has four, which, I predict, will be freaking awesome.

I'm also building a sequel to the Janus I - the Janus II, another two-stage rocket. This one will have larger motors - one D and one E - and will go much higher. I'm also designing it to carry a camera payload:


This teeny-tiny cheap video camera will look down the body of the rocket at the ground as
the rocket launches into the sky - and will hopefully see the first stage fall away!
The Janus I prototype had to be retired, guys... While attempting to put the two stages back together for display, I snapped off one, then two fins from the booster.


GAAAAAAAAARRRHHHHH!!!!


Also, the body tube of the sustainer - the main part (second stage) of the rocket - did get some damage in flight. And while repairing the broken fins, I saw that the centering rings in the sustainer had been pushed in - probably while I was trying to get the two stages together for the first flight, since I got things glued in slightly the wrong spot, and there was a tiny gap between the two stages. I pushed hard to get them together!

I got the fins glued on, and the rocket back together. I could try to fly it again, but this was a test model for me. It's going to sit in a place of honor as my first successful design. And I'll have a future post where I'll show you how I built it - and will show the changes I'm making to Janus II.

Sad little fin - still, check out the airfoil on that baby!
Here's an OpenRocket screenshot of the Janus II with the camera payload bay (you'll have to imagine where the camera is in this picture):


Finally, I'm also currently building the Nautilus II by 3D Rocketry. This was the first non-Estes kit I bought, but I'd held off building it until now. But it's cool looking!


Also, if I can stop spending all my rocket funds on kits and parts each week, I'm planning on joining the National Association of Rocketry soon - and perhaps find a club (or... start one?). I think it's an important next step for me.

So, upcoming on the blog:
  • Rocket motor basics (there are lots of resources on this subject, but I think I should address it before moving on)
  • Rocket stability basics (ditto)
  • Rocket safety and the NAR code (you can find this everywhere, but I am starting to feel like I have a responsibility to at least write something about it)
  • Launching Your First Rocket (For N00bs) - a follow up to the Skill Level 1 Building the Big Bertha series of posts
  • A post on designing a really simple rocket and building it from scratch - so any rocket n00bs out there reading this will see that it can be done!
  • Pictures of my current and future builds
  • A new regular segment - N00b Mistakes - where I show you some things I've screwed up on some of my builds, and what I've done to correct them
  • What's in my toolbox?
  • A few cool tools you can make for yourself
  • Building technique videos
  • More launch videos (which means I gotta go launch some more rockets soon!)
Wow. That seems like a lot, now that I've written it down... But I enjoy doing this.

Some of this stuff might just be turned into pages in the sidebar so new readers can find it easily, and more experienced rocketeers who stumble upon this blog won't need to bother with it if they don't want to.

I have gotten some nice feedback on this blog lately, which is really nice. When I started writing it, I had no idea what it was going to be about, other than my own rocket building experience. The other day, I actually got a subscriber!

Oh, I nearly forgot! If you'd like to keep up with posts on this blog, please go to the Rocket N00b Facebook page - facebook.com/rocketn00b.

I hope you'll continue to enjoy reading this as I've enjoyed writing it. 

Friday, November 7, 2014

A Word of Thanks

This last weekend, I did a fundraiser for the Bloomington Playwrights Project, the only professional theater in the state of Indiana devoted solely to new plays. This is where I met my rocket launch buddy Chad, who is the Artistic Director there (and now also at a summer theater festival in the Adirondacks, where I'm sure he's seeking out some boss launch sites for our visit next summer).

As it has become my new obsession, I used rockets as my incentive to get people to donate - and it was really successful! We did a 24-hour play writing competition, The Playoffs. We got drafted onto teams, then were assigned a theme, a prop and a line of dialogue, all of which had to be incorporated into every play. The playwrights went home and wrote all night, then we rehearsed all day, and at the end of a long, exhausting day, we performed the plays as one show.

Audience members voted on their favorite plays, and if we raised money, we'd get extra votes. I raised nearly $500 - not huge, but perhaps more than any of the other actors, and certainly more than I usually raise (I average about 40 bucks, maybe).

To my donors, I promised that I would design and build rockets for them. Anybody who donated would get a mention on this blog, and an invitation to a Donors Only Rocket Launch, which we'll probably hold in the spring. Anybody who donated $50 or more would get the Donors Rocket, a line of small sport models which I will design and build myself, and anybody who donated $100 or more would get either a Freaking Huge single-stage rocket, or a Big two-stage rocket. We're gonna launch these, and any that don't get lost in trees or crash will go home with the donors.

This actually worked! I'm now going to get to design and build rockets for several  people! My girlfriend even chipped in $100 with the request that I build her two rockets, named for her nephews Titus and Pius (both awesome names for rockets), and that I not build rockets on the kitchen table for one week.

That week is now over... And I'm jonesing to get started on a couple new projects, which I'll talk about in my next post.

Therefore, let me please thank the following people:

Keith Solberg
John Whikehart (Deputy Mayor of Bloomington, Indiana)
David Chadwick
Christiane Kaden
Jackie Lee King
Lisa Barton
Dan Allen
Hank Greene (the playwright and sketch comedy writer, not the Nerdfighter, although he is awesome too)
Anonymous (That's you, Biff & Josie)

We came within two votes of tying for winner of the night, and we did get the Audience Choice award, just losing out to Chad's team. Chad always wins - the dude may not be the greatest at not losing rockets, but he can really raise money for new theater. Still, putting the fear in him for winning by a margin of a mere two votes is good enough for now.

Thanks again!

See you at the launch pad, guys!
One last relevant word about rockets and theater - if you're near the central Indiana area, check out the upcoming BPP production this coming April, Ugly Lies the Bone by Lindsey Ferrentino. It's a drama about a soldier coming back from Afghanistan at the end of the Space Shuttle era, and will be directed by David Anspaugh, the filmmaker who directed Hoosiers and Rudy. Chad and I might actually take on the project of building a Dr. Zooch space shuttle and hold a cast launch for this one. (Any excuse to launch rockets...)

That's right, guys. Chad has really made this theater great.

Wednesday, November 5, 2014

Building the Big Bertha - Part 8 (For N00bs)

[Click here for Part 1]

Now that your Skill Level 1 rocket is painted (and completely dry), it's time to finish building it - then you get to fly the thing!

If you've been following my posts here, you may get the impression that these things take forever to build. Actually, you can complete a Skill Level 1 rocket in a day or two - sometimes in as little as just a few hours (most of that is waiting for glue to dry). But I wanted to give you the details on how I build a rocket. I approach even easy rockets with care, so mine sometimes do take weeks, but that's only because I'm fussy and want a really nice end product. If you skip all the extras and just follow the instructions in the kit, you'll be done rather quickly, something you should probably do for your first rocket, so you don't get frustrated and quit before you see how awesome this hobby is.

OK, let's finish this baby up by adding the recovery system - this is how we get the rocket back safe and sound to fly again. All we have to do is attach the shock cord and parachute, and we're done!

First, we're going to attach the shock cord - that's often a long, flat, rubber band-looking thing (or sometimes a thick, yellow Kevlar thread). We'll assume you're probably doing an Estes kit, like the Big Bertha, because that's what most people do. So, the rubber bandy thing.

Your instruction sheet will have an elongated trapezoidal shape divided into three numbered sections. That is the shock cord mount - you'll have to cut that out with scissors. Fold the two sides inward along the fold lines, so they'll crease easily when you glue the shock cord in.


Put a dot of wood glue in the middle area, and place one end of the shock cord in it, with the other end running out through the fat end. Fold the skinny end of the shock cord mount over the center part and press it so the glue spreads throughout it. Hold that in place a moment until the glue starts to set.


Next, place some glue onto the fat end of the shock cord mount where the cord itself is trailing out, and fold the middle/skinny ends over that. Press until excess glue squishes out the sides, and hold that until the glue starts to set.

Now you'll have a long shock cord secured into a tiny trapezoid of paper. Allow this to dry a little bit (I've moved too quickly here and the whole thing came apart because the glue hadn't properly set), but you don't need it to dry completely to move on.

You now have what's sometimes called a "tea bag mount," because if you hold the shock cord with the mount hanging down, it kind of looks like a tea bag.

This finished mount is smaller - because it's from the Estes Star Trooper - a tiny rocket. Again, I got
engrossed in finishing the Big Bertha and neglected to photograph the finished shock cord mount.
But it looks the same, aside from the size.

The final step here is to place some glue into the body tube. Get a good dab of glue on the pad of your finger and spread it in one squarish spot on the inside of the body tube, about 1 1/2 to 2 inches from the top - no less. You need to make sure the shock cord mount is far enough into the rocket body to keep it from touching the nose cone when you insert it, or the cord might get in the way, and you won't get the nose cone on, because the fat shock cord won't leave enough space!

Wipe the excess glue off your fingers and place the shock cord mount down onto the glue, with the side the shock cord comes out facing the opening at the top of the rocket. Press this down and rub it around a little to make sure the glue spreads evenly and thinly under the paper shock cord mount. Hold it there a few moments until the glue begins to set, then let go.


Set the rocket on its side and allow the glue to dry for at least probably 20-30 minutes. Then, for good measure, use your finger to apply a thin layer of wood glue over the top of the shock cord mount to make sure you've got it good and sealed to the inside of the rocket.

Boom. Shock cord is now done. With the other end, you'll tie it to the loop of plastic in the base of the nose cone. Tie it well - a buntline hitch works, or just a simple double knot - and then you might put a dab of glue onto the knot to keep it in place.

Tying a buntline hitch

Let the shock cord mount and the nose cone glue (if you used it) dry completely, with the rocket lying on its side, and the nose cone lying separately - don't put the nose cone into the rocket at this point, or you might glue it on permanently, and you don't want that!


Once the glue is dry, it's time to attach the parachute. Probably the majority of basic kits use a parachute for recovery. Smaller rockets might use a simple streamer - a ribbon of plastic or paper which slows the rocket's descent enough that it won't be damaged. The streamer is pretty simple; you just tape one end of it to the shock cord. Other rockets might use some other form of recovery - tumble recovery, say, where the rocket comes apart and is so light it just falls to the ground in two pieces, and doesn't tend to get damaged.

But let's assume you have a parachute for now, like the Big Bertha has.

Skill Level 1 kits come with the parachute already assembled - you get a hexagonal chute with three shroud lines, each line attached to two corners of the chute.

The easy way to attach it to the nose cone is to hold the three lines together, form a little loop at the end, and thread this through the same loop of plastic in the nose cone to which you attached the shock cord. Pull the loop through, open it up with the shroud lines halfway through. Then you're going to pull the chute tight and pass it through the big loop and pull that tight - the chute will be attached to the nose cone.

This parachute is tied directly to the nose cone - you can see how the shroud lines get tangled after a few flights.

However, you might want to be able to remove the parachute between flights, and if you tie the chute right to the nose, you won't really be able to do that. It will quickly become tangled, and you won't get it untied. Parachute lines become tangled in ways that almost seem impossible to me. The lines are attached to the chute at one end and the nose cone at another, and yet, sometimes, I look at a parachute after a flight and ask How did those lines get tangled?? They crossed over each other! What is this sorcery??


Also, it's good for the chute to be stored separately from a rocket, hanging upside down, like from a pin in a cork board. The chute will be less likely to become permanently folded, so you're less likely to have it fail to open. A good way to attach a parachute is with a snap swivel. You get these where you find fishing equipment.

I love this aspect of rocketry - you find useful tools and materials where you wouldn't expect them to be, and you hack or adapt them to your purposes.

Just attach the chute to the closed loop of the snap swivel like you would to the nose cone, and when you want to attach everything to the nose cone, you just open the snap swivel and attach that to the nose cone.


All you do now is fold up your parachute, stuff it and the shock cord into the body of the rocket, and put the nose cone on top.

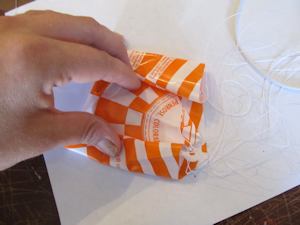
There are a number of ways to fold the parachute - some better than others. The instructions for the Estes kits aren't great - when I fold a chute like that for flying, they fail to open about half the time.

Estes has you fold the top of the chute over and roll the sides in - not
ideal for launching, as they don't open half the time (in my experience).

We'll discuss parachute folding - with pictures - when we talk about launching. For now, you can roll the chute up like it says in the kit instructions.

Put the nose cone on, and look at your handiwork:

The completed Estes Big Bertha rocket - tall and beautiful!

YOU HAVE FINISHED YOUR ROCKET!

I hope any rocket n00bs out there have gotten some useful information from this Skill Level 1 tutorial series. This is just the beginning. There are a lot of cool tools and techniques, more advanced kits, higher skill levels, more powerful rocketry options and cool add-ons for rockets (payloads, multistage boosters, etc.). We'll get to all these on this blog, I hope. For now, build yourself a kit, fly it, and see if you like it. If you do, build a few more kits. When you get confident with your skills as a basic rocket builder, you're ready for something more challenging.

I've been doing this for only a little over three months now, and I've learned so much. There's a lot of fun stuff to do in rocketry, and things that seem way too complicated when you first start out are actually achievable. If you develop a passion for this, like I have, you can advance your skills and do things that will surprise you.

Take it slow. It's not a race. Have fun.

But here's a preview of something you might not yet think you can do - I certainly didn't when I started. This is a rocket I designed and built myself - and it's a two-stage rocket on top of that! I'll make a post soon about designing and building your own - something very satisfying, and not as complicated as you might think - it just takes a little time, the right tools, and some thought.

For now, though, here's a video of the first launch of my first "scratch-built" rocket, Janus I - named for the two-faced Roman god of beginnings and change. I hope you enjoy.


Saturday, November 1, 2014

The Rocket N00b on Yout00b

Just a quick update to announce my new Youtube channel.

So far, I have posted one video of last night's Spooknik Halloween Rocket Launch - of my first "scratch build" (designed and built by myself): a two-stage rocket called Janus I. Full post about this rocket, and designing your own, coming soon. It's easier than you think!

Janus I - complete