This is the one year anniversary of The Rocket N00b blog! I started this thing as a total n00b, just weeks after launching my first kit, the Estes Der Red Max.
At first, this blog was just a way for me to put up some pictures of what I was doing, and maybe coax the few friends I thought might read this into joining me in the awesome hobby I'd just discovered.
In the intervening time, I have:
Found out just how alive and well the hobby of rocketry really is
Learned a ton about how rockets work - especially what keeps them stable
Learned to design my own rockets - something I didn't know was possible when I started
Built a number of great kits
Designed and built several of my own rockets, most of which worked pretty well
Started building mid power rockets - and launched a couple
Convinced a few skeptics that it was fun to go watch a rocket launch
Had one of my rocket videos featured on Make magazine's Facebook page
Taught rocketry to kids
Recorded my first appearance on The Rocketry Show
Joined the National Association of Rocketry
Had over 100,000 pageviews!
I didn't expect any of this. It's been really fun.
The
fins are made of 1/8 inch plywood, and they're nice and large. Which
leads me to my first decision - do I want to shape the fins?
On
most of my rockets, I shape the fins. I like to sand them into an
airfoil shape, or at least, to round the leading and trailing edges. But sanding balsa is a lot easier than plywood. So, my first decision is, do
I want to bother?
The trailing edge of the fins are
not straight - they curve downward at the root. This might make shaping
them more of a challenge - it's much easier to taper fins evenly if they are
straight. But it's not impossible. I airfoiled the fins of all three
Cosmic Explorers I built.
This makes for a very pleasing shape, and may improve the rocket's performance. And, for me, it just makes the rocket look more finished, more crafted.
But it's not necessary. And that curved bit at the root got rather
thin, almost to the point of being sanded off. So, it takes some care to
do it right.
I did round the edges of the Partizon,
but working with sandpaper on such a large, plywood fin, I wasn't too
pleased with the result. But this is probably something at which I could get better with a little practice.
Some people like to use a disc sander or even a router or
power saw to actually sand or cut a beveled edge into their mid- and high power
rocket fins.
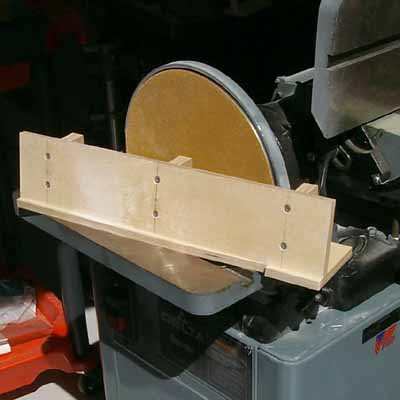
Here is a fin bevel sanding jig from rocketeer John Coker's website. He has a lot of great tutorials for the advanced rocketeer, and even as a beginner, I found a tip or two I could use.
But I don't have access to such power tools. So, for now,
it's sandpaper or nothing.
Now, on such a large fin, being only 1/8 inch thick, this might not be such a big deal. On a small rocket, a 1/8 inch fin looks really thick, but on a larger rocket, it looks like a flat plate, and that might be a look I'll be OK with.
Besides, I have three of these things. I can always try again.
Like all rocket kits, the Ventris comes with launch lugs. Because of the larger payload section, the lugs must each be on a standoff
- a piece about 1/2 inch tall which moves the lug away from the body of
the rocket enough that the rocket can go straight onto the launch rod
without bending it. You'll find a standoff on any rocket that has a nose cone fatter than its airframe.
Launch lug standoff for the Estes Mini Honest John
In the Ventris kit, the standoffs are
made of two 1/8 inch thick pieces of balsa, which you glue flat together, to
make a 1/4 inch thick standoff. The rocket requires a 1/4 inch launch
rod for stability.
The Ventris standoffs. You cut out these four pieces, and glue two each side by side, to form two launch lug standoffs about 1/4 inch thick.
With a larger rocket like this, I think
I'd prefer to use a launch rail, rather than a rod, and so instead of
the launch lugs supplied with the kit, I would use launch rail buttons. A
rail is much sturdier and less prone to "wire whip" than a rod,
especially when you need something longer. The longer a launch rod gets,
the more likely it is to whip violently back and forth during a launch -
or from the wind. It's a sturdier platform.
A couple of larger rail launch pads, from Vernk.com
And there has been
speculation (though I don't know if there has been any scientific wind
tunnel testing) that rail buttons create less aerodynamic drag on a
rocket than launch lugs. In any case, a small button looks better than a
large launch lug.
But I have a few things to consider before attaching launch rail buttons to this rocket.
The
first is what to use as a standoff. Two tiny strips of balsa glued
together are probably not ideal, when you consider that you must screw
the buttons to the rocket. Driving a screw into the kit standoff would
probably split it in two, and the standoff may not even be thick enough
in the first place.
The second consideration is: if I decide to go with rail buttons, what size buttons should I use?
Probably
the most common size rail button - often used in high power rocketry -
is known as the 1010 rail button. It is sturdy enough for larger,
heavier rockets, and fits into the slot of a 1 inch wide t-slot rail.
There is a 1515 sized rail button, but that's for pretty monster sized
rockets.
Still, smaller might be better. On the advice
of Randy from rail-buttons.com, I opted to put the "mini" rail buttons
on my Partizon. These are smaller buttons, which fit a metric t-slot
rail. They're plenty sturdy for mid power rockets, and take up less
space on the airframe.
The mini button, lower left, and the 1010 button, upper right
I do have a metric rail, but I
don't have a 1010 rail, though I do have buttons of both sizes. Still, it's a
question of when and where I'll be launching this rocket. I doubt I'll
have much chance to launch this rocket on my own (in fact, I'm not yet
sure where I'd launch any of even my small model rockets on my
own - Boston doesn't seem like an ideal place for this, and I don't know
the surrounding area at all yet). My best bet to launch these rockets
is to go to a club launch, and in my case, the club will be CMASS - the
Central Massachusetts Spacemodeling Society - one of the country's great
NAR sections. But I haven't joined the club yet. My work schedule has
not yet permitted me to get out to a launch, the closest of which take
place about 45 minutes from Boston.
But when
I do manage to get to a CMASS launch, I need to find out what kind of
launch equipment they have. I'm not 100% sure of this, but I believe the
metric rail is not (currently) in widespread use. I need to contact
them and ask about their launch equipment, and whether I'd be allowed to
bring my own launch pads if necessary (many clubs are OK with this, but
I don't want to show up at my first launch and just assume it's OK).
So, I can begin building the rocket, but before I finish, I'd need to find out which would be a better choice
for me with this rocket - the 1010 button, the mini button, or the
launch lugs.
A final decision I need to make with this
rocket is to what use I want to put the payload section, as it may
affect how I build the rocket.
The payload section is
large, but a lot of that space is taken up by the shoulders of the nose
cone and the plastic transition piece.
The Ventris payload tube, with the shoulder and nose cone showing how much space is actually open inside
If
I want to put a serious payload in here, like an altimeter or a camera,
I may need to open up some of that space. It could be as simple as
cutting off the very bottom of the nose cone, which opens up the whole
interior of the nose cone itself for payload space. But I haven't built
anything like this before, so I need to figure out how all that is going
to look.
Since this is my first build of this rocket,
it's probably best to simply build the rocket without making any major
modifications, the goal simply being to build the rocket well and fly
it.
Yesterday, this blog hit the 10,000 pageview mark, in just under a year of publication. I don't really know if that's a lot for a blog in general, but it sure seems like a lot to me. I hope you guys are enjoying this, and if there are any fellow rocket n00bs out there reading this, I hope you've picked up a few tips and maybe learned a few things.
. . .
A while back, I dropped a hint of something to come that I was pretty excited about.
I am a podcast junky. I listen constantly, and have a lot of favorites. High production ones, like Radiolab, interview shows, like The Nerdist, and comedy stuff, like The Dead Author's Podcast. Since I mostly walk to work, and work early in the morning, it's how I get from home to the workplace while keeping myself entertained.
About a year ago, I looked on iTunes to see if there were any rocketry-related podcasts. At the time, there were none that related to the kind of rocketry I do - amateur, hobby, DIY rocketry. I did find the Space Rocket History podcast, which I've listened to from the beginning, and which is fascinating - it's a history of space exploration, done by a guy in North Carolina. As of this writing, he's working his way through the Apollo program.
I've always wanted to start a podcast, to put something out there. In Bloomington, Indiana, there is a large comedy scene, and I knew a lot of people with their own podcasts*. But what would it be about? I couldn't think of any subject I'd talk about, so I let it go.
Once I got started in rocketry, I briefly considered starting a rocketry podcast. But I'm just one person. Nobody else I knew was that into it. Chad and I would go out launching from time to time, but I had nobody to talk shop with, and the idea of one person talking, alone, without anybody to bounce ideas off of sounded like a boring podcast indeed. So I started this blog.
Months later, I discovered The Rocketry Show, with two guys calling themselves CG and Gheem.
It was only about three episodes in when I found it, and I subscribed and started listening to it whenever a new episode came out.
A while back, I got a message on my Facebook page from CG - asking if I'd be interested in being on the podcast. I gotta admit, I had actually thought about this before! For me, it was like the rocketry version of imagining yourself as an actor or comedian on Letterman or Conan. I thought, "Man, it would be great to get really good at this, and write a cool blog, and maybe I'd get to talk to the Rocketry Show guys some time!"
I jumped at the chance.
Then, after it was over, I thought, I don't know if anything I said was usable! I've done radio before, but rambled a lot, couldn't hear myself over my own headphones... And besides, a lot of people listening to the Rocketry Show are advanced rocketeers! I write a blog that's essentially for n00bs... Will they get anything out of hearing me on the show? I wondered.
And then I didn't think about it for a while - just concentrated on moving to Boston and then back to writing the blog.
Today, I was listening to the latest episode - Part 2 of the LDRS34 coverage. (For n00bs, LDRS is one of the largest rocketry events of the year, focusing largely - but not exclusively - on high power launches. It stands for Large and Dangerous Rocket Ships. It happened in Potter, NY, just a few days before I was set to pass that way, and man, I wish I could have been there!)
Guys, I think I'm gonna be on The Rocketry Show next week! CG and Gheem did a little teaser about it, and they said some really nice things about my blog on the show.
Anyway, I hope I can bring some stuff for n00bs to the show without boring the more experienced guys. I'll let you know when the show is up. And thanks for reading - I hope you've found it valuable. Writing this blog has helped me a lot.
*BTW: If you want to check out a few of my friends' comedy podcasts, subscribe to Strangers On This Road, by Mat Alano Martin (a hardworking comic who, if you don't know him yet, you will) and History Bluffs, with David Britton and Bob Nugent, plus a ton of comedian guests.
One of my launch pictures is currently being used as the cover photo on the NAR Facebook page!
The Estes Shuttle Express lifting off!
I got this E2X kit as a birthday present last January, and uploaded the launch photo about a week or two ago to the NAR page. I guess they liked it, because this week it's at the top of the page!
Last week, I got a delivery from Estes. They've had sales going on practically all summer, so it's been a good way to pick up some deals.
I had hoped to buy another Leviathan, one of Estes' Pro Series II mid power rockets.
I love the way this rocket looks, and I wanted to have a backup in case I either screw up the build or lose the rocket. Unfortunately, the Leviathan looks like it is now out of production. Sad, really, I think it's a pretty popular rocket, and a solid flyer.
Also, looks like one of my favorite Skill Level 1 kits - the Cosmic Explorer - may also now be out of production.
So I picked up another Ventris - also a PSII kit - and a new rocket called the Sahara.
Estes Ventris - PSII rocket
with payload section
Estes Sahara
The Sahara - like the Scion - is another SPEV - Spare Parts Elimination Vehicle. Scion used Leviathan parts, while the Sahara uses body parts of the Argent, with the fins of the Partizon.
Estes Argent, left, and Partizon, right. Images from Jonrocket.com.
Does this mean Estes is eliminating these other PSII rockets? I'm going to guess they are phasing these out, though I hope I'm wrong about that.
Well, I received my order and did a count - I have 11 unbuilt Pro Series II rockets, plus one mostly-built Partizon, which I wasn't entirely happy with (I managed to get a fin on crooked and some saggy fin fillets).
The built but unpainted Estes Partizon - 56 inches tall!
I think I've held off on building these rockets for a couple of reasons. First, I had to stop building for a while in anticipation of my move to Boston.
But mainly, I think, I've been afraid to screw these rockets up. I like these larger rockets, and I didn't want to do a bad job of them.
Which is ridiculous! Mistakes happen, but at this point, I shouldn't be intimidated by building a rocket. Building smaller rockets is harder in many ways, anyway. A small flaw looks much bigger on a tiny rocket than on a large one, because it takes up comparatively more space.
Plus, I have doubles. So, it's time to start building. I'm going to go slowly, because I have a few decisions to make. But I've started the first steps on building the first two of my PSII rockets - the Ventris and the Nike Smoke.
When I was a kid, I found this strange book in a library - I forget the title. It was written in the 1960's, and was a kind of activity book with various crafts you could do to pretend you were living in the stone age. One of these crafts was to make a spear from a broom handle. You used colored tape to decorate it, and there you go, kid. You're a caveman!
Problem is, I could never through the darned thing straight. I thought paleolithic man must have had some secret spear-throwing technique this book didn't cover. It wasn't until I started building rockets that I thought back to that book and realized what the problem was.
. . .
There are three types of stability you may encounter in rocketry: positive stability, neutral stability, and negative stability.
Positive Stability
In the first post, I mentioned the concepts of center of gravity (CG) and center of pressure (CP). These are both central points, of sorts, on a rocket. The CG is the balance point of the rocket (or of any object). It is an imaginary point at the center of all mass on the rocket. The rocket (or any object flying or falling through space) will rotate around this point, always, 100% of the time. The CP is the center of all aerodynamic pressure on a rocket, and is where it is due to the surface area of the rocket.
Although gravity acts on all points of a rocket equally (the motor hook is pulled toward the Earth with as much force as the nose cone), we say that gravity acts through the center of gravity. If you balance an object on your finger, at its center of gravity, it won't fall. Although gravity is pulling on the ends of the object just as much as it's pulling on the center of gravity or mass, you can hold it up just by balancing it at that point.
Similarly, although the air acts on all points of a rocket, we say that it acts through the center of pressure.
I also briefly mentioned the proper relationship between the CG and CP - that the center of gravity must be ahead of the center of pressure. If the rocket is built this way, it will fly straight up, in the direction intended. It may oscillate - wobble back and forth - a bit as it does so, the fins correcting its trajectory as it flies upward. As the fins dampen the oscillation and the rocket accelerates, it will oscillate less and less. A rocket built this way is what is known as positively stable, or, simply, stable.
In this slo-mo supercut, you can best see the slight oscillation in the Der Red Max launches. It's not very prominent, but you can see it in the smoke trail.
Negative Stability
If a rocket is built with its center of pressure ahead of its center of gravity, it will not fly straight.It will fly erratically, flipping and flopping around the sky, and probably crashing to the ground in the process. This can be dangerous, with a larger, heavier rocket. In this case, the rocket is called negatively stable, or just unstable.
In this great video from KQED Public Television, at about 3:40, you can see what some unstable rocket flights really look like.
Neutral Stability
A neutrally stable rocket is one in which the CG and CP are at roughly the same point. A neutrally stable rocket can have a very strange flight. It won't necessarily flop around in flight, but neither will it necessarily fly straight. In fact, it will go in any direction it is pointing. That might sound like it will fly straight up as desired, but in fact, any small gust of wind, or anything which disturbs its straight flight, will change its direction. A neutrally stable rocket cannot correct its trajectory, as a stable rocket will.
An illustration of the three types of stability: positive, neutral, and negative. From Centuri Technical Information Report 30: Stability of a Model Rocket In Flight, by Jim Barrowman, 1970. We'll discuss
Barrowman and his contribution to the understanding of rocket stability in the next post in this series.
The oscillation depicted in the stable rocket illustration is exaggerated.
But neutral stability is interesting, because with it, we can do a little experiment to show us how we make a rocket stable. The key ingredient: fins. The fins on a rocket have two purposes.
An Experiment in Stability
Take a foot long dowel rod and balance it on your finger.The point where it balances is its center of gravity - it's the center of all its mass. The mass on one side of your finger is equal to the mass on the other side of your finger.
If you flip the dowel rod in the air, it will rotate around that balance point exactly. If you try to force it to rotate around some point closer to one end, it simply won't work.
Now try throwing the dowel like a spear straight across the room, and see if you can get the front end to stay at the front. Perhaps you can do it, but most times, it will simply point wherever. It probably won't spin fast, but it will end up turning sideways, maybe backwards. The dowel rod is neutrally stable. Can you throw it straight? Maybe, but not reliably. Because the point at which the surface area is equal is also the point at which the mass is equal on all sides, the center of gravity and center of pressure are in the same spot.
This is why I could never throw my broomstick spear straight! The center of pressure and center of gravity were essentially the same, so the spear (like a rocket) was neutrally stable!
Now take three bits of masking tape, a couple of inches long. Tape one to an end of the dowel rod, making a T shape. Then fasten the other bits of tape on the same way, so that the three pieces of tape come in contact with both the dowel rod and the sticky parts of each other. You've now made fins. They're a bit janky, but they'll do the trick.
If you re-balance the dowel rod, you may notice that the center of gravity has moved rearward just a little bit, due to the mass of the tape being added to one end. But you've also moved the center of pressure rearward, and by much more than the center of gravity. That is the first purpose of the fins - to move the center of pressure rearward.
If you now throw the dowel across the room, it will go straight, with the pointy end forward and the fins aft. The dowel is now stable!
If I'd added a bit of weight - like a clay spearhead - to the tip of my pretend spear,
moving the center of gravity forward, or if I'd added some kind of
fletching to the rear, moving the center of pressure aftward, or a little of both, I could have thrown the broomstick spear with no trouble.
Now, this is not because the fins are merely guiding the rocket. If that were the case, the fins could be anywhere. If you try to throw the dowel with the fins first, you cannot do it. The dowel will flip around in flight and fly fins last. If the part with the fins were your "nose cone," you'd have an unstable dowel rocket, because the CP would be ahead of the CG. This is why we do not put the fins at the front of the rocket. If we did that, we'd have a terribly unstable rocket, which would try to fly backwards.
Of course, a rocket cannot fly backwards, because it has the continual thrust of the motor coming out the back, trying to push the rocket forward. The result is that the rocket flips around all over the place, constantly trying to "correct" itself and fly with the CG ahead of the CP, but the thrust keeps pushing it in different directions.
If the fins were merely guiding the rocket, it might seem like having fins all the way up the side of the rocket would make it go straighter. Let's take a look at why that's not such a good idea.
Here's a simple design of a 4-finned rocket.
Click the pictures to enlarge.
You can see that the CG is ahead of the CP, and that the stability is positive - in this case, 1.35 caliber. We'll get more into caliber next time. For now, you can see that this is a stable rocket, and will perhaps fly over 800 feet on a C6-5 motor.
Now, what happens if we add some fins to the front end as well - in an attempt to make the rocket fly even straighter.
The rocket is now negatively stable. It's stability is -0.915 caliber. The simulation also tells us that the rocket may hit 98 feet. But it won't be pretty.
Why is this?
Let's illustrate the CG/CP relationship. Here we see a cardboard cutout of a simple rocket design - Sounder IB.
As I mentioned in Part 1, the center of gravity is indicated by the blue and white circle (really tiny in this image), and the center of pressure is the red circle with the red dot in the middle. Note that the CG is ahead of the CP.
As the rocket flies straight, assuming there's no wind coming from the side, the rocket experiences the wind coming at it straight on, flying past the body and fins at an angle of 0 degrees. This angle is known as angle of attack, and we'll talk more about it later.
For now, though, just imagine the pencil as indicating the airflow past the rocket. The thumbtack is on the center of gravity, because a free-floating object in space can only rotate around its center of gravity.
Now imagine that something disturbs the rocket in flight. It could be a gust of wind, an odd bump of plastic on the nose cone - anything. The rocket will turn slightly, so that the apparent wind is coming at it at an increased angle (of attack). The rocket is still flying upwards - how does it correct itself?
Well, as mentioned before, the air pressure acts on all parts of the rocket. But the center of pressure is the point the air pressure acts through. It is as though the air pushes right on that spot.
Because the air pressure is essentially pushing on the CP, it will cause the rocket to rotate around the CG, making it fly straight forward again. When a rocket is flying at an angle of attack above 0 degrees, the airflow over the fins creates high pressure on one side and low pressure on the other side. This creates an aerodynamic force called lift, which we'll talk about in more depth later, and straightens the rocket out. The rocket corrects its trajectory. This is the second purpose of the fins - to correct a rocket's trajectory in flight.
It may overcorrect, and flip the other direction. In that case, the air pressure once again causes the rocket to rotate around its CG, in the other direction. This is the oscillation you may notice in rocket flight.
Eventually, the fins dampen out the oscillation and it becomes less and less, until the rocket flies more or less straight up. That's a stable rocket.
But what happens if the CG is behind the CP? Using the same cutout (because it took me a lot of effort to cut it cleanly and reinforce it), let's imagine that scenario.
Maybe this is because we have a really heavy motor, or really tiny fins, or we thought it would be a good idea to put a second set of fins near the front of the rocket to provide "more guidance."
Here, I've moved the imaginary CG behind the CP.
As the rocket flies, the air pressure, acting through the CP, rotates the rocket around it's CG - this time, flipping the rocket around so that it's trying to fly backwards!
Of course, with the thrust coming out the motor, the rocket continually tries to fly forward, so the apparent wind continually changes direction, and the rocket flips and flops around in the air until it crashes.
A neutrally-stable rocket has its CG and CP at roughly the same spot. The fins cannot correct its trajectory, so it's free to fly wherever it happens to be pointing.
"Whatever... I do what I want."
Just remember: G comes before P - in the alphabet, and in your rockets.
How do you know where the CP is? And does it matter how far behind the CG you put the CP? And what if you have an unstable rocket design - what are some things you can do to fix it without throwing the whole thing out?
Well, we'll talk about that in the next couple posts in this series.
But why do we need to know this, if kits are designed to be stable in the first place?
Because I want to show you how easy it is to design your own rockets. But in order to do that, you need to understand the basics of stability. And of all the different aspects of rocketry, stability might be my favorite subject.
When I put the first part of this series on Twitter, Homer Hickam himself posted it on his Facebook page, and even commented on the blog post itself. You can imagine how thrilled I was at that!
He mentioned a couple of things which he thought might be other explanations for the lack of stability in that early flight - including non-vertical launch, poorly mixed propellant, or a poorly-machined throat nozzle. I might talk a little about those in a future post in this series - especially the non-vertical launch possibility (something he corrected in later launches, if you read the book, which I highly recommend).
Of course, this series isn't meant to be an analysis of his rockets per se - that would be nearly impossible to do for a rocket launch which took place nearly 60 years ago and was not filmed!
I mention Mr. Hickam's book (and the movie), because once you gain some understanding of the basic principles of rocketry, you can make an educated guess as to what happened when you get a weird flight. And I think that makes reading the book more fun - you can understand and appreciate some of the technical aspects of what he's talking about.
The Estes Leviathan, a very popular mid power rocket, seems to have disappeared completely from he Estes website.
It was on sale, along with a lot of other rockets, all of July. The July sale has been extended, but the Leviathan is now no longer to be found on the Estes website.
This does not look good...
A few months ago, I mentioned the Estes Scion rocket, which is made up of Leviathan parts with an extended airframe. A while back on The Rocketry Forum, I heard that Estes was getting out of the mid power market. The Leviathan, a beautiful, simple rocket, is now gone. Permanently? I certainly hope not!
I tried to get one more for the build pile at the recent sale, but it was already out of stock.
I've started building my first rocket in months. I decided to take one of the smaller rockets off the build pile - the Estes Reflector.
It's a small, BT-50 (24mm) based rocket with a short payload section. I'm building it with the intention of adding a camera to the payload, following the instructions on this Instructables build, because it's a pretty cool project, and I have yet to successfully launch a camera payload (Janus II had a weird flight and vanished without a trace, and the camera wasn't working anyway. I may post video soon.).
An Estes Reflector with internal, horizontally-
oriented camera, from Instructables.com
Despite having become much more confident in my building skills, sometimes mistakes happen.
Well, first of all, I airfoiled the fins, and one or two came out a little uneven. Not badly, and I hadn't done it in a few months, but the problem was due mainly to rushing the job.
Then, a couple of the fins warped when I brushed on CWF to fill in the wood grain. I pressed them under a heavy book (my trusty Riverside Shakespeare, an invaluable rocket building tool), but there was still a nasty warp on one of the fins. I dunked the bad fins in water, and am re-pressing them. We'll see how that turns out.
The real problem is the motor hook.
Like most Estes low power kits, it comes with a standard motor hook with a little recurved bit on the end as a thumb grip.
From Apogeerockets.com
Some rocketeers religiously remove the thumb grip and smooth off the remaining bit with a file. I actually like the thumb grip - it makes it easier to install the motor. But in some cases, it gets in the way.
A lot of rockets with backward-swept fins will sit nicely on a shelf with no need for a stand or support. Many rockets have fins that don't sweep backwards, so in order to display them on a shelf in a convenient, upright manner, you need to make (or buy, but don't ever buy) a stand of some sort.
The Reflector has swept back fins, but they don't go too far back. On a standard Estes motor hook, the thumb grip is longer than the fins, meaning you cannot simply rest the rocket on its fins. On an old-fashioned, simple motor hook, which is basically just a strip of metal with a bend at the front and a bend at the end, you'd have plenty of space at the bottom - no need for a stand.
Here's a picture from Chris Michielssen's blog with a before and after pic of a modified Estes hook:
The top hook has been modified, and looks more like an old-fashioned
motor hook. This is the kind of hook you get when you order parts online
from vendors such as Jonrocket.
First, I tried cutting the thumb grip off with a pair of wire cutters.
I've had these probably since I was 12. I've used them for trimming guitar strings for 29 years. They didn't work... Didn't even make a dent.
Looking around my Rocket Room...
My Rocket Room in Boston - a couple weeks ago, in progress
...I found a pair of PVC pipe cutters.
This evil parrot-looking thing cuts through 1 inch PVC pipe with little effort.
I figured these would have more power. But instead of cutting the hook, it bent it - backwards. Now there was no more hook to the hook. It wouldn't hold the motor in - but of course, the thumb grip was still attached. AND I dented the end of the airframe, slightly...
I reached for a pair of needle nosed pliers to try to re-bend the hook into shape. What I ended up with looked like this:
It will hold the motor in, and the hook is now definitely short enough to not extend beyond the aft end of the fins, but it looks pretty janky. And the thumb grip now sticks out beyond the diameter of the airframe. This could catch on a two-piece Estes launch rod. Chad had that happen with a bent motor hook on his Estes Crossfire ISX once, and the rod went flying with the rocket! It was terrifying.
Fortunately, I do not use the two-piece rods, and, because of the payload section, the launch lug for this rocket is actually on a stand-off, so it's not likely that the rod will come into contact with the hook.
I could have tossed this whole thing out. I do have plenty of spare parts. It would have been easy for me to cut a 10-inch piece of BT-50 body tube, and make a whole new lower section of this rocket from scratch. But I wanted to go forward, not backward, and as you can see above, I went ahead and started gluing on the fins.
This kind of laziness is not like me - not in rocketry, anyway. I'm usually very meticulous with my rockets (if only I could be that diligent in other areas of life). But it's been so long since I built a rocket, I wanted to move quickly.
If I had it do do over again, I'd have saved the Estes motor hook for another rocket, swapped out a plain hook from Jonrocket, and have saved myself the trouble of all this. Live and learn!
I'm sure I can still make this rocket look pretty good, and when I'm done, the flaw won't be noticeable. Perhaps I'll even find a better cutter to take care of that hook later.