With this, I'll be able to join a club, maybe get high-power certified, maybe make some new friends who are into rocketry. Plus I get insurance on launches and a cool magazine.
I've meant to do this for a while, but finally took the plunge. I don't know what my member number is yet (it isn't 100000 - that's held by some 10-year-old. Man, that would've been cool!), but I should get a nice card in the mail soon.
First thing I decided was to abandon the idea of making launch controllers for everybody. That would have required some soldering, something I didn't want to go into with the kids. And while I have soldered, I'm not terribly good at it, and the thought of soldering up to 30 launch controllers in a week was not terribly appealing to me, and I wasn't sure I'd have enough time to do it.
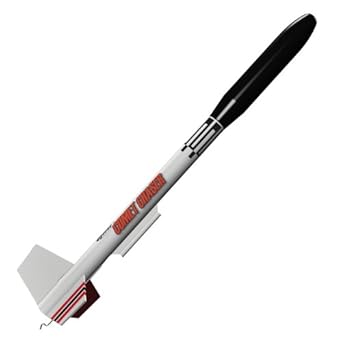
I'd considered a couple of rocket bulk packs other than the Estes Alpha. One I nearly selected was the Estes Comet Chaser.
I liked the large fins on this rocket, and the payload compartment. But the lower portion of the rocket is minimum diameter, and you have to line the fins up just right so they will fit over the Mylar ring which holds the motor hook in place. And due to the fatter payload section, the launch lug had to go on top of a standoff. I wasn't sure how dextrous the kids would be, and getting those bits lined up just right is critical.
I also toyed with the idea of doing egg lofting - the practice of launching an egg payload and getting it back uncracked.
This is a popular challenge for kids, as you get to launch something which is fragile, but not alive - launching live animals is definitely a no-no.
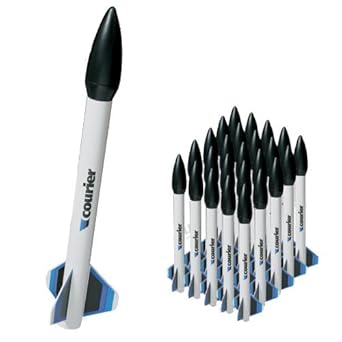
There are a lot of great egg lofters on the market, but I needed a bulk pack, and the one I liked best was the Quest Courier.
It's a great little rocket. But Quest has this listed as a Skill Level 2 rocket. Skill levels are kind of an arbitrary classification system, with every rocketry company having its own standards, and some Skill Level 2 rockets are quite simple to build, but I didn't want to risk having a rocket which was too complex. And there was a launch lug standoff again. I decided that egg lofting, while fun, was more than we needed to deal with for what would be many kids' first rockets.
I even considered offering the kids the option of choosing between two rockets - the Comet Chaser and the Alpha. In the end, I realized things would go better if we all built the same rocket. That way, I could control how quickly or slowly we went through certain steps.
I decided to stick with the Estes Alpha bulk pack. I requested three of them. That turned out to have unintended consequences...
I was hoping to get a kit before classes began, so I could build a display model. With the kids, I certainly wouldn't take all the time to do the fussy detail work I usually do on a rocket - filling the tube spirals, shaping and filling the fins, sanding the flash off the nose cone, etc. That alone could take the whole week. Some kids might go on to build intricately detailed models, but to start with, it's best to keep things simple. Get the rockets built, and launch them into the sky.
But I wanted to have a nice model to show the kids. I wasn't able to get my hands on one before the first week started. I figured I'd make one for weeks two and three. The first session would probably be a little haphazard anyway, with me figuring out the structure of the class, and getting an idea of what was enough material, and what was too much.
Other Concerns
Would it be OK for the kids to use hobby knives? One-on-one, with your own kids, this is probably fine. If I had a classful of 10 kids - other people's kids - would this be OK, or too dangerous? I was assured by the camp director that this would be fine, and they had done it in the past. I decided I'd keep an eye on everyone, only let one child use a knife at a time if necessary, and do the cutting myself if it came to it.
Painting - could the kids use spray paint, or did we need to opt for hand-painting rockets? Or skip the painting altogether?
This turned out to be great - Ivy Tech had a brand new, ventilated, indoor spray painting booth. I failed to take a picture of it, but it looked much like this:
There were added flaps at the bottom to keep all paint inside the booth. All fumes were filtered out the top. You couldn't smell a thing - I'd like one of these at home!
How much would be enough material to fill a week? How much would be too much? 3 hours a day for 5 days is a lot. A teacher friend of mine suggested that you always have more material than you think you will need. You can drop something extra on the fly, but if you end up finishing something early, you need to have more.
My Goal
People say that rockets are educational. They certainly can be. But it depends. A lot of kids get a ready-to-fly kit for a birthday, launch it for a summer, maybe lose it in a tree, maybe launch a few more... And then get bored, never really learning how they work, or where they can go from those beginnings. I wanted my kids to see that they could do a lot with rocketry - and that, even if they quit the hobby in a few years, they've gotten something more out of it than simply burning some black powder. I wanted them to see that they could design their own rockets, if they kept it up. That if they put their minds to it, they could actually accomplish something - maybe get on a TARC team in high school and get a scholarship. Maybe move on to high power rockets as adults. Maybe more. And I wanted to motivate them to explore more. Basically, I was hoping they'd do their math and science homework, because there are fun things you can accomplish if you do the hard stuff.
The Plan - Part 1
My brief attempt at stand-up comedy taught me that when anything goes, if it's all up to me, I can have a million ideas and no structure to them. I decided I would write out a basic plan structured around the build of the rocket. The idea was to build during the week, and launch on Friday. I obtained the Alpha kit instructions online, read through them, and sketched out a plan.
I wanted to start with something exciting to get everyone jazzed up, so I figured first thing Monday, we'd launch a couple of rockets. Not only would this be fun, it would give me the opportunity to demonstrate the stages of rocket flight - powered flight, the coasting phase, ejection and recovery - as well as introduce some safety rules.
Then, of course, the weather looked like it was going to be bad - wind and rain. I'd have to hope for the best, and if we couldn't go outside, I'd show a video of a model rocket launch.
Monday, after the launch, we'd talk about the parts of a rocket, examine the kits, glue a few things together, talk about rocket safety while the glue dried, then glue some more stuff together.
By Friday, we'd have built and launched rockets, talked about some science, watched some videos, and even started talking about designing and building our own rockets. Easy-peasy.
Then Monday came, and the whole plan went out the window...
July 5 was the anniversary of the first time I ever went out to launch a few model rockets, with Chad, David, Lee, and a few other people. On that day, we just flew a few of Chad's rockets. We had fun, but I wasn't sure whether we'd do it again.
One year ago today, July 20, 2014, was different. We decided to hold a rocket launch/picnic around the 45th anniversary of the moon landing, and make it an event.
By then, I'd decided to get a few rockets of my own, including the Estes Der Red Max. This rocket required assembly. It took me four days, as I was being very careful, worried I'd mess the whole thing up.
It turned out great.
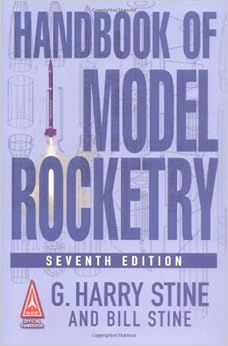
Launching ready-to-fly or easy-to-assemble rockets is fun, but nothing compares to the thrill of taking something you built yourself and making it fly. I quickly became obsessed, bought and devoured The Handbook of Model Rocketry, and a few weeks later, I started this blog.
Some people thought it was weird that I'd suddenly gotten into rocketry for some reason. A lot of people see it as sort of a childish hobby. But I'm fond of saying "Rocketry: it's not just for Webelos any more."
I've found this hobby so satisfying. In the last year, I've learned a lot, built much larger rockets than your typical cub scout would ever do, and even taught rocketry to kids - many of whose parents told me they were surprised at how much actual physics the kids learned.
I still have lots to learn and lots to build - and, I hope, lots to teach other rocket n00bs, either through this blog or other avenues. I'm still settling in at my new place in Boston. But soon, I hope to join a club, and in the next year, get into high power rocketry.
Here's the video of that first launch. I haven't posted it on the Rocket N00b Youtube channel until now. I needed to edit it for language (when I shot this, I wasn't thinking about starting a semi-educational rocketry blog).
Also, note a few things: This was before I'd heard of the Model Rocket Safety Code. A couple of times, we launch without doing a countdown - something I would not do now. Also, our comment about the airplane was a joke - be assured, we never launched with aircraft flying overhead. We were n00bs, but we weren't stupid!
That said, I hope you find this entertaining. It sure makes me feel nostalgic for my friends back in Indiana.
A few months ago, because of a recommendation from Chad, I read Homer Hickam's book Rocket Boys. This was adapted into the film October Sky, starring Jake Gyllenhaal.
In 1957, after the launch of Sputnik, Hickam became obsessed with building his own rockets. But model rocketry hadn't really been invented yet - in fact, the hobby got its start that same year - and a lot of kids tried building their own rockets at home, sometimes with tragic consequences. Cooking up propellant isn't something kids should do in the kitchen. Nobody should do it, unless they really know what they're doing, and most people don't.
If you've read the book, or seen the movie, you know Homer's first few rocket flights didn't go well. The first "flight" blew up his mother's fence. The second didn't blow up - but it flew out of control.
Since his rockets were made of metal, he was really lucky he didn't kill anybody. This is why we make model rockets out of paper, balsa and plastic. Their destructibility is a safety feature, in case something goes wrong in flight.
But what happened to Homer's rocket? Why did it fly all over the place, rather than straight up?
Reading the book was fascinating, and since I'd been studying rocketry for several months, it was fun to see how Hickam came up with a lot of innovations that we see in modern model rocketry today - electric ignition systems, tracking altitude from the ground, using a launch rod and launch lugs - all on his own. Model rocketry was invented in 1957, and it didn't get really popular until the 1960s, so a lot of young rocketeers did not have the benefit of its innovations or safety features, but many of them discovered better practices along the way.
I'd seen the movie years ago. But when I read the book, I thought, I bet I know why that happened. Actually, the reason why could have been one of several things.
There are a number of things to consider when designing, building and launching a rocket to ensure a stable flight. If you are merely building a kit, you probably don't have to worry about it that much. Most model rocket kits are well designed, and designed to be stable.
But if you'd like to design your own rockets - and it isn't that hard, as long as you understand a few simple concepts - it is very important to know something about stability. Also, sometimes we like to hack a rocket kit so it will take a larger, more powerful motor than the kit was designed for. I did this with the Estes Cosmic Explorer, because I love the way the rocket flies with standard motors so much, and I wanted to see it go higher.
My two Estes Cosmic Explorers - the stock kit build on the left, which accepts up to a
C motor and flies to about 600 feet, and the upgrade on the right, which accepts a much
more powerful E motor, and can top 1800 feet.
A larger motor is heavier, and so stability issues come into play - this is another time it's important to understand the basics of rocket stability. I was able to upgrade the Cosmic Explorer with confidence, knowing that it would have a stable flight, because I understood the basics of rocket stability.
Stability is covered in depth in G. Harry Stine's Handbook of Model Rocketry, which I highly recommend reading.
But I want to cover some of the basics here.
What keeps a rocket stable in flight? The answer might seem obvious: the fins. But simply slapping a set of fins on a rocket is not enough. You need to understand why the fins work, and what might prevent them from working.
The two most important concepts to understand with regard to rocket stability are the following: Center of gravity and center of pressure.
Center of Gravity
Every object has a center of gravity. This is also sometimes called the center of mass. It's a theoretical point somewhere on, inside, (or sometimes outside) the body of the object around which the mass is equal in any direction. This is also known as its balance point, because if you can balance an object - a stick, for example - on your finger or the back of a chair (or whatever), you've found its approximate center of gravity.
Any object in space, whether it's in the vacuum of outer space, or tumbling through the atmosphere, will rotate around its center of gravity. If you flip a stick in the air, it will rotate exactly around its balance point. A gymnast doing a somersault rotates around his or her center of gravity.
Remember how I said that sometimes the center of gravity is located outside the body of an object? That's how a boomerang operates. It rotates around its center of gravity, which is located somewhere in the air between its two arms.
A rocket will also rotate around its center of gravity. Keeping that rotation under control is what stability is all about. Although gravity is pulling equally on all parts of a rocket, from the tip of the nose cone to the end of the motor hook, it acts through the center of gravity.
In rocketry, the center of gravity is often abbreviated CG.
Center of Pressure
The center of pressure is the average location of pressure variation on an object. It's another theoretical point on a rocket - this time, the theoretical center of all the aerodynamic forces operating on the rocket. It is determined by the total surface area of the rocket, and in a way, it's similar to the center of gravity; it's the point where all the aerodynamic forces are in balance. The surface area in front of the center of pressure is equal to that of the surface area behind the center of pressure. Much like the center of gravity, air pressure acts on all parts of a rocket equally, but because the forces are balanced before and behind the center of pressure, we say that aerodynamic forces act through the center of pressure.
But the center of pressure is tricky, because while the center of gravity of an object mostly stays put*, the center of pressure can move around, as we'll see.
In rocketry, the center of pressure is often abbreviated CP. CG and CP are very important concepts, so keep them in your mind.
*(On a model rocket, the center of gravity does move forward slightly during flight. More below.)
The center of gravity is usually indicated with a blue and white checked circle, and the center of pressure is indicated with a red dot, often with a red circle around it, as in the picture below. Notice where the CG and CP are in relation to one another.
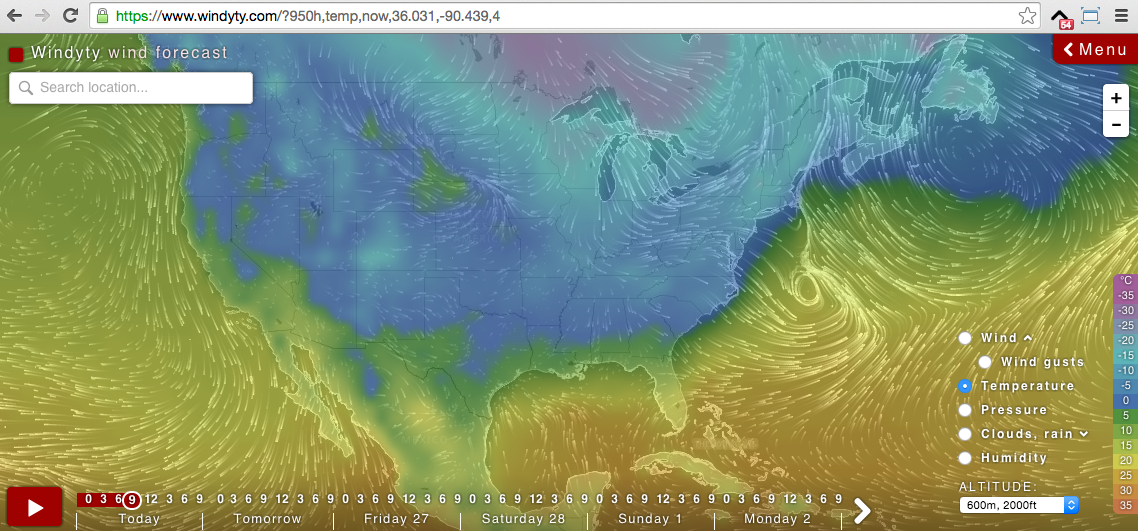
It's a website called Windyty, and if you enter your location, it will show you an animated map detailing wind direction and speed, both current and forecasted. If you want to make sure your launch field will have calm enough winds - and this has been an issue for me in the past - check this website first. It might also help you figure out the best place to set up your launch pad to ensure recovery.
Rocket camp is finally over, and it was a wild ride. I have never launched this many rockets in this short a time period. Even though I had to limit our altitude, which meant we launched only with A or B motors, it was a lot of fun. I usually completely avoid the A motor, as it's pretty wimpy on a big field, but it turns out that with a lightweight rocket and a small field, an A8-3 motor can still produce quite a spectacular launch.
I wasn't sure what to expect with this class, but it turned out that if I had expected anything, everything would have changed on Day 1.
Preparation
There would be three week-long sessions, each lasting three hours per day for five days. That seemed like a lot of time to fill, and it was. The age group I would be teaching was to be 11-14, and there were ten spots available in each session.
I had to figure out what I would be teaching, and what we would need. I had been told "Do whatever you'd like. The camp can be whatever you want it to be." Apart from the fact that we needed to build a rocket and launch it at the end of the week, the whole thing was pretty open-ended.
I had several months to prepare a shopping list. Ivy Tech had a pretty healthy budget for these classes. I think that's probably pretty rare. Mostly when you get to teach rocketry to a group of kids, it's often probably only for an afternoon or two, it's usually on a volunteer basis, and there's little to no money available for kits, supplies, etc. So, my mind was kind of blown when I was told to "try to keep the shopping list under $400 per week."
Wow... Wow... I could do so much with a $400 budget, as long as I planned it right. The biggest expense would be kits, followed by motors. Both Estes and Quest Aerospace sell educator's bulk packs of rocket kits, and I wanted to pick something that was 1) standard (with balsa fins, parachute recovery, centering rings - i.e. not a minimum diameter rocket) 2) required some building time (15 hours is a long time, and it doesn't take that long to build a basic rocket if you leave out all the fussy fin filling, tube spiral filling, shaping of fins... All the stuff I like to do, but which could be off-putting to a group of kids), and 3) not so expensive it would squeeze the rest of the budget. So, I was looking for your basic Skill Level 1 rocket.
I decided on the Estes Alpha. This is kind of a classic, and a really basic 3 Fins and a Nose Cone (or 3FNC) rocket, and one I hadn't built before.
I'd never had an opportunity to do something like this before, so planning was a little hard to figure out, since the structure would be entirely up to me. I kept changing my mind on the shopping list, and submitted it really on the last possible day. I wasn't sure how ambitious to be, but it seemed like I had a ton of time to fill. I considered having the kids build their own simple launch pads, and maybe launch controllers like this one on the NAR website, so that they'd go home with not only a rocket, but the ground support stuff necessary to launch it whenever they wanted to.
Also, there was the question what would I teach the kids? What was going to be accessible enough? What was too much? The age group was to be 11-14 years old, and I wanted to challenge everybody, but not lose the younger kids or bore the older ones.
My impression is that a lot of times, when you get the opportunity to introduce kids to rocketry, you might have an afternoon, so you want to keep it simple - launch some rockets, talk about the most basic of basics. Having time to build with kids is lucky. But here, I had so much time, I had to chart out what I planned to do. I started by laying out a bare bones schedule based on what I guessed it would take to assemble the rocket and paint it, making sure to get the rockets done by Friday, when we'd launch.
Well, I'm here to tell you that plans change. Whatever plans I'd thought I would follow got thrown out the window on Day 1. And the "plan" changed from week to week (this was to be three week-long sessions each, so if I had a program that worked solidly, I could have simply repeated it three times). There was no leftover materials from the previous years' camps, so I had to make it up as I went along.
And then there was the weather. Launch on Friday, you say? Ha! You'll launch whenever you get a clear window, pal...
Now, if you've read my blog, you know I tend to write really long posts. I've been thinking about this story for a while now. I'm just getting settled in to Boston after the move, and I've been procrastinating on the blog. Rather than take forever to write this up, I'm going to break it into chunks, so that I can get some blogging done, and not burden the reader with too much information at once. Also, I need to get hold of some pictures for this series, and that means digging through my stuff to find my camera.