Every time I'm on my way to launch rockets (only casually with friends, until tomorrow), I sing a little song that popped into my head one day.
It goes:
Get me to the launch on time Get me to the launch on time Da-dum da-dum da-dee Da-dee da-dee-dee-dee Get me to the launch on time
I haven't fully fleshed out the lyrics.
I'm not sure where the melody comes from, but I think it might be an old Hank Williams tune.
Anyway, tonight I've been prepping for tomorrow's first club launch in Amesbury, Massachusetts, with CMASS. Launch prep always takes me longer than I think it will. I'll talk about launch prep in another post.
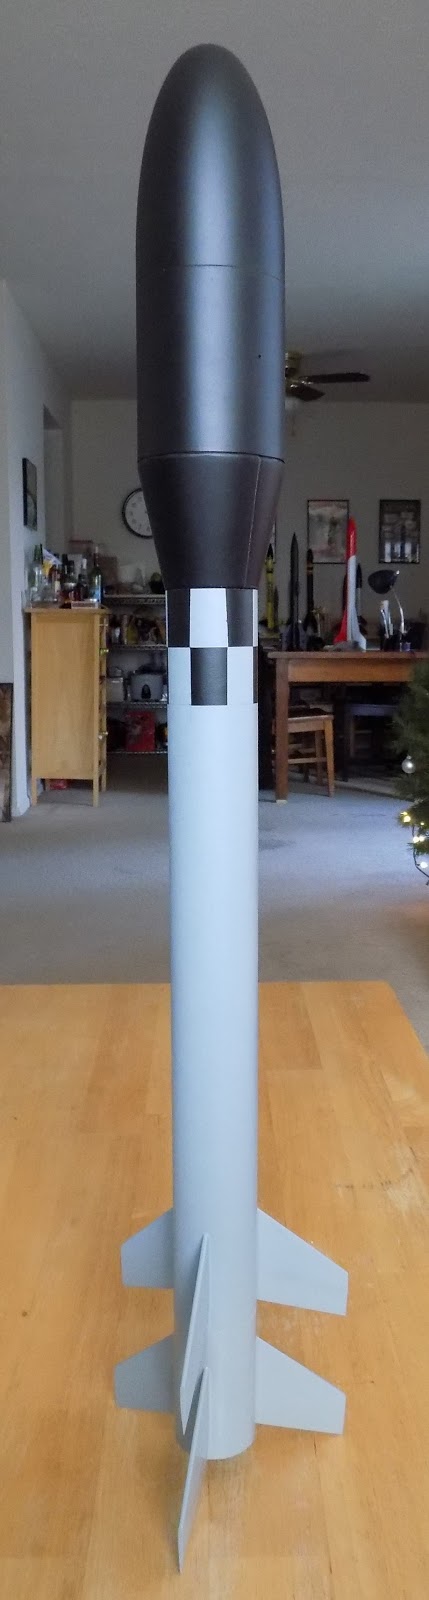
What I will say is that I've taken Janus I, my first scratch design, out of retirement. I had to make some modifications to it, but I think it's flight-worthy. It's a simple rocket, but a two-stager, and it flew beautifully - one time. I figured it would be a shame not to fly it again.
I'll talk about the repair briefly in a future post. It wasn't a major operation, but I had to change a few things.
Starting probably next week, I'll be doing a bit of a re-boot of The Rocket N00b blog. I've strayed a bit from my intentions and done too many posts where I talk about what I've purchased, what I'm building, or my feelings. There hasn't been enough that a n00b to rocketry can actually learn from. Some of these instructional posts take a lot of time and thought, but I don't just want to write a personal journal with some rocket pics, here, I actually want some rocket n00bs to get some use from this blog.
So, after tomorrow, I'll probably have some cool pictures, video, and stories for you, including some high power stuff. Apparently, they're launching the first high power two-stager CMASS has ever been able to get sanctioned (the airspace in New England is a little busy, I guess).
After that, it's back to basics: rocketry, for beginners, from a beginner's perspective. The I'm building this and look what I got in the mail posts will creep in occasionally, but I want to make sure this blog has some value to people who are just getting into the craft, science and discipline of building and flying rockets.
Also, some cool pictures that hopefully the more advanced rocketeers will like.
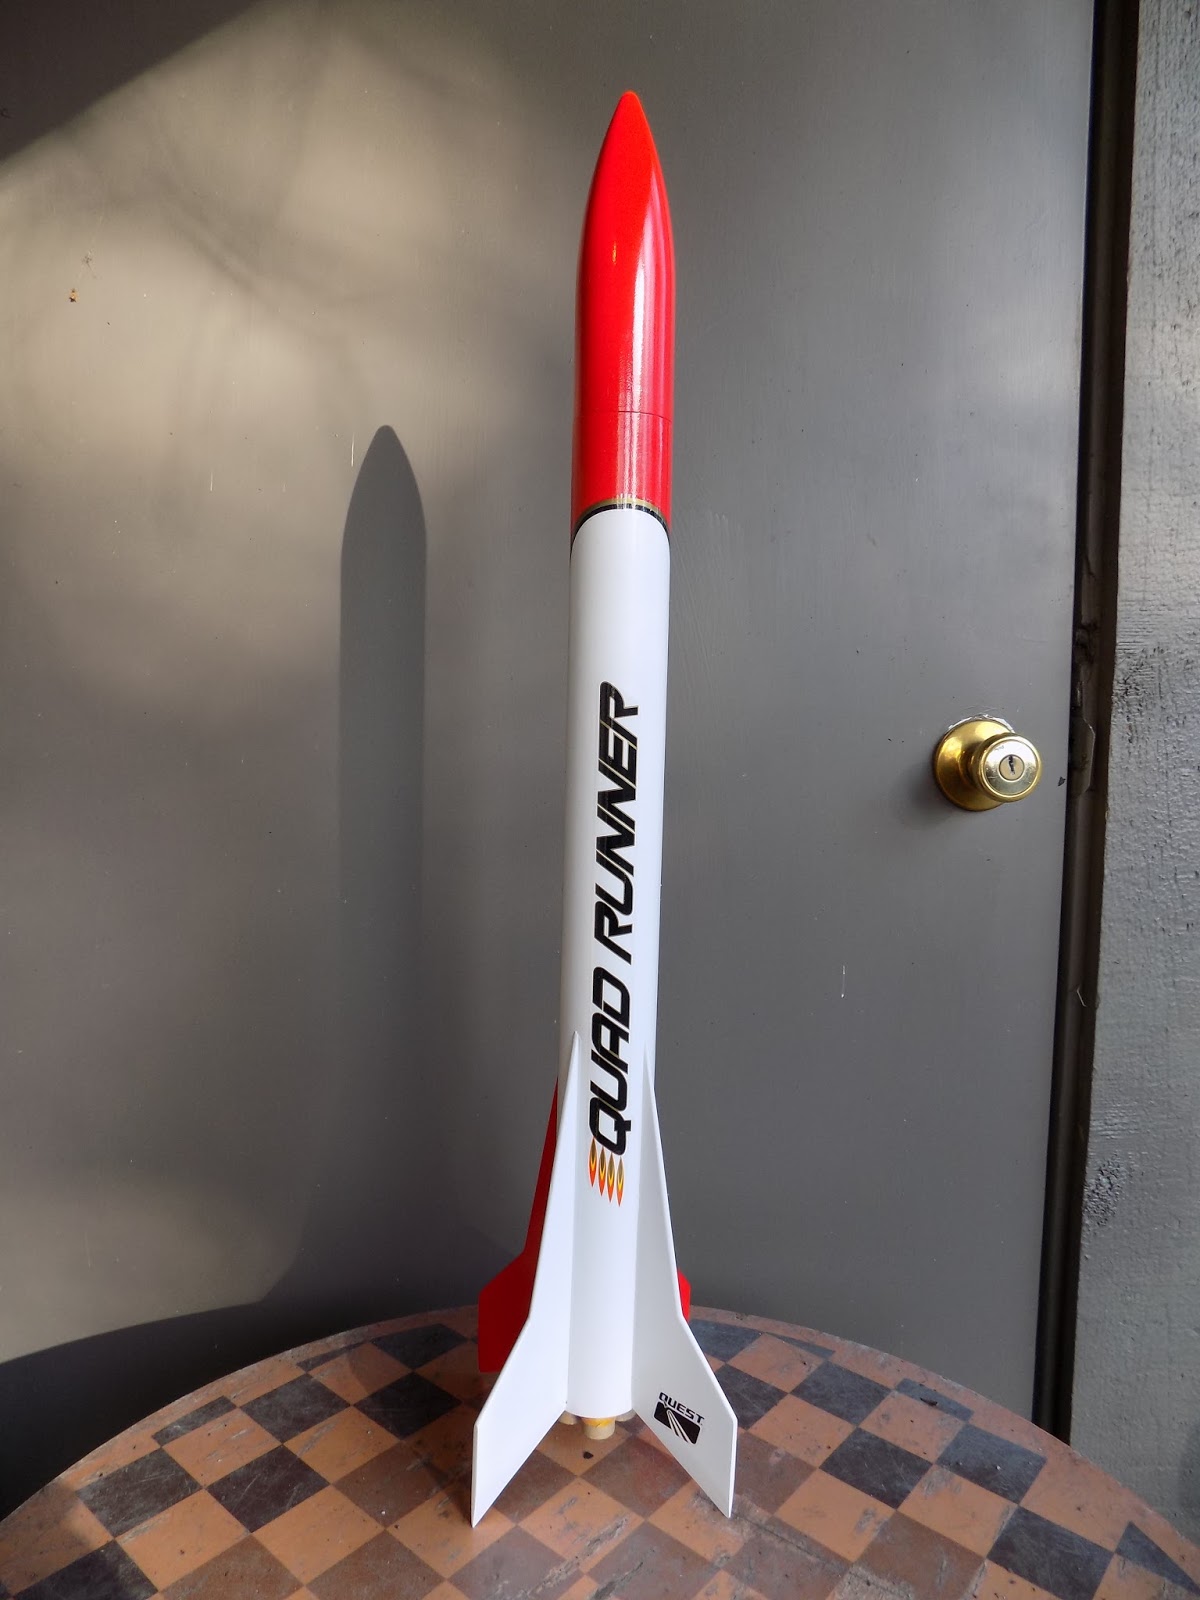
I'm only taking five rockets to the launch tomorrow - but one is the Quest Quadrunner - a four motor cluster I've never launched. I hope it does not disappoint.
I've just realized my little song sounds a little like the chorus to In the Jailhouse Now. Jimmie Rodgers. A bit older than Hank Williams. But a classic.
I'm nervous about this weekend's upcoming CMASS rocket launch in Amesbury, MA.
At first, I was nervous about joining the club. What if I have nobody to talk to at launches? What if they don't like me?
That's just the kind of social anxiety you develop when you move to a new city and it's hard to meet people. But rocketeers have the reputation of being very friendly folk - if you like rockets, they like you. And I've been welcomed by some of the club members, chatted with a few of them online, so even though I haven't met any of them in person, I feel good about meeting some fellow rocketeers. Joining a club is a great way to expand your rocketry experience and meet new people.
No, what has me nervous now is simply that I haven't launched in a long time, and I am hoping to launch a few rockets I've built but never flown.
The Quest Quadrunner was finished last December.
This beautiful Quest Aerospace kit is about 3 feet tall, just under 2 inches in diameter, and flies on a cluster of four standard B or C motors. And I put a lot of work into this rocket - and had some moments where I thought my work would be ruined. But I really like the way it came out.
This rocket is the first I've completed with a 29mm motor mount, big enough for an F or G motor (or a small H, but that would probably be ill-advised with this rocket, and would require high power certification in any case). It's another beauty, and like the Quadrunner, has never flown.
Then there's the Estes Cosmic Explorer with an E motor mount.
I have a standard Cosmic Explorer, and I have in fact built one with an E mount before. It flew beautifully, and then disappeared in fast-moving high altitude winds. But this second attempt at an E Cosmic Explorer is perhaps the best work I've ever done on a rocket, and I have not launched it yet, so I really want to see how it performs.
The Quest Magnum Sport Loader has flown before - one time.
Magnum Sport Loader on the left, next to its Quest brothers
This is yet another beautiful Quest rocket capable of carrying a payload - the chamber is in fact large enough to loft two eggs at once. It's a two-motor cluster which has a dramatic flight.
I love these rockets. But, apart from the Sport Loader, they are much larger rockets than I've flown before. It's part of the reason I hesitated attempting to launch several times in Bloomington.
They're by far not the largest rockets you can build and launch. Amesbury is a high power field, so there will be much larger, more complicated, and higher-flying rockets than these. But they're the largest I've attempted so far, and I'm nervous about them.
What if the parachute does not eject? What if it gets tangled and doesn't open? What if my clusters don't ignite simultaneously? What if they have a hard landing and break on the first flight?
These are the things which make me nervous. It's because I haven't flown in a while, and because I'm new at this whole mid power thing. And it's because these rockets have been waiting on the shelf so long, I'm worried they won't make it back, because I've grown attached to them.
But these rockets are made to fly. I'm confident I built them well. I built them with care. I just need to get out there and do it.
Failure is part of the learning process. Sometimes your rockets will crash. Sometimes you'll lose them. But if you're not willing to risk a loss, you'll miss out on the excitement of a successful flight.
Someone on one of the Facebook model rocketry forums recently posted a picture of his first rocket - the Estes Crossfire ISX - a great, high-flying little rocket.
And he confessed that he was nervous about launching it. I could understand - he'd done a beautiful job building it, and now it was time to strap a motor in it an launch it into the sky??
But that is why we do this. We don't take unnecessary risks - sometimes you put a less powerful motor in than at other times. Sometimes you have to scrub a launch. But we launch these rockets, because that's what this is all about.
But, get out there, rocket n00bs. Build those rockets - then go out and fly them.
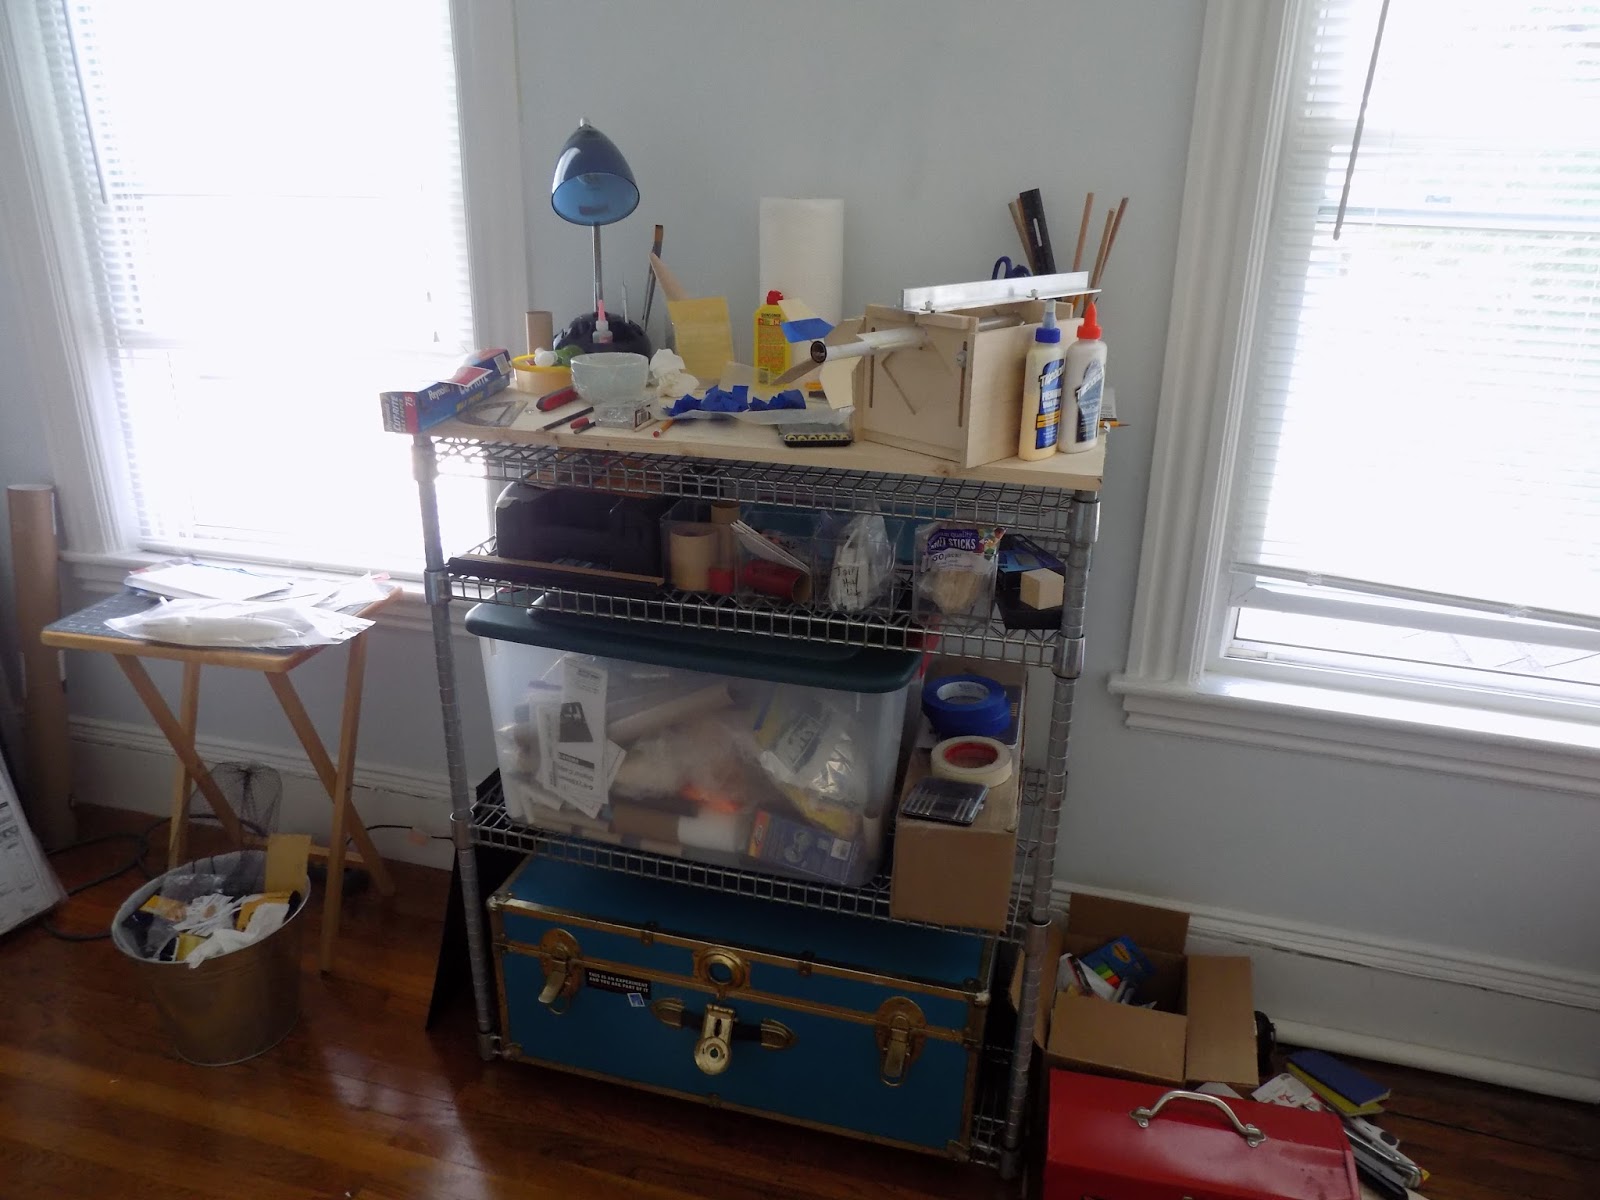
I have been in the market for a table for my Rocket Room. I was thinking of getting a folding table - a six-foot long, plastic top folding table, the sturdy kind you find at your finer non-profit board meetings and family reunions. Something perfectly flat. My current work surface wasn't cutting it.
A metal shelving unit with a board on top was my previous work surface these last few months. The shelves are great, but the top is a little high, a little small, and the board isn't flat.
I found a nice folding table on Amazon which I could get delivered free for about $59.
Then, the other night, the city of Boston presented me a gift: A solid, sturdy, six-foot long oak table, discarded, left by the curb right outside my house.
The top alone may have weighed nearly 100 pounds, and it wasn't fun getting it upstairs, but you can't beat free, and it's perfect for rocket-building.
There's just one problem with this table.
Right now, I have about 5 or 6 rocket projects on it, and I haven't made much progress at all on any of them. I've been working very slowly.
Last Saturday, I hung out in the rocket room almost all day, and only did one thing: sanded some wood filler off a balsa nose cone.
I need some inspiration.
Thankfully, I am four days away from my first club rocket launch, in Amesbury, MA, with CMASS.
I spend a lot more time building than I do launching. And I love building rockets. But there has to be a goal. Rockets are meant to fly. I noticed in the past that if I hadn't launched in a while, I tended to slow down my building.
Further complications to living here is that I can only go so far in a build before I encounter a major challenge - painting.
At the old homestead, I had a large grassy area surrounded by trees. As long as it wasn't too breezy, it was a perfect painting area.
I'm considering several options here: joining a maker space, or maybe building an indoor painting booth. Perhaps I'll make friends with someone at the club who happens to work in an auto body painting shop, and we could paint rockets on the weekend.
So, there are some challenges to being a rocketeer in a big city, as opposed to a suburban area, one of them being that I can't just go outside and launch whenever I feel the need. I'm considering a future post on this subject - Challenges for the Big City Rocketeer - but I need to find some solutions for it first!
My final challenge lately is this blog. It's been too filled with posts exactly like this one: what I'm doing, what I'm not doing, blah blah... This is exactly what I want this blog not to be - a personal catalog of rockets I'm building or not building. This is meant to be a blog for rocket n00bs to get some tips and information, and for more experienced rocketeers to have another place to read about rockets, even if it's stuff they probably already know, and to look at cool rocket pictures.
This launch should do the trick. I have a feeling my mind is going to be blown this weekend, with higher flights and larger rockets than I've ever seen in person before. In the past, whenever I've come back from a launch, I'm inspired and ready to build!
My short-term goals therefore:
Finish building a rocket, already!
Figure out the painting problem
Write some more how-to posts for n00bs on this blog.
I did get a little bit of inspriation in the mail yesterday. One perk of membership in the National Association of Rocketry is a subscription to Sport Rocketry magazine - the official NAR magazine. I haven't had a magazine subscription in ages, and I was excited to finally see my first issue in the mailbox.
Launch. Then build. And write something of substance for all my fellow rocket n00bs.
Long ago, Estes Industries published a newsletter called Model Rocket News. This was long before I got into the hobby.
This kept model rocketeers (mostly children in those days, though a lot of the information was very sophisticated, involving advanced mathematics and physics) up to date on the latest developments in rocketry, presented ideas for science fair projects, and allowed young rocketeers to present tips, feedback and ideas to both Estes and other rocket kids around the country.
You can find issues in PDF form around the Internet (though I think a complete collection still eludes us).
I recently downloaded as many of these as I can find. I enjoy reading them, because even though they are from the early days of model rocketry, and even though some of the information is no longer relevant (parts or motors which no longer exist), there are still good ideas in the Model Rocket News, and still tidbits to learn from. And much of the basic rocketry information continues to be true. And I appreciate them as historical documents.
And they have rocket plans!
Some of these were submitted by Model Rocket News readers - some of the kids who were designing rockets in those days had some pretty interesting designs, and you can still make them today.
Some of the designs were free rocket plans from Estes.
Tonight, I was reading Volume 3, Number 2, from April/May 1963, and I saw something surprising: A free plan for a rocket I'm very familiar with: Estes Industries Rocket Plan No. 13: Big Bertha.
It seems that before it was a classic Estes kit, the Big Bertha was a classic Estes free design. This might not be a surprise to longtime rocketeers, but to a n00b like me, it was a cool discovery.
It looks much like it does today, with a few minor differences.
The nose cone was made of balsa (which you can still find at Jonrocket.com or Balsa Machining Service or a number of online rocket parts vendors around the Internet), and motor mounts were made a little differently then. Also, instead of a motor hook, the original Bertha design used a friction fit, requiring you to wrap a bit of masking tape around the motor before inserting it into the rocket for a snug, secure fit.
Also, at least according to the drawing, the nose cone was slightly pointy.
You can find the full edition of Volume 3, Number 2 Model Rocket News here, including a full-sized plan which you can print out and build. You'll also get a glimpse into the early days of Estes Industries operations, complete with mail-order procedures.
If you look at the comment section below, you'll see a few rocketeers have corrected my big dumb mistake here. Turns out, I was mis-reading the instructions for the Q2G2 igniter, and inserting it all wrong in the first place.
My initial reaction was to delete this post. But I've decided to leave it up for two reasons.
1 - It's a good example of a n00b mistake - not reading the directions.
2 - It's full of pretty pictures. For the correct method of installing Q2G2 igniters, see this post by Chris Michielssen.
My apologies for not doing my homework!
. . .
In May, I went to launch some rockets with Chad. I took along several I'd built but never flown before. It was breezy, and I lost a few. Against my better judgment, I put the Quest Quadrunner on the launch pad.
This beauty of a rocket from Quest Aerospace is a four-motor cluster capable of pretty high altitudes for a model rocket. It took me a long time and some heartache to build, but in the end it turned out really beautiful.
I installed four standard EC6-7 motors in the rocket. But clusters are tricky. The trick is getting all the motors to ignite at once. Estes motors (or "engines") all come with igniters, but they're not as reliable as you want for a cluster rocket.
There are a couple problems that prevent Estes igniters from being ideal for clusters. One is their size - they're pretty small and don't have much reach. But the main problem is that they require too much current.
Getting one Estes igniter to fire is one thing, but when you have the current from your launch controller split between two or more igniters, the total current reaching each igniter tip is less and less. What can then happen is that sometimes one motor might fire, and take the rocket with it, ripping out the other igniters before the other motors light.
Quest Aerospace has a much better igniter for this job. It's called the Q2G2 igniter.
These were off the market for a while, but they're back. The supply still can't quite meet the demand, but they are on the market.
Two things make this igniter much better for cluster rockets.
The first, is that the igniter has a black pyrogen on the tip.
This is a flammable substance. When the igniter tip heats up, the pyrogen creates a small flash or flame, aiding in the motor's ignition.
Estes igniters used to have a pyrogen, but they stopped making them like that in the last year. I still have a few, but I save them for special occasions.
But what makes the Q2G2 an even better igniter for cluster ignition is that they are low current igniters. That means it takes much less electric current to make the tips hot enough to ignite the rocket motors. You can send the same amount of current through several Q2G2 igniters as through one Estes igniter, and they will all fire pretty much simultaneously.
I put the Quadrunner on the pad, inserted the safety key into my launch controller, counted nervously down from 5, pressed the ignition button... And there was this loud puffing sound signifying ignition.
And then the rocket just sat there. Fortunately! I'm sure I would have lost it otherwise!
But what had happened?
As you can see in the above photos, the Q2G2 comes packed in a little red straw. This is actually what keeps the igniter installed in the motor before ignition. This is a different method than the plastic plug method seen in the Estes igniter photos.
Quest Q2G2 installed in an Estes C6-7 motor
I really like the straw method. It allows you to insert the igniter until you can really feel that it's in contact with the propellant.
I looked at the rocket. The Q2G2 igniters - all of them - had slipped downward a little inside their straws. The straws were blackened, and the puff of the pyrogen had actually ejected them from the nozzles of the rocket motors without igniting any of the propellant.
OK, so that saved me losing a beautiful rocket on its first flight.
On other occasions, I've used multiple Q2G2 igniters successfully, but only after fiddling around with them, then placing the rocket gingerly on the pad, hoping nothing would disturb the igniters before I pressed the launch button. Then I'd have to rush to launch the rocket before any of them fell out.
Rushing is not a good idea with rockets.
I've got a big launch coming up in a large field, and I'd love to see the Quadrunner finally take flight, and have a reliable ignition system securely in place.
If you've had trouble keeping your Q2G2 igniters staying in place, here's a way to prevent them falling out.
The problem isn't the straw. It fits into the nozzle of the rocket motor just fine. The problem is that the igniter itself can pass too easily through the straw, slipping out before you press the launch button.
Here's what you do:
Cut a very small bit of masking tape.
Wrap the masking tape around the twisted part of the Q2G2 igniter. You don't want to cover the pyrogen head, obviously, and you want to leave the free ends of the igniter free to bend them in whatever direction you need to to hook the leads up to the launch controller.
You want just enough masking tape around the twisted part of the igniter so that it can still pass all the way through the straw and come into contact with the propellant, but that it will have enough of a friction fit that it won't fall out.
Now the igniter is securely installed. Don't worry - it isn't "stuck." When the motor ignites, it will eject the straw and the igniter. But it will ensure you get reliable ignition on as many motors you have in your cluster rocket!
Note: These pictures are for illustration only. You should not install the igniters in your rocket motors until you are on the flying field, preparing for launch! Edit: As Rich Holmes correctly points out, it's fine to install an igniter at home. It won't fire unless the launch controller is hooked up to it. What I should have said is that you should install the motor in the rocket first, then install the igniter. Myself, I wait to install igniters until I'm at the pad. I transport my rockets in a big box full of newspaper, and I figure some of the igniters will fall out if I install them at home.
I haven't launched a rocket in months. Last time it was with the Ivy Tech Rocket Camp I taught in June. The rockets were all really small, I was the only adult, and because of where we launched, I had to make sure the rockets didn't go much above 300 feet.
Big News for Me, Guys
This weekend, I sent off the a check for dues plus a season launch pass to what will be my first rocketry club - CMASS, the Central Massachusetts Spacemodeling Society, a NAR section.
I'll be attending my first ever club launch in just under two weeks, up in Amesbury, MA.
For the last year, I've been pursuing this hobby mostly in a vacuum. My friends would occasionally go launch with me. Chad himself likes rockets, and built a few, but is far too busy a guy to really throw himself into rocketry like I did. So, it's just been me, a few books, some websites, and a huge online community to turn to for help. This will be my first time meeting other rocketeers in the flesh. I'm terribly excited. This will be my chance to hang out with other rocket obsessives, and meet people I can learn from - back in Bloomington, I was the local rocket "expert." But I still have a ton to learn, and this... This is gonna be awesome.
This post was going to be about how nervous I was to go out to the launch and meet people, as I'll probably be going alone - my girlfriend wants to go, but she probably has a thing she has to do. I'm a pretty outgoing guy, but sometimes in new situations where I don't know anybody, I get a little shy.
But I just got a message from Howard, one of the officers of CMASS - three messages, actually - and not only has my membership been approved, but he told me there are probably several members of the section who either live near or work in Boston, and he kindly invited me to tomorrow night's meeting in Gloucester.
Gloucester is a little far, but I'll go as long as I can get my local parking pass worked out (driving in Boston... Not as bad as parking in Boston). In any case, rocketeers are a friendly bunch, and even if I don't get to meet anybody before I show up in Amesbury, I know it's going to be great!
Hearing such a welcoming message was really great. Rocketry is a real passion for me (you might be able to tell, if you read this blog), and I need it. CMASS is my best option to continue and to grow in this pursuit, so it's really good to feel welcomed.
. . .
The upcoming launch is a big one. The Amesbury field is CMASS' high power range, meaning that I'll see some high power rockets in person for the first time. But that's not what makes this particular launch a big deal. Actually, now that I read that last sentence, it totally is a big deal for me... It's a huge deal for me! But for the club in general, it's a special event.
It's the Jim Flis Anniversary Launch. Jim Flis is the owner and founder of FlisKits, a model rocket company. Estes is the 600 pound gorilla of the model rocketry world, and Quest has some great kits. But if you're looking for something a little different, FlisKits is one of the independent companies you should check out.
They do have standard sport models, of course, and some scale historical models, but what stands out in my mind when I think of FlisKits is the slightly more oddball-looking rocket. Boost gliders (for n00bs, this is a rocket that looks a bit like an airplane - it goes up under rocket power, then glides to a safe recovery), oddrocs (something that just doesn't look like a traditional rocket), or sport models which have unusual fins -
either very large, or attached at unusual angles. Or insanely wicked futuristic models. Check out this newer kit - the Tesla.
Copyright FlisKits, Inc.
I have no idea the kind of mad modeling skills it would take to build this rocket! Maybe I'll see one of these in person.
Here are a few other interesting FlisKits rockets (the above and following six images are copyright FlisKits, Inc.).
Frick-n-Frack, and oddroc which
is also a two-stage rocket.
Rose-a-Roc - a helicopter recovery rocket.
It goes up like a normal model rocket, then
the helicopter blades eject and the whole
thing rotates slowly to the ground.
S.P.A.D - a fat sport model
Decaffeinator. Yes - it's made of
coffee cups
Nantucket Sound. Yes. It's a flying lighthouse.
This is a rocket company with a sense of humor. And adventure.
FlisKits has been in business for 13 years, and Jim Flis apparently goes to CMASS launches quite regularly, so they're throwing him a rocket party.
. . .
I've got a huge rocket wish list. I forget to check it now and then. Now that I'm going to the Jim Flis Anniversary Launch, I really wish I'd checked it earlier.
One rocket that's been on my wish list for some time is the FlisKits Deuce's Wild.
Copyright Fliskits, Inc.
Very early on, I developed a fascination for cluster rockets - rockets which have multiple motors burning side-by-side. Though I haven't had the chance to launch very many of them (mostly because of wind conditions and the size of the field from which I was launching), I find them spectacular, and it may be my favorite kind of model rocket.
The first cluster I built and successfully launched was the Quest Magnum Sport Loader. You can see how much more smoke and flame comes out the back of a cluster - so awesome to watch!
As you can see from the above image, the Deuce's Wild is a two-motor cluster rocket. But it's special feature is that it has canted motor tubes. The thrust comes at an angle. Both motors fire slightly outward, producing a fatter smoke trail. It has the added advantage that the motors are pointed roughly through the rocket's center of gravity. That's a good feature.
One of the tough parts about launching clustered rockets is getting all of the motors to actually ignite simultaneously. Sometimes you'll have the rocket leave the pad with one or more motors unignited. That can lead to a crooked, uneven flight (and, of course, less altitude). With the canted motor mount, even if one of the two motors does not ignite, the Deuce's Wild will still tend to fly more or less straight.
And it's an affordable rocket. I definitely should have bought one of these before, so I'd have a Flis rocket to launch in a couple of weeks. But maybe it will be even better to buy it directly from the guy himself at the field.
. . .
I have three rockets I've built but never launched - the Estes Cosmic Explorer with an E motor mount, the Quest Big Dog, and the Quest Quadrunner - a 4 motor cluster rocket. Some of those require a special launch pad with a miniature launch rail. I have built the pad, but until I have met some people in the club, I'm not going to show up with a bunch of my own stuff and say "OK, guys, where do I set up?" That seems presumptuous.
The pad is well-constructed, and I'm sure I'll eventually be able to get the Big Dog and Cosmic Explorer in the air, but for now, I need to see how the club operates. Some clubs have a range setup called "misfire alley," where rocketeers bring their own launch pads and controllers, and everyone sets up their own stuff. But that's often, if I understand it correctly, for newer clubs who don't have a lot of their own equipment. From what I've read, CMASS is pretty well-established.
I'll probably just take a few smaller rockets with me the first time, and see what I can launch.
I cannot wait - it's been too long!
Check out Jim Flis' personal website: jflis.com Thanks to Jim for allowing me to repost images from FlisKits.
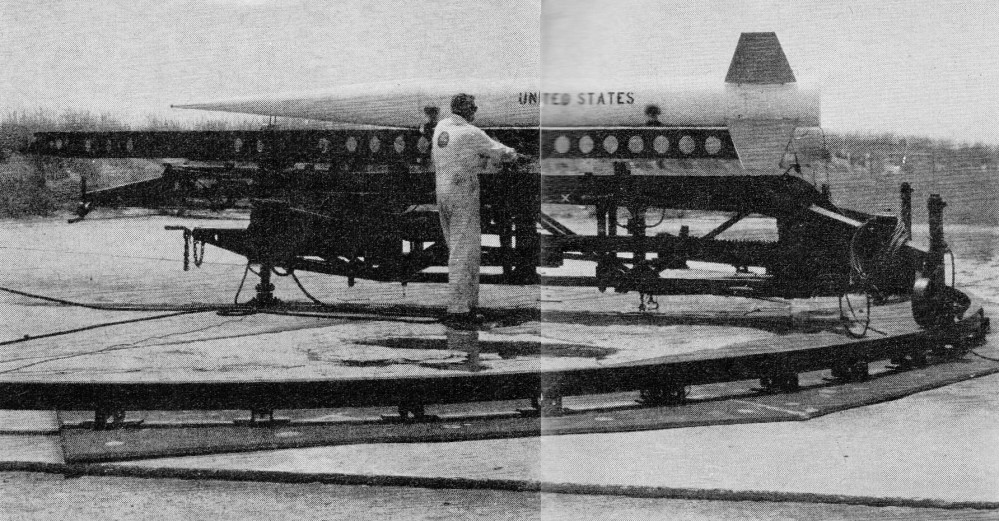
The Nike Smoke rocket was a NASA sounding rocket used during the 1960's.
A Nike Smoke being prepared for launch, 1968
A sounding rocket is one which carries instruments to conduct experiments and take measurements while in suborbital flight. It may be used for meteorological research, radiation levels in the upper atmosphere, microgravity (yes, I'm roughly paraphrasing Wikipedia here), or any number of other experimental applications.
The Nike Smoke rocket, in particular, was used to measure wind shear - the difference in speed and direction of the wind at different altitudes. This was important to space flight, as NASA rockets had to make it safely through the atmosphere on their way to space. It did this using tracking film footage which triangulated the changes of a smoke trail left by a special payload in the nose cone of the rocket. Using trigonometric functions, the cameras could tell the exact position, and direction and speed of movement of different parts of the smoke trail. (Using the same mathematics, model rocketeers can accurately track the altitude of a rocket in flight using two theodolites, as described in this Apogee Components newsletter.)
Here's a short NASA film on the subject, featuring the Nike Smoke rocket.
Because of its historical importance, as well as its iconic look but relatively simple design, it has become a favorite scale model for hobby rocketeers, and there have been several kits on the market throughout the years, as well as many scratch built versions.
High power rocketeer Neil Brown with his Nike Smoke Extreme, a "stretch" version
of the rocket, built for LDRS34 - a high power rocketry event held this July in Potter, NY.
Find his website at high-powered-rocketry.com
The Nike Smoke, like many sounding rockets, also used a solid propellant, as opposed to the liquid fuel propellants used in space vehicles, like the Saturn V rocket. Since we use only solid propellant (or sometimes hybrid fuels - but that's a more advanced topic for another time), that means that a flying replica of a Nike Smoke rocket is, in at least some ways, not too different from the real thing.
The Estes Pro Series II Nike Smoke is a great kit.
With a diameter of three inches, the rocket stands about three feet tall. The distinctive, long conical nose cone is nearly the length of the airframe itself, making this the largest nose cone that I have yet in my collection.
The rocket is pretty simple to build. But, as with Ventris, I still have some decisions to make.
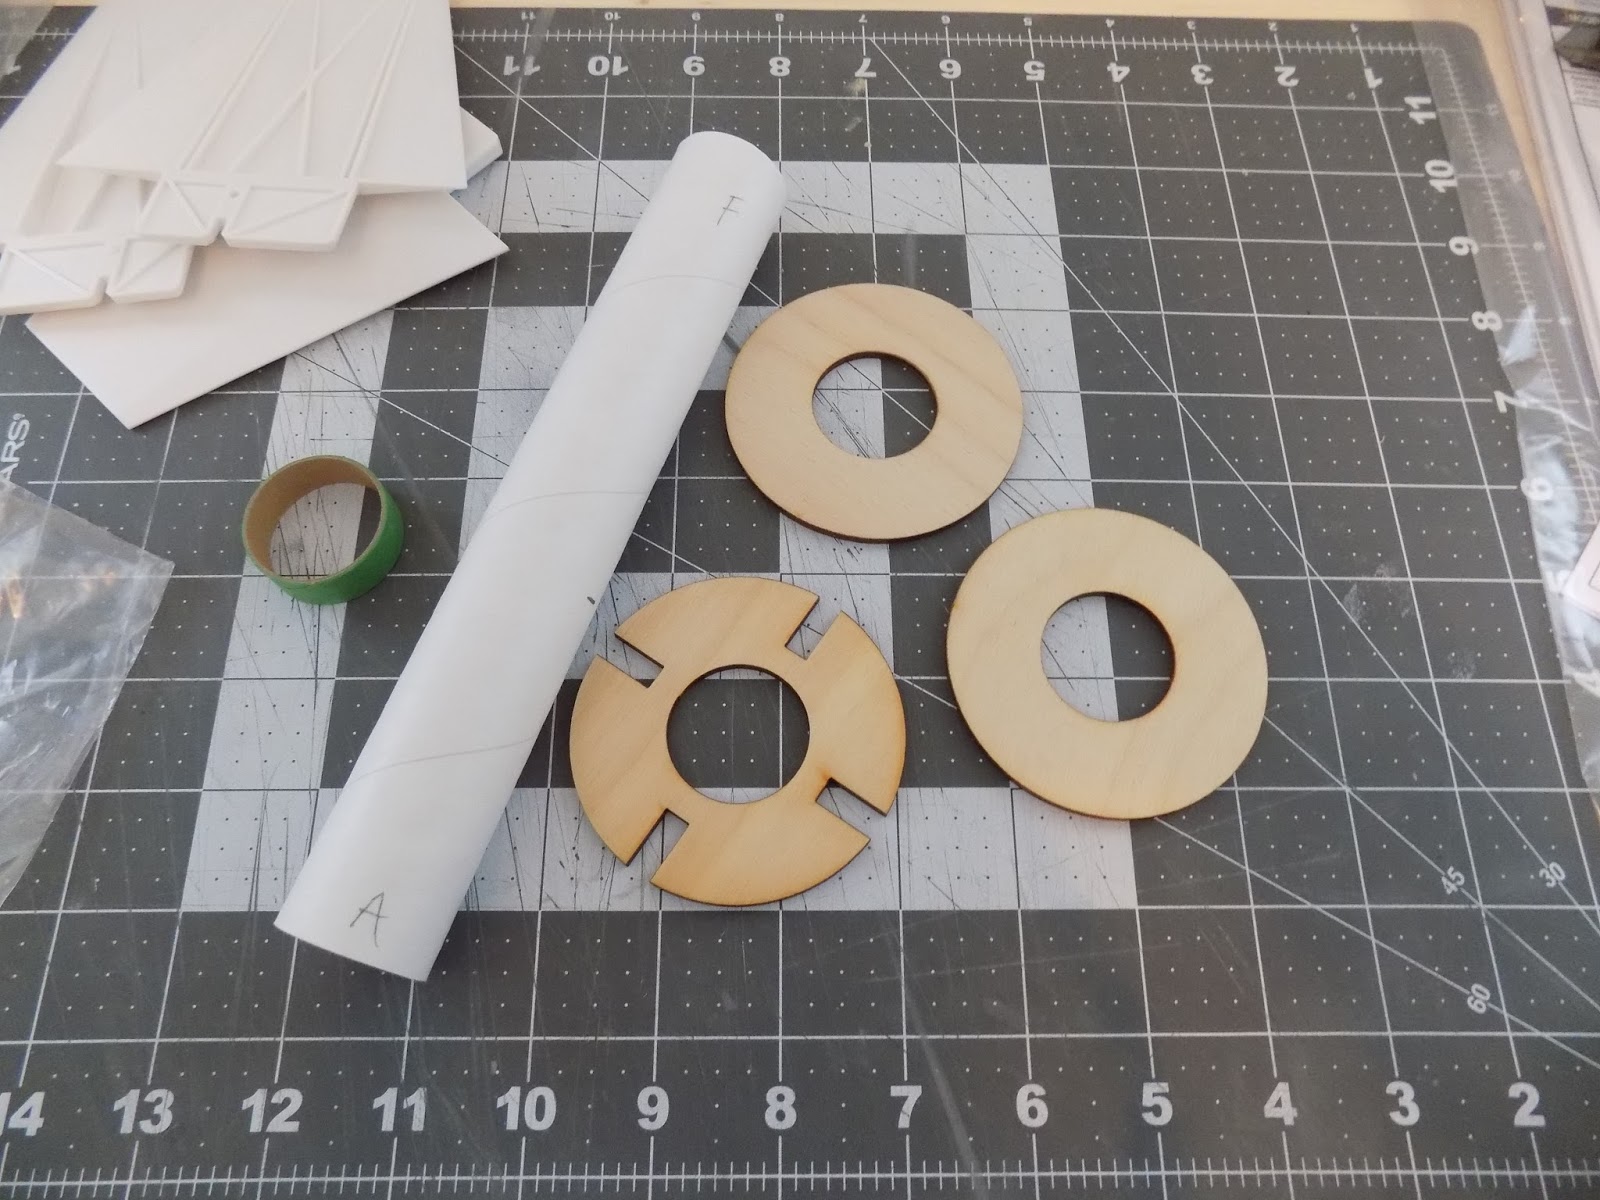
As with all Estes PSII "builder" kits, and many mid and high power rockets, the motor mount uses sturdy plywood centering rings, as opposed to the paper or cardboard rings you find with smaller model rockets. (A builder kit is one that requires a certain level of construction. Estes has several PSII rockets which are considered E2X - Easy to Assemble [or "eXecute"]. A builder kit takes more time and effort to construct. It's more of a challenge.)
In this case, the middle centering ring is special.
Parts for the Nike Smoke motor mount. The ring with the notches goes in the center.
As with all of the PSII builder kits and many other mid and high power rockets, the Estes Nike Smoke has through-the-wall fin construction, meaning the fins extend via a tab through a slot in the airframe, and attach to the motor mount. This makes the attachment much stronger than merely gluing fins on the outside, as one does with a smaller model rocket.
The ring in the center has notches. As you'll see below, this helps you get the fins perfectly aligned. The Nike Smoke shares this design element with the Pro Series II upscale version of the classic Skill Level 1 kit Der Red Max - Der Mega Red Max.
Speaking of the fins, on this kit, they're made of plastic, and come in two parts.
Two-part fins
They have a radial taper, meaning they get thinner by the same proportions they get narrower, and they are beveled at the edges. This makes them look cool and helps them slip through the atmosphere more easily.
Because they're in two parts, they must be glued together.
One fin dry fit together
Which leads me to the first decision I have to make: what to use to adhere the two parts together.
The kit instructions say to use CA - cyanoacrylate, or super glue. But they don't specify what viscosity of CA to use. The thin stuff is way too thin. So, do I use medium or thick CA - or something else? Epoxy is a possibility. CA might be too brittle. I might choose to go with epoxy, which is much stronger over time. Also, when dry fitting the fins together, you find that the edges don't come quite together. There's a bit of a gap, unless you squeeze. When you stop squeezing, the gap comes back.
So the adhesive is important. I need to choose something which will hold the fins together, won't break down, and will keep the edges from coming apart. That might prove tricky. CA will bond immediately, but might be brittle, and also might superglue my fingers to the fins. Epoxy might be stronger, but won't bond immediately, so I'll have to keep the fins squeezed together until the epoxy cures - or, at least, partly cures. And the epoxy could make a mess I won't be able to clean off if both my hands are occupied by squeezing the fins together. Like Indiana Jones in The Last Crusade, I must choose - but I must choose wisely.
I'm writing this in the present tense - "I need to choose..." etc., but in fact, I've already done this part. You'll see what I opted for.
The notched centering ring is great for getting the fins on perfectly straight. Once you get the motor mount into the rocket, the notches in the ring correspond to the notches you can see at the base of the fins.
Spoiler alert! You can see here I've already started assembling the motor mount.
The fin locks into place - perfectly aligned.
Another choice - this time an easy one - is what to use to attach the fins to the motor mount.
The kit again suggests CA, but I don't like this idea. CA can get brittle over time, and it's just not a good adhesive when you need a strong bond that might take some stress. I'll use epoxy for this.
Also, the kit suggests using wood glue for the fin fillets - which seems bizarre to me. Wood glue makes fine fillets on a small model rocket, but it shrinks, and isn't great if you want a nice, rounded fillet. Also, I feel pretty sure that wood glue would have a hard time bonding too well to the plastic. I'll use epoxy here as well.
Finally, I have to choose how I'm going to launch the rocket. As with Ventris, the Nike Smoke comes with two launch lugs.
Notice how these lugs are not simply cardboard tubes. The actual lug is raised slightly. That's because the lip of the nose cone is slightly wider than the airframe.
As with Ventris, replacing the lugs with rail buttons is something to consider, but if I do that, I'll need to make a short standoff for them.
Whether I go with launch lugs or rail buttons - and which size rail buttons - again depends on what kind of launch equipment will be available at my local club, and/or whether I can bring my own launch pad if necessary.
Luckily, I'll be able to attend a club meeting next week! CMASS - the Central Massachusetts Spacemodeling Society - has just begun holding biweekly meetings in Cambridge, just across the Charles River from my little home. Which means that, for the first time since I started this venture into rocketry, I'll be able to meet other actual human beings who are into this hobby! And I'll get the chance to ask some questions which will help me make these important build decisions.
The nice thing about these lugs, as you can see from the picture above, is that they're conformal. They are slightly curved on the bottom so that the entire underside of the lug can attach to the airframe of the rocket without leaving any gaps. Not only does this look better, but it assures a better bond, and reduces the chances of a lug pulling or snapping off at launch.
I'm excited to get this build underway!
Here's a flight of Neil Brown's above Nike Smoke Extreme before he repainted it in the traditional white, red and yellow colors:
My schedule is all over the place. Sometimes I work late at night; sometimes early, early in the morning. All this back and forth has left me with less time than I'd like for rocket building or blogging. I get maybe two good building days a week, and I work slowly.
Fortunately, I have OpenRocket - free rocket design and simulation software.
As any gamer or couch potato can tell you, even if you're really tired, you can still spend hours fiddling around on your computer.
So, when I don't have the time or energy to build rockets or write about them, I play around with different designs. It's a way of staying an active rocketeer when I'm too busy to be actually building.
Once you know the basic principles of stability and rocket construction, it isn't that hard to design a basic rocket - or at least to get one started. You might need to make revisions, weigh components and change a few things, but you can come up with some cool basic designs in short order. I've even built and flown rockets that took me 20 minutes to conceive, and I only had to make minimal revisions.
Here are some designs I've been working on.
The Circe Series
I started this the other night. I wanted something simple to replace my lost Estes Hi Flier - a small, lightweight, high-flying rocket. It performs so well because it's a minimum diameter rocket - meaning it is only as big around as it needs to be to hold the motor. It has no motor mount - the body tube is the motor mount!
Circe A - a small rocket which will hold a standard 18mm diameter (A-C) motor, and go quite high
Though I am trying to build bigger and bigger rockets (and currently building two of my Estes Pro Series II rockets), I just had the urge to design this little thing.
OpenRocket has a scale function, so you can take a rocket of a particular size and scale everything up or down by the same amount. So while Circe A (pictured above) will only take a C sized motor, Circe B looks exactly the same, but is larger and will take a D or C motor. When you scale things up in OpenRocket, sometimes you have to adjust components, because, for example, the mass of the nose cone might actually end up being much greater than the part you actually have on hand. Other than that, it's pretty simple.
I went up to a BT60 sized rocket with the Circe series before going to bed. BT60 is a 1.637 inch diameter tube, and is the same size as the Big Bertha. The cool thing about the BT60 is that it's just the right size to fit a cluster of 3 standard motors.
Circe C2 - looks much the same, but has a cluster of 3 motors. You'll notice the nose cone is slightly shorter - this is due
to the size of nose cones I have on hand, which are a of slightly different ratio than the BT20 nose cones I have.
If you're an advanced rocketeer and are good at making stuff from scratch, you can make your own parts. All of them - even the body tubes. And, of course, nose cones.
I'm not to that level yet. I don't have access to a wood lathe, and I haven't picked up the skill of designing and making a custom-shaped nose cone. Fortunately, there are a lot of good parts on the market.
So what I do, for now, is look at the parts that are available - either in my parts box, or online, and design around that.
Here's a lovely balsa wood nose cone I picked up from JonRocket months ago.
This shape is a spherically blunted tangent ogive, and the nose cone fits a BT70 tube, which is about 2.2 inches in diameter. This is getting toward the higher end of body tube size you'll find for low power model rockets, and into the mid power range. If you're new to model rockets, this thing will look huge to you - there are not many BT70 kits out there!
I have realized I need to get more of these, or get some other BT70 nose cones, because over the months, I've designed a number of rockets around this very nose cone.
One of the first was called Horus.
The Horus Series
People give rockets all kinds of zany names. A quick look at an Estes catalog gives you some idea - Sizzler, Prospector, HiJinks, etc. A rocket can have any kind of name. But I guess I'm more of a classical kind of guy. I like to name my rockets after Greek, Roman, or sometimes Egyptian gods or mythological characters, or after celestial bodies. Horus is the falcon-headed Egyptian god of the sun.
Seemed like an appropriate name for a rocket.
I wanted to design my own rocket which looked vaguely like the Sirius Rocketry Eradicator - a beautiful rocket which has been on my wish list since I first saw it - but would be simpler to design and construct for a n00b.
The Eradicator, from Sirius Rocketry, available here
(Eradicator - there's an interesting one. I love this rocket, but the name reminds me of this Kids In the Hall sketch)
No offense, Sirius Rocketry - you guys are awesome!
Anyway, I love the two differentiated diameters of the airframe on the Eradicator. I designed this one:
Not too bad, I thought. But in order to get a minimum of 1 caliber stability, I needed to have 5 fins, if they were to be swept forward. I was able to decrease the number of fins to four by adding fin vanes.
This increases the surface area of the fins, moving the center of pressure aftward, without making the fin span inordinately wide.
The Eradicator has a lot of great detail - it looks like a real launch vehicle. That level of design was a bit advanced for me. That's not to say you can't add additional detail to the build, but it's tricky to add it to the OpenRocket design.
FMLV
This is a simple recent design, but one I like and am building now. It's another BT70 design with a 24mm motor mount. Like the Circe rocket, it's got swept back fins, but as you'll notice, the tips are not parallel to the rocket.
I've seen a few designs like this recently, and I like the look of it. Actually, a lot of classic kits have fins like this, but I've only just recently thought of changing the shape of the fins in OpenRocket.
You can select a few basic fin shapes in OpenRocket. I almost always opt for "trapezoidal," and then simply change the dimensions of the root chord, tip chord (chord is the distance from the leading edge to the trailing edge) and height (the distance from the airframe to the tip of the fin).
That means that most of my designs look like this:
Imperius, formerly known as the "Donor's Rocket"
See how the tips of the fins are parallel to the rocket body tube? Nothing wrong with that, of course.
But part of what gives a rocket its character is the shape of the fins. I went with a few designs that had the fins swept forward, like the Horus series above, and the Copperhead (formerly known as "Keith's Rocket").
And I like these designs. But you learn by playing with the tools you have, so I decided to try a different shape. Still simple enough to cut with a ruler and hobby knife, but a little different from what I'd made before.
FMLV stands for First Massachusetts Launch Vehicle, because it's the first scratch design rocket I'm building here in Boston. I'm using a 24mm Estes "quick release" screw-on motor retainer so that I can use my newly-acquired AeroTech 24mm reloadable casing, or an Estes black powder D or E motor.
That gives me a lot of motor options.
It will also be the first rocket I build from scratch which will have through the wall or TTW fin construction. This means that the fins have tabs at the base which will go through slots in the airframe and attach directly to the motor tube. You fins this as pretty standard in mid power and high power kits, and even some Estes low power kits, like the Cosmic Explorer.
Attaching fins to the Cosmic Explorer. In this kit, the slots are already cut for you.
Of course, in a kit, the slots are cut for you. For the FMLV, I'll have to cut my own fin slots for the first time.
BT80 Rockets
Also included in my parts box is a BT80 sized parabolic nose cone.
You may have noticed that this nose cone has a similar profile to the Big Bertha nose cone, but while the Bertha uses a BT60 body tube - 1.637 inches in diameter, the BT80 is 2.6 inches in diameter. For a beginning model rocketeer, that's really big!
Regular readers of the blog may also recognize this nose cone as part of the ICU2 camera payload bay from Make: Rockets: Down-to-Earth Rocket Science by Mike Westerfield, which I used in the design of the Janus II two-stage rocket.
Since I had another one, I played around a little with a few designs.
A really large rocket, called Titus, after my girlfriend's nephew.
Meh... This kid needs to have a cooler looking rocket named after him.
Also played around with a large two-stage rocket.
Could be fun, especially with the two large 24mm diameter motors. But still a little inelegant. It was probably late at night when I did this one.
I might make a larger, not-quite-proportional version of the Copperhead rocket pictured above.
A larger Copperhead design with the BT80 nose cone, and a 29mm motor mount, for E, F or G motors
Of course, the Janus II with its payload bay was lost on first flight, so I may just rebuild that...
Finally, a design I nearly forgot about. This must have been months ago.
Arrowhead
I had this idea when building both Sounder I, a tiny minimum diameter rocket I lost on its first flight, and the Ceres B booster, again from Mike Westerfield's book.
I stacked one on top of the other with a balsa transition I had in the parts box.
It reminded me of some of these:
This looks like a two-stage sounding rocket, but it's really just one stage. Not that you couldn't do a two-stager here, but it would require some electronics I haven't worked with just yet.
I haven't discussed staging on the blog yet, but in brief, most model rockets with multiple stages rely on the first motor igniting the second. The first motor has no delay grain or ejection charge, or even clay cap.
The propellant is exposed at the forward end of the motor, so when it burns up, hot particles shoot forward into the nozzle of the second motor, igniting the second stage propellant.
Many multi-stage rockets have the motors touching each other. This is known as contact staging. There can be a gap between them, in what is known as gap staging, but the gap can only be so wide - 12 inches is probably the maximum.
This rocket is longer than that, and the two parts are separated by a solid balsa transition, so there would be no way for the hot propellant particles to reach the top portion. You can make hollow paper transitions, but I'm not very good at that yet, and balsa transitions of all sizes are available online.
Again, for a beginning designer, working around available components is the easiest way to get started.
High power rocketeers do multi-stage rockets using altimeters, or sometimes timers, to electronically ignite upper stages in the air. This is known as an air start.