All rockets are prepped and loaded, and all cameras and altimeter are charged and ready. All I have to do now is shower, load up the car, and get out there.
I've nearly completed the three rockets I've been working on for a month and a half, just in time for tomorrow's Epic Rocket Launch. Just a bit of paint here, a few stickers there, and a couple knots tied, and we'll be All Systems Go.
Janus II with camera payload bay, Quest Quadrunner 4-motor cluster rocket, and 3D Rocketry's Nautilus II, the first kit I ever purchased which wasn't from Estes (which is where most of us start)
All that's needed now is a few details.
The Janus II - which is the big brother of my first ever designed-and-built (or "scratch built") rocket Janus I - will get a touch of black on the fin tips.
Looking at this rocket, with the gray body and fat payload section, it kind of reminds me of a shark - which gave me an idea for a new design I'm going to play with (but which in the end may be unstable and therefore unflyable) called the Hammerhead. Mostly I like names for rockets that don't try too hard to sound "badass," but I might make an exception in this case. Stay tuned.
Here are the two Janus models side by side for comparison.
Janus I and Janus II. Janus I uses standard 18mm (A-C) rocket motors, while Janus II is designed for 24mm motors - one D and one E. Both are two-stage rockets.
Even without a special payload section, you can see that Janus II is taller than Janus I - this is because since it's made to take larger (and heavier) motors, which sit in the aft end, the rocket needs to be either longer or weighted in the nose in order to be stable without using oversized fins. This has to do with the relationship between the center of gravity and center of pressure, and if you're new to rockets, we'll get to that in another post on the basics of rocket stability.
Also notice that Janus I has four fins on the booster and main body (sustainer) of the rocket, while Janus II has only 3. This reduces drag and increases altitude (and makes building faster - less sanding and fewer fin fillets to apply). My simulation estimates that Janus II will top 1700 feet.
But just to check, I also have an altimeter.
Altimeter Two, from Jolly Logic
This tiny little guy will tell me what the peak altitude reached is, and a number of other flight data points - such as top speed, maximum acceleration up to 23 Gs (!!), altitude at parachute ejection and the velocity at which it descends (with that parachute). It's can go up to 29,500 feet, so I think it'll do the trick.
Here's the camera seated in the Janus II payload bay:
Peekaboo!
So, this rocket will carry two payloads - the camera and the altimeter - it has enough room for both, plus an egg if I wanted to do that (though I'd like to spare my new altimeter the potential humiliation).
The Quadrunner is in pretty good shape, considering the ordeal I blogged about a few days ago. It's not perfect, but once the decals are on, the little flaws may not be noticeable.
The Quest Quadrunner - tall, powerful, beautiful...
With four C6 motors, this should easily top 2000 feet, although I may add a bit of weight just to slow it down a bit. Four motors can lift a lot of weight. This rocket is not that heavy - and in a recent Youtube video I saw of a launch, the thing took off so fast the camera couldn't keep up. After a month and a half of work, I'd prefer to minimize the risk of my losing this rocket on its maiden voyage.
The Nautilus II by 3D Rocketry will get copper fins and perhaps nose cone, although I'm tempted to leave it this flat black color. It looks imposing like this.
But I got the copper paint, so I feel like I should go through with it. I hope I don't regret that decision! The rocket flies on a D motor, and should go pretty high.
We're also going to attempt to launch Chad's Aspire rocket from Apogee Components. This thing is supposed to top one mile in altitude. Last time we launched, I must have inserted the igniter wrong (it's a composite motor, not black powder, and I'm not used to those yet), because it flashed, and nothing happened. Such a disappointing end! I have four spare igniters for this rocket, so we'll try our best. We'll probably never see it again...
I was going to hold back on a few of my smaller rockets, but I realized, hey, this is the last launch of the year! I should go all out! So I'm launching everything I've got - everything I've built, that is. My pre-made, ready-to-fly models will probably stay at home, or I'll launch one first to check the wind direction and speed.
But here's nearly everything I built myself since I started doing this less than six months ago - the fleet for tomorrow's launch:
Back row: Janus II, Cosmic Explorer (Estes), Nautilus II (3D Rocketry), Aspire (Apogee Components), Magnum Sport Loader (Quest Aerospace), Big Bertha (Estes), Quadrunner (Quest Aerospace). Middle row: High Flier (Estes), Crossfire ISX (Estes), Der Red Max (Estes). Front row: Star Trooper (Estes), Mini Honest John (Estes)
Janus I is retired, due to damage, but everything else I've built is going into the sky tomorrow, and I hope to have pictures and video to share - including POV video from the nose of the Janus II!
The weather looks good, so we shouldn't have to scrub the launch like we did Saturday. Honestly, I was glad for a few more days to finish these three rockets, but now it's Go Time.
I've been putting together a video compilation for a few weeks of all my launches - or, at least, all the ones that came out OK, and after tomorrow, I'm going to put a Slo-Mo Supercut on my Youtube channel. Rocket porn, basically. Now that I'm building bigger rockets, I hope to get some good video. Small rockets are really impressive to watch in person - they go so high so fast! But on video, it's hard to convey the exciting nature of the launch. Bigger rockets look better on video.
If I stick with this (I plan on it), I think I'll try to make it an annual tradition of putting out a slo-mo launch supercut of the year on January 1. I've got some bigger rockets to build, so hopefully years to come will see some good video - and who knows, maybe a Level 1 high power rocket certification launch??
I tend to write really long posts, and this is no exception. But, if you're new to rockets, I hope you find something of value here to use in your rocket builds. If you're more experienced, I hope you at least find this amusing.
I'm finishing up one of my three latest builds - the Quadrunner, by Quest Aerospace. This is a cool-looking rocket, and has a cluster of four motors - that's a lot of thrust, fire, noise and smoke compared to what I've launched in the past.
Check out what the kit looks like:
I'd been eyeballing this rocket for some time. I loved the idea of clusters, even before I'd tried them out. My first was the Quest Magnum Sport Loader, which was a lot of fun. Even with only two motors, you get a much more dramatic launch than with a single motor.
Here's the video of the Magnum launching on two Estes C motors - slo-mo at the end:
The Quadrunner is a little pricier than the standard basic kits I'd built in the past - about $45. I got it for less, thanks to an Amazon gift card. But I was nervous about building this rocket. It's more complicated than a Skill Level 1 rocket, and I really wanted to make it look good. It has, of course, the cluster of four motors, which means that putting together the motor mount is more complex, and needs to be more precise than a single-motor mount. You need all four motors to be perfectly aligned.
The finished mount
This means measuring and gluing precisely, and then rolling the whole thing across the table to make sure it's not wobbly.
There's another part that goes in the middle - it holds the bolt in place you see in the above photograph, which will hold the motors in - this is in place of the usual hooks most beginner's models use.
This meant threading the bolt through two diamond shaped bits, attaching a Kevlar shock cord to the top, then pulling the whole thing through the middle of the four motor tubes - then gluing that in place.
This little bit keeps the motor retention system in place, and is key to assuring your parachute ejects. And it's a tight fit.
It requires some precise sanding to make it fit, and without a precise fit, the ejection gasses from the motors will escape out the back of the rocket. The nose cone won't come off, the parachute won't eject, and the whole thing will come crashing down to earth and destroy all your work.
Then there are the fins. They're two-part fins which you have to glue together to make one piece - something I was nervous about, as I was pretty sure it would be easy to get them crooked.
How on EARTH was I going to get these perfectly straight? And how was I to round the leading edges, with that
joint right there?? This was an area I really could have screwed up this build and made a shabby-looking rocket.
The joint here needed to be pretty close to perfect.
I thought of several options, since in the directions you're meant to lay them flat on waxed paper to glue them together flat. I thought no way that's gonna come out straight - it's gonna dry crooked! I finally emailed Chris Michielssen of the Model Rocket Building blog, to ask what he'd do if he built this rocket. I hadn't found any references to the build on his blog, but I knew that if anybody knew what to do, it would be him.
He gave me some advice - turns out he had built this rocket. He said that gluing them flat on waxed paper was a good idea, and then putting a book on top would keep things straight. I sanded a rounded edge on part of the fins, then beveled the trailing edges, and put them together.
So far, so good.
I took all the steps I've learned so far to make the rocket look (and fly) great - carefully filled in those spiral grooves in the paper body tube, filled and sanded and filled and sanded and filled and sanded the fins, attached the fins to the body as carefully and precisely as I could...
Ted Macklin's guillotine fin jig...
Totally worth the money I paid for it.
Hi, Ted!
I got the fins down perfectly, with no gaps between them and the body tube. Made the best glue fillets I'd ever done - I mean, guys, this thing was looking really solid. Carefully filled the seam in the nose cone with some plastic putty, then refilled when I saw a little divot in the putty. Got the thing as smooth as possible.
Was I going to let this little flaw in the nose cone go unfilled? Oh, no I was not!
Up to this point, I was really proud of what I'd done. I had to take it slow, but I hadn't made any major errors I was bothered with.
Then, I had to wait to do the painting. Or, so I thought.
It's been cold here in Bloomington, and my understanding was that you should never spray paint if it's below 50 degrees Fahrenheit. So I waited.
Then, on a warmer day, I primed the rocket. I used a new primer to me - Rustoleum Sandable Primer. I always use primer that's "sandable," but had never used "Sandable Primer."
Actually, this was my first mistake. It turned out fine, and I really liked the primer. But I had intended to use Rustoleum Filler Primer. This stuff has a "build" to it, and apparently it can fill in flaws in your work. I believe it's used to fill in gouges in a car's paint job. I had a few spots I wanted filled on the fins, and a few weeks ago when shopping, I had been looking at both the Sandable and the Filler Primers. I thought I got the Filler stuff. I realized only after priming the rocket that I'd gone home with the Sandable stuff.
Never mind - it worked great. A few minor flaws that perhaps could have been fixed with the Filler stuff, but after some rigorous sanding, it still looked pretty good.
Warmer than it looks - time to prime
Primed and sanded, ready for painting
Round about this time, I got a suggestion on The Rocketry Forum that you can, in fact, paint when it's cold outside. You warm the paint can with some warm water, run outside with the warm paint and rocket, do a light coat of paint, and bring everything inside to dry and warm up for a few minutes between coats.
I had a launch scheduled for Saturday (cancelled, in the end, due to rain), and I thought I'd have time to finish this rocket by then. I always like having something new to launch each time, because I don't have any other rocketeers to fly with - I launch with friends who are only interested because I try to make it fun for them. Basically, every launch I do is a kind of "demonstration launch," and I'm secretly trying to get one of my friends interested enough to start building and launching, so I have someone to talk rockets with.
I wiped the rocket down with rubbing alcohol to rid it of any dust, and did my undercoats of white. The rocket looked great. No problems due to cold weather - a nice, smooth, shiny finish.
It's hard to light a white rocket indoors, but you get the idea.
After letting the white cure for two days, I was ready to paint the red top coat.
This is where the trouble started...
Now, I was going to include this paint job in a post for my fellow rocket n00bs on the fact that you need to plan certain parts of your build, particularly painting, to avoid a messy job, and to keep from being frustrated. In the process, I learned that I have a lot to learn about certain materials with rocket building...
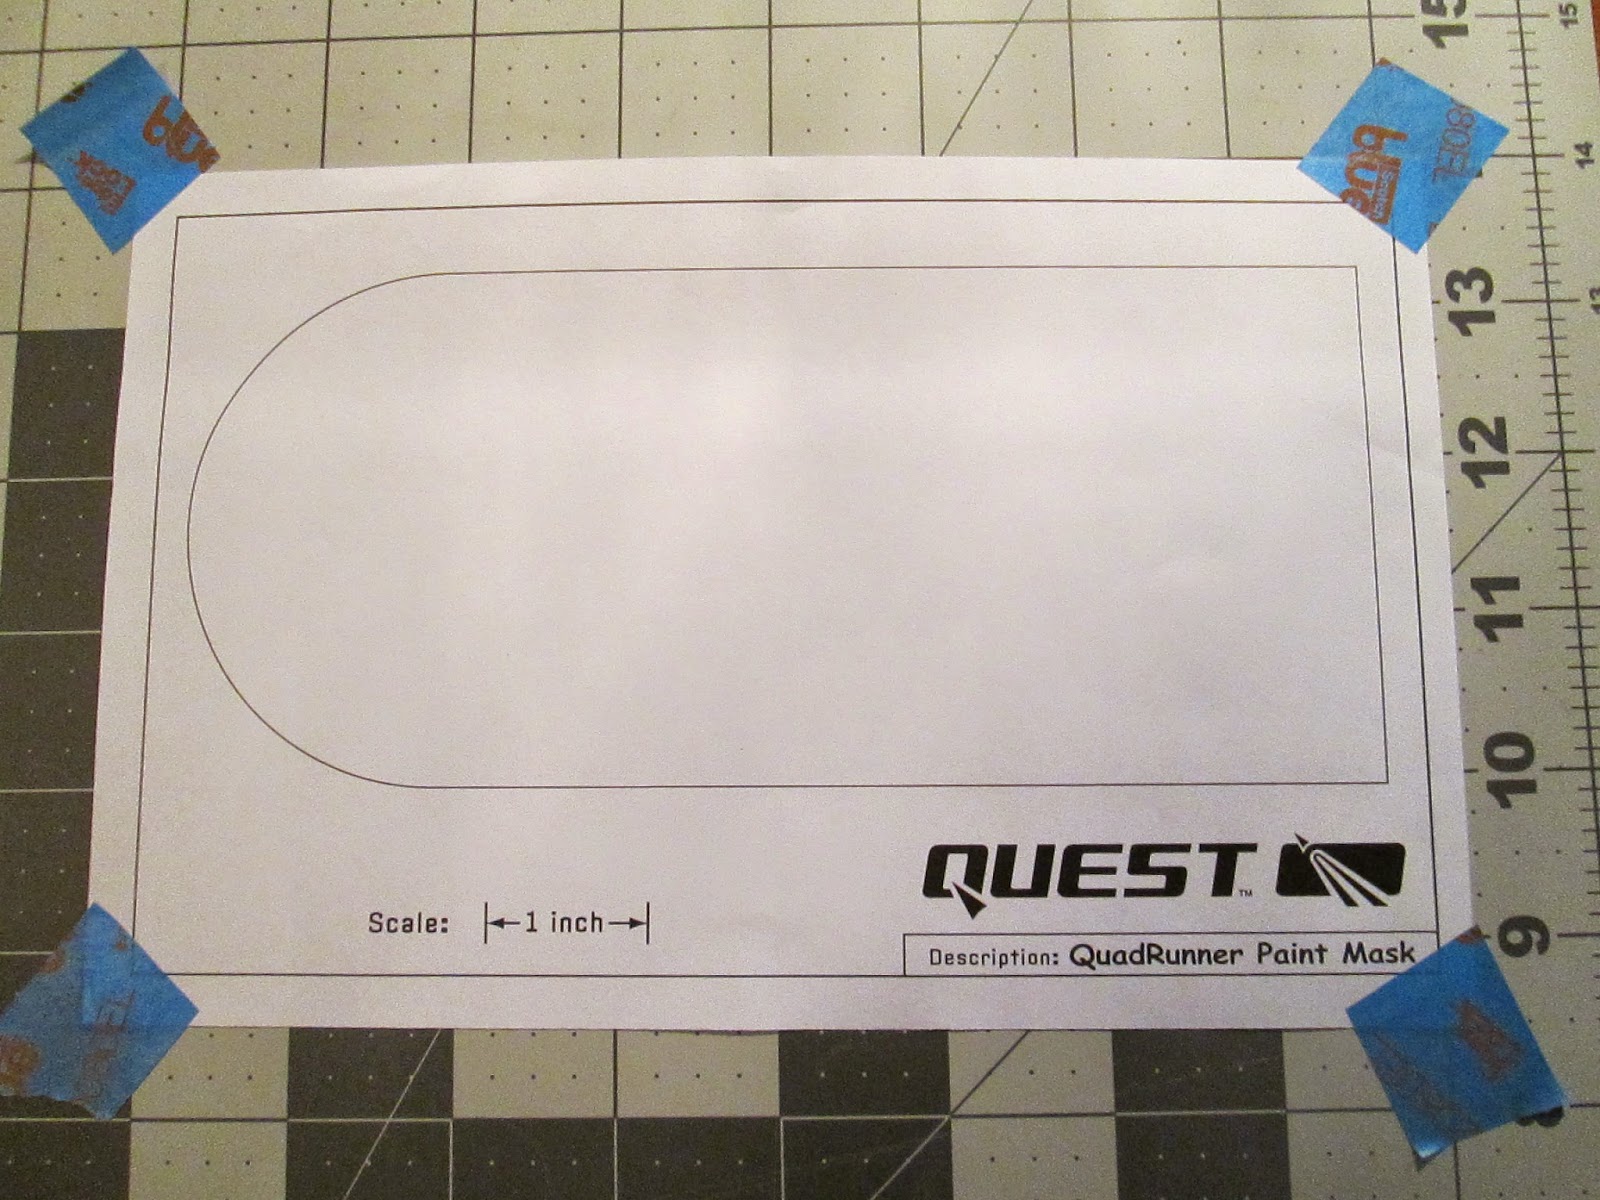
OK, so the Quadrunner comes with a paper mask for painting.
You're supposed to cut this out and apply it to the rocket, with the round half at the top, 1 5/8" from the top of the body tube, then extend the side lines of the mask down to the base of the rocket with masking tape. Then you mask off that whole section with tape and paper, spray the rocket red, and when you're done, you should have a beautiful half-red, half-white rocket with a nice round part near the top of the white side.
This presented a challenge. How could I be sure to get the mask centered and straight? If I applied it the correct distance from the top, how could I be sure that the part of the round top I started with was even the true center of that bit?
Well, I thought about it a bit, and came up with what I think was a pretty good plan, and I thought this is perfect blog material, too! What a smart guy I am!
First, I measured the bottom of the mask, finding the center of that line. Then, using a right angle, I drew from that point up the center of the mask, through the top.
To check my work, I did a little geometry to find the center of the semicircular top - and you can see was off by just a little bit. I made sure the line was straight up the center from the bottom to the top, and carefully cut out the mask.
I cut up the sides with my hobby knife and a metal ruler. I tried to rig up a tool to do the top round cut precisely, using my high school compass and my hobby knife. I think I found this idea in an old Estes or Centuri rocket design publication I found online.
This didn't work as planned, so I just carefully cut the top out with scissors. Not to worry - the black and gold stickers would probably cover any minor imperfections in the shape.
Then I found the centerline between two fins by measuring the distance between the leading edges of the fins and making a mark with a pencil. Then I drew a line all the way from there to the top of the body tube, and on that line, I put a mark 1 5/8" from the top.
Now I had a line on the rocket, and a line on the body tube. If I could get those lines to match up with the top of the mask at that little 1 5/8" mark, I knew I'd have the mask centered and placed correctly, and we'd be good to go.
See? This should work great!
I still think this is a good idea, despite what came next...
To apply the mask, temporary spray adhesive is called for. I have some Elmer's Craft Spray Adhesive, which is either temporary or permanent, depending on how you apply it.
I applied the adhesive to the back of the mask, waited three to five minutes for it to be less tacky, then applied it to the rocket. Success! I got it on perfectly!!
Then I built a beautiful, elaborate mask. It fully covered everything, yet would be easy to remove when I was done painting. I was feeling pretty good up to this point. Why was I so worried about this rocket? Now all I had to do was paint - this would be a cinch!
Doesn't look like everything's covered, because the edges are Scotch tape. But this was
a masking masterpiece, guys. Perfectly aligned edges, full coverage... Great work.
Then came The Ordeal.
To seal the edges, I did a quick pass of the white paint first. Then, to my horror, the edges lifted away from the rocket and began to curl up. Gahh!!! Stop it! Stop it!!
There was no way around it - I'd have to stop my work, remove all the masking, and start again the next day.
I carefully peeled everything off, and laid the paper mask flat. It was a little wrinkled, but the edges were mostly fine, so when it was dry, I laid a book on top of it to flatten it out and left it overnight.
I figured I hadn't used enough of the spray adhesive. So the next day, as soon as I got home from work, I started again. This time, I made sure to get plenty of adhesive on all the edges, and reapplied the mask. Then I built up the whole brown-paper-and-tape masking apparatus and started again.
Here's where I grew impatient. I skipped the white sealing coat (not best practices, but not what led to disaster), and went straight for the red. And what a red! Rust-Oleum 2X Apple Red - bright, shiny, smooth... This rocket was looking beautiful.
I waited for about ten minutes, then began removing the mask. I pulled off the tape and the paper, and the fins were a brilliant white. The line was clean and neat. I pulled off everything but the paper mask... and then the mask wouldn't come off!
I used fingernails and lots of swearing, but the thing wouldn't budge. I even tried to gently, carefully slide the tip of my hobby knife underneath the mask to loosen it. Nothing!!
I went from happy to pretty desperate very quickly. What should I use? Water? Goo Gone? Razor blades?? After several more attempts to just coax the thing off, I'd scratched through in a few spots to primer, and in a couple tiny places down to the white body tube, and I worried I'd even gone through the glassine coating to the fibers below.
A lot of people suggested water (until I mentioned breaking through the tube - then it became too risky), WD-40, white vinegar. Problem with all of these is that the paint had made the paper pretty impenetrable.
Finally, in frustration, I got out a sheet of 220-grit wet/dry sandpaper and went to town on this rocket. Probably a terrible idea, I thought, but at this point, I don't care if the finish is smooth and beautiful - I just want that red paper OFF OF THERE!
Now, I don't have this next part documented with pictures, because I was acting in desperation. I wetted the sandpaper, and scrubbed like hell. Then, the sandpaper started breaking through the paint. Then through the paper mask. Then, I could see the white paper underneath!
I had three thoughts: 1) This is a terrible idea, and this paint job is ruined, but I don't care. 2) Wait... Is this working? I can't believe this is working!! 3) Holy crap! I can't believe this isn't causing more damage to the surface than it is!!
After scrubbing and scrubbing with the sandpaper, I finally got the paper mask off!! There was still some residue on the white part of the rocket, but the cursed red paper was gone!
Flash! Aaaaaah! He saved every one of us!
OK, so how to get rid of the sticky residue? I mean, maybe the rocket wouldn't be perfect, but there must be some way to get rid of that stuff!
This is the point when Our Hero, inventor of the guillotine fin jig, rocketeer extraordinaire, stand up guy, and my Internet buddy Ted Macklin, posted those three magic words: Ronsonol lighter fluid.
According to Ted:
As long as this paint is sufficiently dry Ronsonol (which is actually
naptha) will not dissolve the paint. It will soften and loosen most
adhesives, especially those that are relatively fresh. A little Ronsonol
on a cotton ball should work, but test first.
Ronsonol? I think I have some of that!
So I searched in the depths of the darkest closet in my apartment, and found the Ronsonol. I dabbed some on a cotton ball, and began wiping down the rocket. Dudes, this stuff is AWESOME. Took the residue off so easily, and I could feel the smooth finish I'd started with below.
At this point, I was so happy, I did the Dance of Joy.
The rocket is on its way to greatness. I have some chips to repair, and I have to figure out how to safely mask off the red paint so I can retouch the white. But the ordeal is over. The Seal Team Six of rocket painting came through, and we are safely back on home ground - a little scarred, a little bruised, but safe for painting once again.
A Few Things I Learned From This
If you're a relative rocket n00b like me, here are a few things you might learn from my mistakes:
1. Paper masks = bad. Much better is a low-tack substance called Frisket Film. Also suggested possibilities would be vinyl drawer lining (though I'm not sure how low-tack that stuff is) and some kind of vinyl sign stuff. Still not sure exactly what this is called or where to get it.
2. If you're going to use a paper mask, make sure you use temporary, low-tack adhesive, not this "temporary/permanent" stuff.
3. Maybe make a photocopy of paper parts you need if you might accidentally destroy them while making a terrible mistake? I'm not sure how I'm going to cleanly cut a mask for repairing the white part, now that the paper mask is dead.
4. Ronsonol lighter fluid safely takes off adhesive residue.
5. Don't be impatient. If I'd found out about the lighter fluid solution before attacking my rocket with a hobby knife, I would have no repairs to do. The stickers would be on it right now, and after nearly a month and a half building, the rocket would be done and ready to fly.