
Here is the Ventris.

First step, of course, is to check all the parts.

The fins are made of 1/8 inch plywood, and they're nice and large. Which leads me to my first decision - do I want to shape the fins?

On most of my rockets, I shape the fins. I like to sand them into an airfoil shape, or at least, to round the leading and trailing edges. But sanding balsa is a lot easier than plywood. So, my first decision is, do I want to bother?
The trailing edge of the fins are not straight - they curve downward at the root. This might make shaping them more of a challenge - it's much easier to taper fins evenly if they are straight. But it's not impossible. I airfoiled the fins of all three Cosmic Explorers I built.

This makes for a very pleasing shape, and may improve the rocket's performance. And, for me, it just makes the rocket look more finished, more crafted. But it's not necessary. And that curved bit at the root got rather thin, almost to the point of being sanded off. So, it takes some care to do it right.
I did round the edges of the Partizon, but working with sandpaper on such a large, plywood fin, I wasn't too pleased with the result. But this is probably something at which I could get better with a little practice.
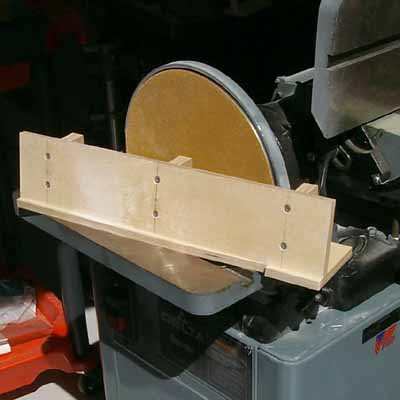
Some people like to use a disc sander or even a router or power saw to actually sand or cut a beveled edge into their mid- and high power rocket fins.
Here is a fin bevel sanding jig from rocketeer John Coker's website. He has a lot of great tutorials for the advanced rocketeer, and even as a beginner, I found a tip or two I could use.
But I don't have access to such power tools. So, for now, it's sandpaper or nothing.
Now, on such a large fin, being only 1/8 inch thick, this might not be such a big deal. On a small rocket, a 1/8 inch fin looks really thick, but on a larger rocket, it looks like a flat plate, and that might be a look I'll be OK with.
Besides, I have three of these things. I can always try again.
Like all rocket kits, the Ventris comes with launch lugs. Because of the larger payload section, the lugs must each be on a standoff - a piece about 1/2 inch tall which moves the lug away from the body of the rocket enough that the rocket can go straight onto the launch rod without bending it. You'll find a standoff on any rocket that has a nose cone fatter than its airframe.
 |
| Launch lug standoff for the Estes Mini Honest John |
In the Ventris kit, the standoffs are made of two 1/8 inch thick pieces of balsa, which you glue flat together, to make a 1/4 inch thick standoff. The rocket requires a 1/4 inch launch rod for stability.
 |
| The Ventris standoffs. You cut out these four pieces, and glue two each side by side, to form two launch lug standoffs about 1/4 inch thick. |
With a larger rocket like this, I think I'd prefer to use a launch rail, rather than a rod, and so instead of the launch lugs supplied with the kit, I would use launch rail buttons. A rail is much sturdier and less prone to "wire whip" than a rod, especially when you need something longer. The longer a launch rod gets, the more likely it is to whip violently back and forth during a launch - or from the wind. It's a sturdier platform.
 |
| A couple of larger rail launch pads, from Vernk.com |
But I have a few things to consider before attaching launch rail buttons to this rocket.
The first is what to use as a standoff. Two tiny strips of balsa glued together are probably not ideal, when you consider that you must screw the buttons to the rocket. Driving a screw into the kit standoff would probably split it in two, and the standoff may not even be thick enough in the first place.
The second consideration is: if I decide to go with rail buttons, what size buttons should I use?
Probably the most common size rail button - often used in high power rocketry - is known as the 1010 rail button. It is sturdy enough for larger, heavier rockets, and fits into the slot of a 1 inch wide t-slot rail. There is a 1515 sized rail button, but that's for pretty monster sized rockets.
Still, smaller might be better. On the advice of Randy from rail-buttons.com, I opted to put the "mini" rail buttons on my Partizon. These are smaller buttons, which fit a metric t-slot rail. They're plenty sturdy for mid power rockets, and take up less space on the airframe.
 |
| The mini button, lower left, and the 1010 button, upper right |
I do have a metric rail, but I don't have a 1010 rail, though I do have buttons of both sizes. Still, it's a question of when and where I'll be launching this rocket. I doubt I'll have much chance to launch this rocket on my own (in fact, I'm not yet sure where I'd launch any of even my small model rockets on my own - Boston doesn't seem like an ideal place for this, and I don't know the surrounding area at all yet). My best bet to launch these rockets is to go to a club launch, and in my case, the club will be CMASS - the Central Massachusetts Spacemodeling Society - one of the country's great NAR sections. But I haven't joined the club yet. My work schedule has not yet permitted me to get out to a launch, the closest of which take place about 45 minutes from Boston.
But when I do manage to get to a CMASS launch, I need to find out what kind of launch equipment they have. I'm not 100% sure of this, but I believe the metric rail is not (currently) in widespread use. I need to contact them and ask about their launch equipment, and whether I'd be allowed to bring my own launch pads if necessary (many clubs are OK with this, but I don't want to show up at my first launch and just assume it's OK).
So, I can begin building the rocket, but before I finish, I'd need to find out which would be a better choice for me with this rocket - the 1010 button, the mini button, or the launch lugs.
A final decision I need to make with this rocket is to what use I want to put the payload section, as it may affect how I build the rocket.
The payload section is large, but a lot of that space is taken up by the shoulders of the nose cone and the plastic transition piece.
 |
| The Ventris payload tube, with the shoulder and nose cone showing how much space is actually open inside |
Since this is my first build of this rocket, it's probably best to simply build the rocket without making any major modifications, the goal simply being to build the rocket well and fly it.
Next up: The Estes Nike Smoke!
Like my Facebook page for blog updates.
Here's how I did the rail button standoffs on my Ventris:
ReplyDeletehttps://richsrockets.wordpress.com/2014/06/16/building-the-estes-ventris-part-3/
I don't know why I didn't see this page before. I read your blog pretty regularly. I'm probably going to go with your technique - looks pretty solid.
DeleteThe payload section reminds me of the Reflector. The face card advertises "Huge Payload Section!"
ReplyDeleteWith the nose cone and adapter shoulders slid in the BT-50 payload section there was only about 1/2" of area left!
It's pretty tiny on the Reflector. The shoulders are way too long to use the payload section for anything useful.
DeleteThey cut part of the shoulders off in order to install the guts of an 808 camera in this Instructables build:
http://www.instructables.com/id/Model-Rocket-with-horizontal-HD-video-keychain-cam/?ALLSTEPS